Showing posts with label Allergy Free. Show all posts

Sunday, July 26, 2009

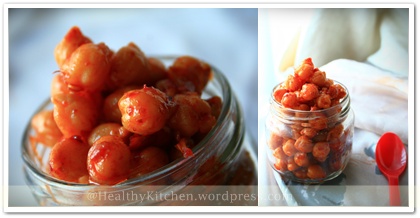
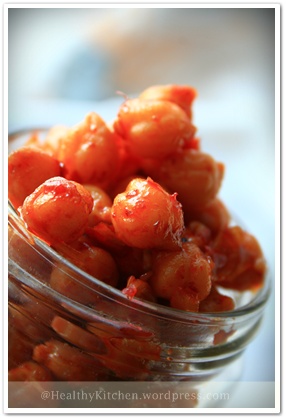
Spicy Chickpeas Snack

Spicy Chickpeas

Has anyone ever tried this snack before ? This spicy chickpea was one of my favorite snack when I was a kid and it still is. Love for the hot and spicy flavor with hint of sweetness from caramelized sugar or sometimes honey. This not greasy spicy snack is super easy to make with great result at the end. You will definitely love it as much as I do.

It’s a big bonus for allergy people who loves spicy and can do legumes, this should be on the list snack you want to try too.

chickpeas snack

Spicy Chickpeas ( makes 5 cups)

Ingredients:

  • 1 bag/ 1 lbs/ 16 oz / 453 grams dried chickpeas

- In a large bowl with enough water to cover , soak the chickpeas overnight, 8-12 hours. By the time,the size of each chickpea will expand due to liquid it absorbs and the texture is softened a little bit.

- In a large pot, pour the soaked chickpeas and fill with enough water to cover the top level of chickpeas.. add a little more water would be great.

- On a medium high heat, boil the beans until cooked and tender but not fall apart, it still quite firm in texture. Add pinch of salt while simmering to add flavor to the beans. Drain the cooked beans , let all liquid drained out and set aside.

Ingredients for the spicy goo:

  • 3 Tablespoons minced shallots or chopped yellow onions
  • 1 clove garlic, chopped
  • 3 Tablespoons chili paste ( depending on how much heat you desire)
  • 3 Tablespoons honey / brown sugar
  • 1 teaspoon white sugar ( optional)
  • 2 teaspoons white vinegar or lime juice
  • Salt, to taste
  • 2 Tablespoons canola oil or other cooking oil

Methods:

1- In a medium wok, drizzle the canola oil. Heat the oil up on a medium heat.

2- Sautee the onions and garlic until fragrant and translucent.

3- Add in chili paste and let it browned slightly and fragrant.

4- Stir in honey, sugar , salt and white vinegar / lime juice . Simmer until the oil separated and appears on top.

5- Add the drained cooked chickpeas, toss it up to well combined on heat for another 5 minutes.

6- Remove from heat and enjoy.

Storing : Keep in a cleaned and dry container for up to 2-3 days at room temperature , up to 2 weeks in the refrigerator.

Thursday, November 13, 2008

A Squeal, A Whoop of Joy!

Four tries. That's how many tries it took for me to come up with a banana cake you won't believe is allergy free!

We had bought combs upon combs of banana so Z and I would have easy accessible snacks. Of course, after a while, these bananas screamed to be used up in something because they were starting to freckle. I had already made the allergy free Jemput Jemput, and on the same day, I had also made two banana cakes, allergy free, but they were not satisfactory at all.

So, I decided to have another go at it, this time, incorporating my baking know how, alternating the dry ingredients with the wet ingredients. I decided to stick with coconut milk for the liquid. Rose Beranbaum's recipe for Cordon Rose Banana Cake had used sour cream, and so far, this cake is the BEST banana cake I've ever tasted in my life, and I have tried quite a few banana cake recipes. So I figured I'd best be sticking to a creamy liquid in my recipe.


On my first try, I forgot to include sugar, but I also thought I didn't need it because the bananas were already sweet. When the cake was done, I took it out. I had peeked while it was baking, and when I saw it rise, my heart leapt for joy, but I told myself not to be too excited because it could still turn out to be a flop. So, I took it out when it was done, and let it cool in the pan on the cooling rack before I inverted it and took it out. While it was cooling, I cleaned the kitchen. I tried hard to ignore it, for fear of facing yet another disappointment of a hard rock and untasty cake after so much work of deciding a measured amount of flour and other ingredients and writing them down on one of my recycled grocery lists paper.

But I finally could not ignore the cake any longer, and I gingerly inverted it. I couldn't help myself, so I lightly pressed it. It sprung back. My heart started to beat faster. I grabbed a knife, and started slicing. It was soft. My heart felt lighter. I took one cut piece. It felt fluffy and tender. My heart probably grew wings. I put the piece in my mouth. Heaven! My heart leapt right out along with my voice,

"Kids!!!!!!!!!!!!!! Come !!!!!!!"

They were all upstairs playing 'Sultan's kids'. They bounded down the stairs. One by one, they popped a piece of banana cake and nodded their approval. I squealed. Now I know how Alexander Graham Bell felt.

The first cake lacked sugar, and at first it tasted bland, but after a while, you could taste the banana. I decided to have a second go though, this time, adding 5 tablespoons sugar.

Meanwhile, Zeyoudee had his first cake, and the rest of us couldn't keep our hands off the cake, and before I knew it, there was no more First Banana Cake left. The second try was baking in the oven, and I peeked again. It rose. Alhamdulillah!

When it was done, cooled and all, well, maybe not all the way through, but I couldn't wait anymore, I cut it. It was gummy. I felt a tad disappointed, blaming the sugar, but after a while I realized that it was underbaked. I had taken it out too soon. So I still consider it a success, allahu akbar!

Personally I prefer the sugarless one though. It is healthier. So I have cut down the sugar to only 3 tablespoons in this recipe.


Zeyoudee's Banana Cake


1 C blended banana
1/2 C coconut milk
3 Tbs sugar
1/2 C brown rice flour
1/4 C sweet potato starch
1/4 C buckwheat flour
1 tsp salt
2 tsp baking powder
1 tsp baking soda
2 egg replacers (3 tsp Egg Replacer + 4 tbs warm water)
2 tsp oil

Preheat oven to 350 Fahrenheit. Lightly oil an 8 inch round cake pan, bottom and sides, and line the bottom with parchment paper, and lightly oil the top side of the parchment paper too. Sprinkle some brown rice flour, and shake the pan to distribute the flour across the greased bottom and sides of the pan, and dump out the excess.

1. Combine blended bananas, egg replacers, sugar, beat till combined, then add oil and beat again
2. Meanwhile, combine flours, baking powder, baking soda, and salt in a separate bowl and stir to distribute them evenly
3. Add the dry ingredients in 3 additions alternating with coconut milk, meaning, you first add a couple spoonfuls of the dry mix to the banana-egg mix and beat it till combined. Then you add 1/3 -1/2 of the coconut milk and beat till combined. Then add the dry mix again and keep alternating, but make sure you end with the dry mix. Here, on Chef Talk, the science behind this alternating method of mixing is explained.
4. Bake in 8 in cake pan (greased) for 20-25 minutes or till it springs back when lightly pressed
5. Cool cake in pan on cooling rack for 10 minutes
6. Slide knife around the edges to loosen the cake, invert it onto the rack and slide the pan off. Cool cake completely on the rack.


Cook's Notes:


  • I used Ener G egg replacers. The directions for use is on the box.


  • Make sure you blend the banana in a blender till smooth. This is so you get a smooth consistency for the cake. Mashing the banana will not result in a smoothly textured cake.


  • Instead of using butter or Baker's Joy spray to grease the pan, I suggested using oil, to make this truly dairy free.
My next try is ... carrot cake, or apple cake, inshaallah.

Tuesday, November 11, 2008

Allergy Free Banana Ball Fritters


If not for Zeyoudee's allergies and a sister's determination in conducting her own kitchen experiments (despite not having any problems with allergies herself), I might have never learned about the properties of different types of flours, the different function of eggs, and eventually be moved to hatch some recipes of my own in concocting something my little Zeyoudee can eat without breaking into hives and going into a fit of coughing and wheezing, alhamdulillah!

It took me a while to get used to eating baked goods made with rice flour, and getting used to drinking rice milk. Rice flour is particularly grainy and gritty, and the first time I ate pancakes I made using rice flour, I was quite disappointed. Brown rice flour though, makes a huge difference!

I had made this Jemput Jemput with white rice flour first, combined with buckwheat flour. It tasted like...rice flour. It was okay, but I decided to try making it with brown rice flour. And it tasted...better.


The only thing I had to deal with was that it would brown very quickly compared to the Jemput Jemput made with normal flour. And I think this probably has something to do with the color of the buckwheat flour, which is somewhat grayish. It also tends to be crispy on the outside, but very fluffy and soft on the inside.

There I was, evaluating and critiquing my allergy free version of Jemput Jemput Pisang, yet when we handed some to Zeyoodee, he joyfully stuffed them in his mouth, simply happy to have yet another new thing to eat. Crispy, fluffy, I don't think he cared. Alhamdulillah!

And alhamdulillah, we gave him something that had coconut milk (coconut is considered a tree nut) days before, and he didn't have any reactions. So that opened up more possibilities for him, and I was beyond elated. He will be a true Malaysian. That means, I have to learn to make these Malaysian desserts now, after avoiding them for years because I couldn't rely on Malaysian recipes that are usually simply written as recipes, as opposed to western cookbooks that also include the science of chemistry behind baking. Let's just say I'm kind of a geek when it comes to following recipes. I want to know the whys, hows, in addition to the recipes. In fact, I don't like it when a cookbook just has recipes but no explanations.

And thus, the Cake Bible, by Rose Levy Beranbaum, is one of my favorite and most treasured cookbooks. Recently I also discovered her blog, and I have to say, it's one of my greatest 'stumble upon' on the internet. Ahhh....however, I have moved from the world of baking to the world of baking/cooking allergy free, and my favorite allergy free site now, is Karina's Kitchen. But I still owe my first peek into the world science behind the baking to Rose's Cake Bible, among other cookbooks I have amassed throughout the years.


Zeyoudee's Jemput Jemput Pisang


2 bananas mashed
1/2 c brown rice flour
1/4 c buckwheat flour
1 tsp baking powder
1/4 - 1/2 cup coconut milk/rice milk
salt


1. Combine the above together till they make a thick batter
2. Heat oil for deep frying
3. Drop spoonfuls of the batter one by one
4. Turn over to brown the other side
5. Drain on paper towels

Cook's notes:

  • The brown rice flour has to be refrigerated once opened because it can go rancid pretty quickly.
  • For a truly allergy free version, use gluten free baking powder
  • Since it will brown very quickly, make sure to turn it as soon as it browns
  • Wait until the oil is really hot, otherwise it will stick

I know most people probably have no need for an allergy free version, but in case you know someone who has allergies, especially multiple allergies, this will be one of those rare pearls!

Thursday, October 30, 2008

Ginger and Chicken, No Oyster.


Originally, oyster sauce is used for flavoring and provides authenticity of Chinese cuisines.. I think! But this time, I decided to make Chicken Ginger without oyster sauce because we were out of it , besides I could make it an Allergy-Free version who craves for the real taste of this wonderful chicken cuisines but can’t do shellfish - oyster, scallop, shrimp, squid and anything made from one of these. In my humble opinion, by using sesame oil for sauteing really gives the true taste of Chicken Ginger , and yes.. do not omit the ginger; that’s where the main flavor and aroma comes from. So make sure you have dark or light sesame oil in hands ;it can be found almost anywhere now.

The substitute I used in place for oyster sauce was based on my grandma’s whom I adore for her cooking soooo much, she is absolutely a great cook to the whole family. I guess everybody thinks their grandma’s foods are the best.MasyaAllah, my grandma doesn’t use oyster sauce much in her cooking yet still get the wonderful flavor and of course taste. She loves tamarind and palm sugar in most of her recipes . The idea of subbing these 2 ingredients came up then. Thanks grandma! I love you…!!

I forgot to measure each ingredients in detail because it was a quick ‘experiment’ . The good news is the Chicken Ginger turned out as good even though no oyster sauce added. The actual taste is still there.. alhamdulillah!

Ok, let’s see what we need to make No Oyster Sauce Chicken Ginger...Please adjust salt and sugar to your taste.

Chicken Ginger

Ingredients:

To marinate:

1 1/2 lbs chicken breast , sliced

1/2 cube chicken bouillon

1 tsp. white pepper powder

1 Tbsp. cornstarch (See Notes)

Combine all together and marinate for 20 - 30 minutes in the refrigerator.

Mix together :

1 or 2 Tbsp. palm sugar

1/3 Cup thick tamarind juice

1/4 Cube chicken bouillon (See Notes)

Mix all until sugar and bouillon are completely dissolved.

Other fresh Ingredients:

2 Inches ginger root, thinly sliced

1 large yellow onion, roughly sliced

3 Cloves garlics, pounded

2 Tbsp. dark sesame oil ( See Notes)

1 Cup thinly sliced carrots

1 Cup green peppers , slice 3 inches length

1 Cup red peppers , slice 3 inches length

1Tbsp. Cornstarch mix in 1/4 - 1/3 Cup water

Salt , palm sugar and white pepper to taste ( See Notes)

Garnishing : Chopped green onions , fried shallot, toasted sesame seeds

Method:

Heat a medium sized pan on medium-high, drizzle 2 Tbsp sesame oil and let it heat for 1 minutes or 2.

Add in sliced ginger and marinated chicken and saute for 2 minutes. Stir every few minutes until the chicken just slightly crisp and fragrant from the ginger .( Do not cook the chicken too long especially chicken breast , this is to keep the chicken moist and tender)

Stir in the onions, peppers and carrots until they begin to soften. About 4 - 5 minutes. Pour the sweet sour mixture ( tamarind, palm sugar, chicken cube) , let it boil. Lower the heat to low , slowly pour cornstarch mixture, keep stirring to avoid lumps.Add more water if necessary . Let it thicken , add salt/sugar / white pepper to your taste. Garnish with chopped green onion, fried shallot and sprinkle sesame seeds on top.

Serve immediately with hot rice.

Served with hot jasmine rice

Notes Of The Day

  1. If you can’t use or out of cornstarch, replace with potato starch or sweet ( glutinous) rice flour . These too are great option to thicken your sauce.
  2. If you can’t find chicken cube ( the halal) in your place, vegetable bouillon would be find.
  3. Use Dark sesame oil for best result. light sesame works too. Like olive oil, grape seed oil and other low saturated fat oil… sesame seed oil provides health benefit to us and help lower cholesterol. If canola oil all you have, that’s find! .. it just the real flavor you will miss. Try not to use olive oil.. it works terribly.
  4. I didn’t have to add salt and extra sugar - chicken cube contains salt. I only had to add a little more white pepper - I wanted it hot and spicy.

Wednesday, October 29, 2008

Eat Your Greens!


I personally love stir-fried vegetables, Chinese style. The aroma of freshly cooked vegetables, particularly that of green beans, cabbage, and carrots drives up my appetite. It brings back memories of one vacation I had on the high plains of Malaysia's central mountain range, Cameron Highlands where my father rented a vacation house, and we got to cook freshly bought vegetables from the local farmer's market.

I think I can officially attribute my love of greens to my grandmother's incessant nagging of,

"Eat your greens. You'll stay looking young that way."

I would dutifully eat my greens, even the bitter tasting ones, because looking old was something to be scared of back then. My father doesn't look his age, and neither does my mother, and for that matter neither did my grandmother. I feared not looking my age (the opposite way) since almost everyone in my family seem to have this youthful look, so I gobbled up my greens. I grew to love them. In fact, I don't remember hating them at all. Now, I deem any meal that doesn't have greens as lacking something crucial.

Unfortunately though, my kids, despite eating their greens with gusto in their earlier years, are now rather fussy about their greens, well, except for my eight year old son, who seems to maybe have inherited my love for greens. So, in an attempt to give a twist to my usual cabbage and carrot stir-fry, I decided to experiment.

Thus was born my Chips in Stir Fry...


2 cloves of garlic, minced
1/5 of a yellow onion, minced
1/5 of a cabbage, sliced thinly
1 carrot, peeled and sliced
1 potato, peeled, and sliced very thinly (imagine making potato chips)
2 tbs oil
salt
pepper


1. In a frying pan, heat the oil and fry the potato slices till golden on both sides
2. Drain the fried potato chips on a plate lined with paper towel
3. In the same oil, quickly throw in the minced onion and garlic and saute them till lihgtly browned and fragrant
4. Toss in the carrot slices and stir-fry till slightly soft, or crunchy, depending on your preference. (if the carrots begin to stick and the oil evaporates, add a little water)
5. Throw in the cabbage and stir
6. Toss in the potato chips and stir till combined
7. Salt and pepper it to taste
8. Take the pan off the heat when the cabbage glistens and looks bright green
(I like my cabbages slightly undercooked for the crunchy texture)\

Cook's Notes:


  • I like my greens slightly undercooked. If you like yours thoroughly cooked, don't take them off the heat until they're thoroughly cooked. Duhh...


  • You can double, triple the recipe as you see fit.


  • We usually eat our veggies with cooked white rice and a meat/chicken/seafood dish - one of our staple lunch and dinner. If you're not Malaysian, you can try eating this with taco shells or wrapped in tortilla, or just by itself!


  • For a healthier version, you can brush the potato slices with oil and bake them until they brown, and then toss them in with the stir fried veggies.

Is this a hit with the kids? Yeah, pretty much, though some of them still pick through the whole medley for just the potato chips. Maybe I need to blend all these veggies and sneak it in their drinks.

Monday, October 27, 2008

Coconut Ice Cream


Does coconut sound familiar to you? to my knowledge , It does for people who live in a tropical country such as South East Asia and some part of Africa. Probably in Hawaii and Caribbean they use coconut a lot too. As for Malaysians, we are grown up with coconut milk , everyday.. ok , I am exaggerating . Not daily but it is “all time available” in the kitchen and we still using it today.

Nowadays, I see Vegans in America and Canada..(I am sure from any other countries too ) use coconut milk a lot for milk alternative in their cooking. This is especially to achieve rich creamy and flavorful dishes as they can get from dairy products/foods.

Ok, I am not a coconut expert so enough about it. What I am about to share you is coconut ice cream that I actually whimped out to even experiment with. Alhamdulillah, I did. I was inspired by a friend , can I just say she is like a sister to me who very much loves ice cream for it’s richness . Let me make it clear, she is not very much into dessert but ice cream.. definitely the only. And recently she can’t tolerate anything dairy for some reason ( let me ask her if she’s ok to say it out loud here, ok I decided not to) . As she mentioned about ice cream made from rice milk, my first impression was not so creamy and more on sorbet-y side.. am I right ? correct me If I am not!

I then raced home and did some research about other milk alternative for ice cream.. something came up in my mind.. what about giving coconut milk a chance! Did some research again, I found a lot for coconut ice cream recipe but for allergy free just seemed impossible. I decided to experiment myself BUT referring from several sources from dairy to vegan. I finally made homemade ice cream that is especially allergy-free ( if you can eat coconut ) and you will never ever miss dairy ice cream.. again!

Thanks a bunch to them for their helpful tips about making ice cream , I will try to update the links I referred to InsyaAllah Please stay tuned! And thanks a zillion to her also for the inspiration that leads me to this.

And for those out there , don’t be afraid to try this recipe.

Vanilla Coconut Ice Cream

Ingredients:

1 ½ Cups coconut milk (See Notes)

½ Tsp. agar-agar powder (See Notes)

Pinch of Salt

1 Tsp. vanilla extract

1/3 Cup white sugar

1 Tbsp. apricot preserve ( See Notes)

1 Tbsp. tapioca starch ( See Notes)

2 Tbsp. coconut oil

2 Tsp. lime juice

1 - In a small pot or sauce pan , combine 1 cup of coconut milk , agar-agar powder and salt. Allow to sit, covered on your countertop.

2 – Cook over medium-low heat until agar-agar is completely dissolved, keep stirring to avoid lumps and burn on the bottom of the pot.

3 – When the mixture starts to boil, turn the heat to low. Stir in white sugar, apricot preserve and continue stirring until the sugar dissolved. At this point, the mixture should be thick ( not too thick) .

4 – If everything (sugar and agar) is completely dissolved, ( the key to determine whether it’s dissolved or not; spoon just a little bit of the mixture with a metal spoon or rubber spatula , when you can still see bits of agar then it’s not ready yet.. keep stirring.)

5 – If everything is all dissolved, remove from the heat and immediately, pour the mixture in a deep shallow bowl. Using a hand blender ( immersion blender) , blend thoroughly to achieve smooth and silky mixture. (this process is to making sure that bits from apricot preserve and agar are perfectly blended.) – if you don’t have immersion blender, regular blender or food processor works well too.

6 – Now, while it’s still warm you can start adding tapioca starch bit by bit. Again use immersion blender / blender/ food processor to bring them all together. Let the the mixture sit at room temperature until it start to firm up and then refrigerate until solid and chilled.

7 – Again, blend again with your blender until smooth and velvety. Slowly pour the remaining coconut milk, coconut oil and lime juice until well mixed. ( See Notes)

8 – Chilled again for 20-30 minutes (for best result chilled overnight) so the ingredients can get to know each other. When it’s ready, pour in ice cream machine and follow the manufacturer instruction. Churn for 20 – 30 minutes, pour in air tight container and allow to freeze for 20 minutes before served.

OR

If you are not using ice cream machine, beat with heavy duty electric mixer for at least 10 minutes on high speed until it fluff up. Place in the freezer for 60 minutes to allow chilling and repeat the same process for 3-4 times. I know it sounds a lot of work but it worth the effort, insyaAllah.

Notes Of The Day:

1 - Please please please use full fat coconut milk, it won’t work if using lite coconut milk.. you will not get that creamy velvety ice cream. Shake the can first before using.

2 - If agar-agar powder isn’t available in your kitchen, use agar flakes BUT the amount used will definitely change, instead of 1/2 Tsp. try 1 1/2 Tsp of agar flakes but I can’t really vouch that.

3 - For tapioca starch, you can sub with cornstarch or xanthan gum since it helps thickening and avoid crystallization for frozen dessert.

4 - In step 7 , you can add your own variation by adding frozen fruits such as banana, raspberry, strawberry and etc. I tried banana and it turned out great.. alhamdulillah.

5 - Oh before I forgot, adding apricot preserve actually enhances the flavor and also helps from crystallization when freezing.

Enjoy!!

http://healthykitchen.wordpress.com/

Saturday, October 25, 2008

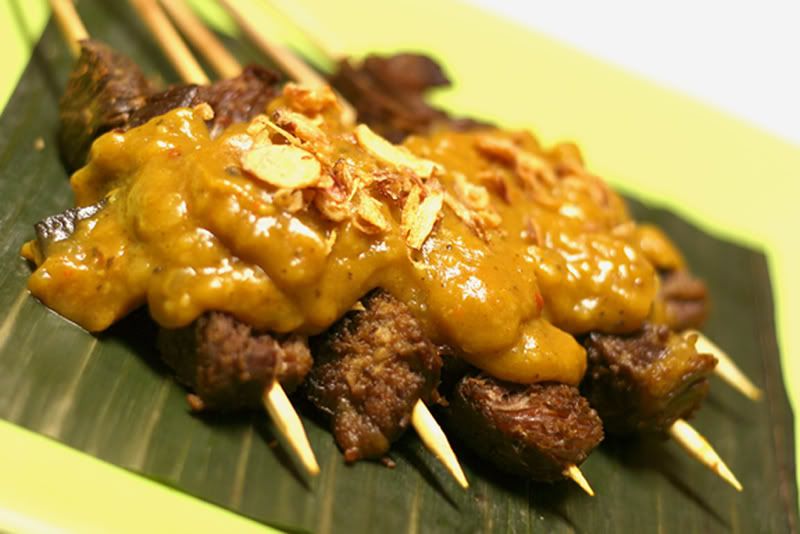
BBQ Southeast Asian Style


Let's just begin by saying I have had bad experiences making satay. I followed all the tips regarding the skewer sticks, but they still smoked horrendously in the oven (I don't have a BBQ grill), thereby triggering an annoying persistent ear-piercing wail of the smoke alarm. I even soaked the wooden skewers overnight, yet they were still burnt.

Fortunately, my love or rather desire, for satay was too high for me to abandon trying to make it altogether, and I tried again, but instead of threading marinated beef slices onto the soaked skewers, I endured the ordeal of deboning whole chickens and chicken drumsticks to make chicken satay. Of course, I had to google the recipe for it, for making satay has obviously not been my strong point. Alhamdulillah, I stumbled upon this Chicken Satay recipe from Rasa Malaysia, which I find pleasantly simple and true to taste.


As I arranged my chicken-threaded skewers on my aluminum foil-lined broiling pan, I made dua the skewers wouldn't burn again. I put the oven on bake for about 350 Fahrenheit until the chicken pieces looked cooked, then turned it on to broil until they were somewhat burnt to a dark brown crisp.


Allahu Akbar! The skewers didn't burn, because the chicken pieces did not take too long to cook, unlike beef, and the skewers managed to withstand the heat of the oven. Now, if we're talking about grilling these satay on an outdoor grill, like the satay sellers do, beef satay would probably be a cinch to make!

Though for my next intended try in making beef satay, I am thinking that I should boil the beef pieces first till tender, marinate them, thread them on the skewers and then grill them. I have a Satay Padang (a Sumatran satay I'm also used to eating growing up, particularly because my father is originally from Sumatra) recipe lying in wait to be tried, which is also allergy free (well, with regards to wheat, gluten, eggs, dairy, and peanut).


Malaysian satay are usually accompanied by peanut sauce (recipe from Rasa Malaysia), which I didn't make because of my toddler's peanut allergy, so I simply devoured my first successful chicken satay, 'dipless'. What a blessing it was, nevertheless! Alhamdulillah.

Because of my tot's allergy, I omitted the soy sauce and oyster sauce from the original recipe, but it still tasted delish!


Satay Ayam (Chicken Satay)

Ingredients:

Deboned chicken legs, cut into roughly 2 x 1 in pieces (big enough to thread on the skewer, you can also cut them into a long strip 1 1/2 in wide and simple weave the skewer through the whole length of the chicken strip)

Spice Paste:

1 tsp of ground coriander
2 stalks lemon grass **
6 shallots/ 1 medium-large sized onion (peeled)
2 cloves garlic (peeled)
4 Tbs of cooking oil
1 tsp chili powder
2 tsp turmeric powder
1 tsp sugar/ 1/2 tsp honey
Bamboo skewers (soaked in water for 2 hours to avoid burning)

1. Blend the spice paste ingredients or process in food processor
2. Marinate the chicken pieces with spice paste for 10-12 hours
3. Thread the chicken meat onto the skewers
4. Preheat oven to 350 Fahrenheit
5. Line a broiling pan with aluminum foil and lightly grease with oil
6. Arrange the satay sticks already threaded with chicken pieces on pan
7. Brush the chicken meat with oil
8. Bake for about 10 minutes, flipping them over after 5 minutes
9. If it looks done, broil for about 2-3 minutes each side, or until they're browned slightly


Cook's Notes:


  • When threading the chicken meat, make sure the skewer pierces through the meatiest part of the meat, otherwise the the meat pieces might fall off the skewers!


  • If you have a grill, by all means, grill them!


  • If you do, don't brush oil on them, because they already have oil in the marinade


  • When you grill them, be careful to extend the unfilled part of the skewers outside of the grilling bars so they don't get burned


  • If they are marinade left over, use it to saute some vegetables in so as to avoid wastage


  • You can eat them like the Malaysians do (dipped in spicy chunky peanut sauce, along with cubed rice cakes, and fresh wedges of cucumber), or like the Americans do (just like that, like BBQ meats)


  • Try to use the dark meat of the chicken (legs), because the white meat (breasts) tend to get dry


  • **Lemon grass stalks can be found at some grocery stores, and Asian grocery stores.


  • Sometimes they're sold frozen, already shredded. You can use this too for simplicity.


  • They're even sold in powder form, but of course this is less fresh.


  • Don't use the whole length, only use 5-6 inches of the bottom part (cut off the remaining root base).


  • When you blend or process them, they will be shredded. Don't be afraid if you hear some roaring in your blender.


  • I usually buy a lot of them, chop off the top part, and store them in my freezer for longer shelf life.


  • Lemon grass provides a tangy taste and fragrance to the cooked food.


* How to debone a chicken: (a very sharp knife makes a LOT of difference!)


Satay Wiki, if you wish to know more about it.

The next time you're having a BBQ, you may want to give it a Southeast Asian twist!

Pumpkin...Pie?

2 little pumpkins were still there sitting on my kitchen pantry since we bought them from the farm. Surprisingly, I had so many wish-to-do list to make with the pumpkins and didn’t know where to start. My mind started browsing up and down the list , let’s go with pumpkin pie first!

I chose the bigger one , cut it, peeled , cored and diced it. Cooked the diced pumpkins and ready to use.

I wanted to make gluten free pumpkin pie, may be crustless pie? pumpkin rice cake or in Malaysia we call it, kuih talam labu? yes , alhamdulillah..I got it! All I need was to play around with the recipe that is lower in fat and gluten free.

Alhamdulillah, the result was a success to my expectation; creamy , not too sweet, custard-y from the inside and slight crust formed along the bottom and sides of the pan make it easy to cut. It is all about the flavor and texture that remind me to malaysian rice cake and pumpkin pie or in between.

Pumpkin Pie

Ingredients:

2 1/2 Cups cooked and diced pumpkin

1/2 Cup white rice flour

2 Tbsp tapioca flour

2 Tbsp potato starch (not potato flour) [ see notes]

2 Cups lite coconut milk ( see notes )

3/4 Cup white sugar

1/4 Tsp of each cinnamon powder , nutmeg powder and ginger powder

pinch of salt

2 1/2 Tbsp coconut oil ( preferable) or other light tasting oil

Method :

  1. Preheat the oven to 325 F
  2. Combine the first 5 ingredients in the blender and blend untill smooth.
  3. Add in sugar , salt , the spices ( cinnamon, ginger and nutmeg) and 2 Tbsp coconut oil.Blend on high, stopping to scrape the sides a couple of times to make sure everything is thoroughly blended. In the mean time, grease the remaining oil (1/2 tsp ) on a 8 - 9 inch pie pan and preheat the pan in the preheated oven.
  4. Pour the mixture into a large pot. Pre-cook on medium-low heat ( keep stirring to avoid lumps and burn on the bottom) until bubbles appear on top and creates steam. The consistency should not be too thick or too runny by now.
  5. Take the preheated pan out of the oven, pour mixture into the pan.. shake a little bit to level it out.
  6. Bake in the oven for 45 to 50 minutes.The top and edges should be brown, but the edges should not be over-done. Do not use fork, toothpick or knife to test because it will remain moist in the middle while still hot even though it is actually done.
  7. Remove from the oven and allow to cool at room temperature. For best results, refrigerate until chilled and completely firm before serving.

This recipe makes 10 servings . I served the pie with coconut ice-cream, InsyaAllah I will post the ice cream recipe on the next entry.

Notes Of The Day :

1- If you are out of potato starch or allergy to it, you can subs with cornstarch. If you can go with egg, you can use one egg instead of the starch.

2 - For the best result, please use coconut milk. If you cannot use coconut, any milk alternatives work too.


** Shida's recipe