Showing posts with label Dessert. Show all posts

Tuesday, December 21, 2010

Chocolate Peanut Buttery Goodness


If you love chocolate and you love peanut butter, this just may be the perfect cupcake combination for you.
I accidentally stumbled on this recipe while viewing this food blog a few months ago

I stared at the recipe for weeks. I've never baked anything with this many steps, so I was definitely intimidated! I thought I had the chocolate cake recipe pretty down pat, but the steps involving dropping the beanut butter fillings on a dollop of cake batter, then filling the top half of the cupake with more cake batter I found quite daunting. And then the frosting, that was even more duanting, I have NEVER had a terribly successful (and by that I mean yummy) frosting come from scratch. So I bookmarked the recipe and decided to put it off...

... until a pregnant friend of mine invited a few of us over to her place for dinner. This was the excuse I was looking for, not just a party, but for a pregnant friend. Now I could indulge.... err, I mean, help my fellow sister in Islam fullfill a pregnancy craving. :p

They turned out delicious. In fact, I've made them 2 more times since. This is officially my favourite cupcake, hands down. I'm not a huge cream cheese fan but I liked the frosting. Mainly because it too was peanut butter flavoured.

* I made 2 batches the first time. If you look in the comments section of the blog post, you'll see that many posters mentinoed their peanut butter balls exploded inside the cupcake. Mine did too the first time. I made the second batch but froze the peanut butter balls for 15 minutes and they held up well and were perfectly in place after baking. Taste wise - they were equally delicious both times, I just wanted to get it right for OCD reasons and aesthetic reasons. ;)

* If you want your cupcakes to look pretty and professional, you can buy a starter kit at Walmart complete with a few cupcake decorating tips and piping bags. This is the one I own. I used the smaller of the two star tips.

* I refrigerated the frosting for about an hour so that it would pipe well and not get messy.
* I don't have any pictures of the inside, because... well... by the time I pulled out my camera to snap some pics, I had already eaten too many. No way was I going to bite into another so I could take a picture!

Enjoy! If you have any questions, or if I'm forgetting to mention something, ask away! =)

Monday, May 10, 2010

I Know What You Did at The Check Out Line


I seem to be wacky things lately. First, I copied down a recipe off a magazine at the doctor's office. Ok, well apparently, it runs in the family because my mother and sister do it too. But then, as if trying to stand out more than I already do, I had to do another thing; memorize a recipe in a magazine at Albertson's check out line.

I have to tell the truth. I hate those check out lines. Why? Because they are always littered with tabloids usually displaying lewd pictures, and I hate that my children have to see those. So we always tell them to wait for us at the other end of the check out line. At Meijer's they had those coin-eating horses that we could redirect the kids to, but here, there ain't much choice. But the kids seem to know why we always tell them to go, so they do.

I have to tell another truth. i love those check out lines. Why? Because they are adorned with home and cooking magazines usually displaying scrumptious food pictures, and I love that I could pick them up and browse through them while hubby and kids unload the cart and wait to pay. I especially love it when the line is long, though many times, I've had to cut my reading short because customers are coming in behind me. At times I get the question,

"Are you in line?"

I know. I'm annoying.

But this time, I did what I never thought of doing before. I was browsing through this cooking magazine whose name I don't even remember, and I my greedy eyes landed upon a luscious cake. I fell in love. Head over heels. I beckoned for S to come and help me out. I don't remember how it came about, but I whispered surreptitiously to her,

"Ski, you think you can help me memorize this recipe?"

I read and reread the recipe. A cake recipe is quite familiar to me now, and one that involves egg separation, I am also familiar with, so memorizing the recipe was a cinch. It was mostly common sense with a little baking know how. The ingredients was the challenge. So we ended up memorizing the ingredients. Right there and then. I looked up to see hubs completing his payment.

"Hurry, S. You think you got it?"

And like a good obedient daughter, she obeyed me. I could almost see her the clockwork in her brain. She slowly nodded.

As we walked out the store, I quickly rummaged in my messy handbag, looking for a notepad and pen (which I always have anyway). Aha! And on the way to the parking lot, I quickly scribbled the memorized ingredient list, thereby creating quite a sight to behold: an abaya clad woman, face covered, not looking where she was going, hastily scribbling something on a notepad while walking towards her car, following her husband and children. Oh well, who cares? I already am a sight to behold with the niqab anyway.

So for quite some time, the recipe sat in my handbag, untouched. My fervor had dissipated, though it was at the back of my mind. Then a few weeks ago, we bought heavy whipping cream because I wanted to make Swiss rolls. But I only used one carton. The other 1 pint carton was still sitting in the fridge, awaiting a gruesome death at the hands of a neglectful owner. Well, neglectful I am not, for I finally rescued that carton of heavy whipping cream from such an end !

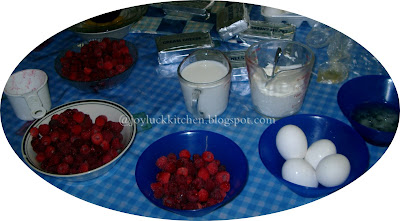
With the help of my lovely children, I made the Strawberry Tres Leches. That reminds me. Getting the strawberry jam for this was not straightforward. I try to avoid non organic berries now, because they are one of the fruits that are high in pesticide. So when we set out to buy jam for the cake filling, we had a dilemma. H, my son, was with me at the time. he forgoed jam for bread and we bought an organic raspberry jam for the cake instead of strawberry because they were out of strawberry. And with that, I present ...

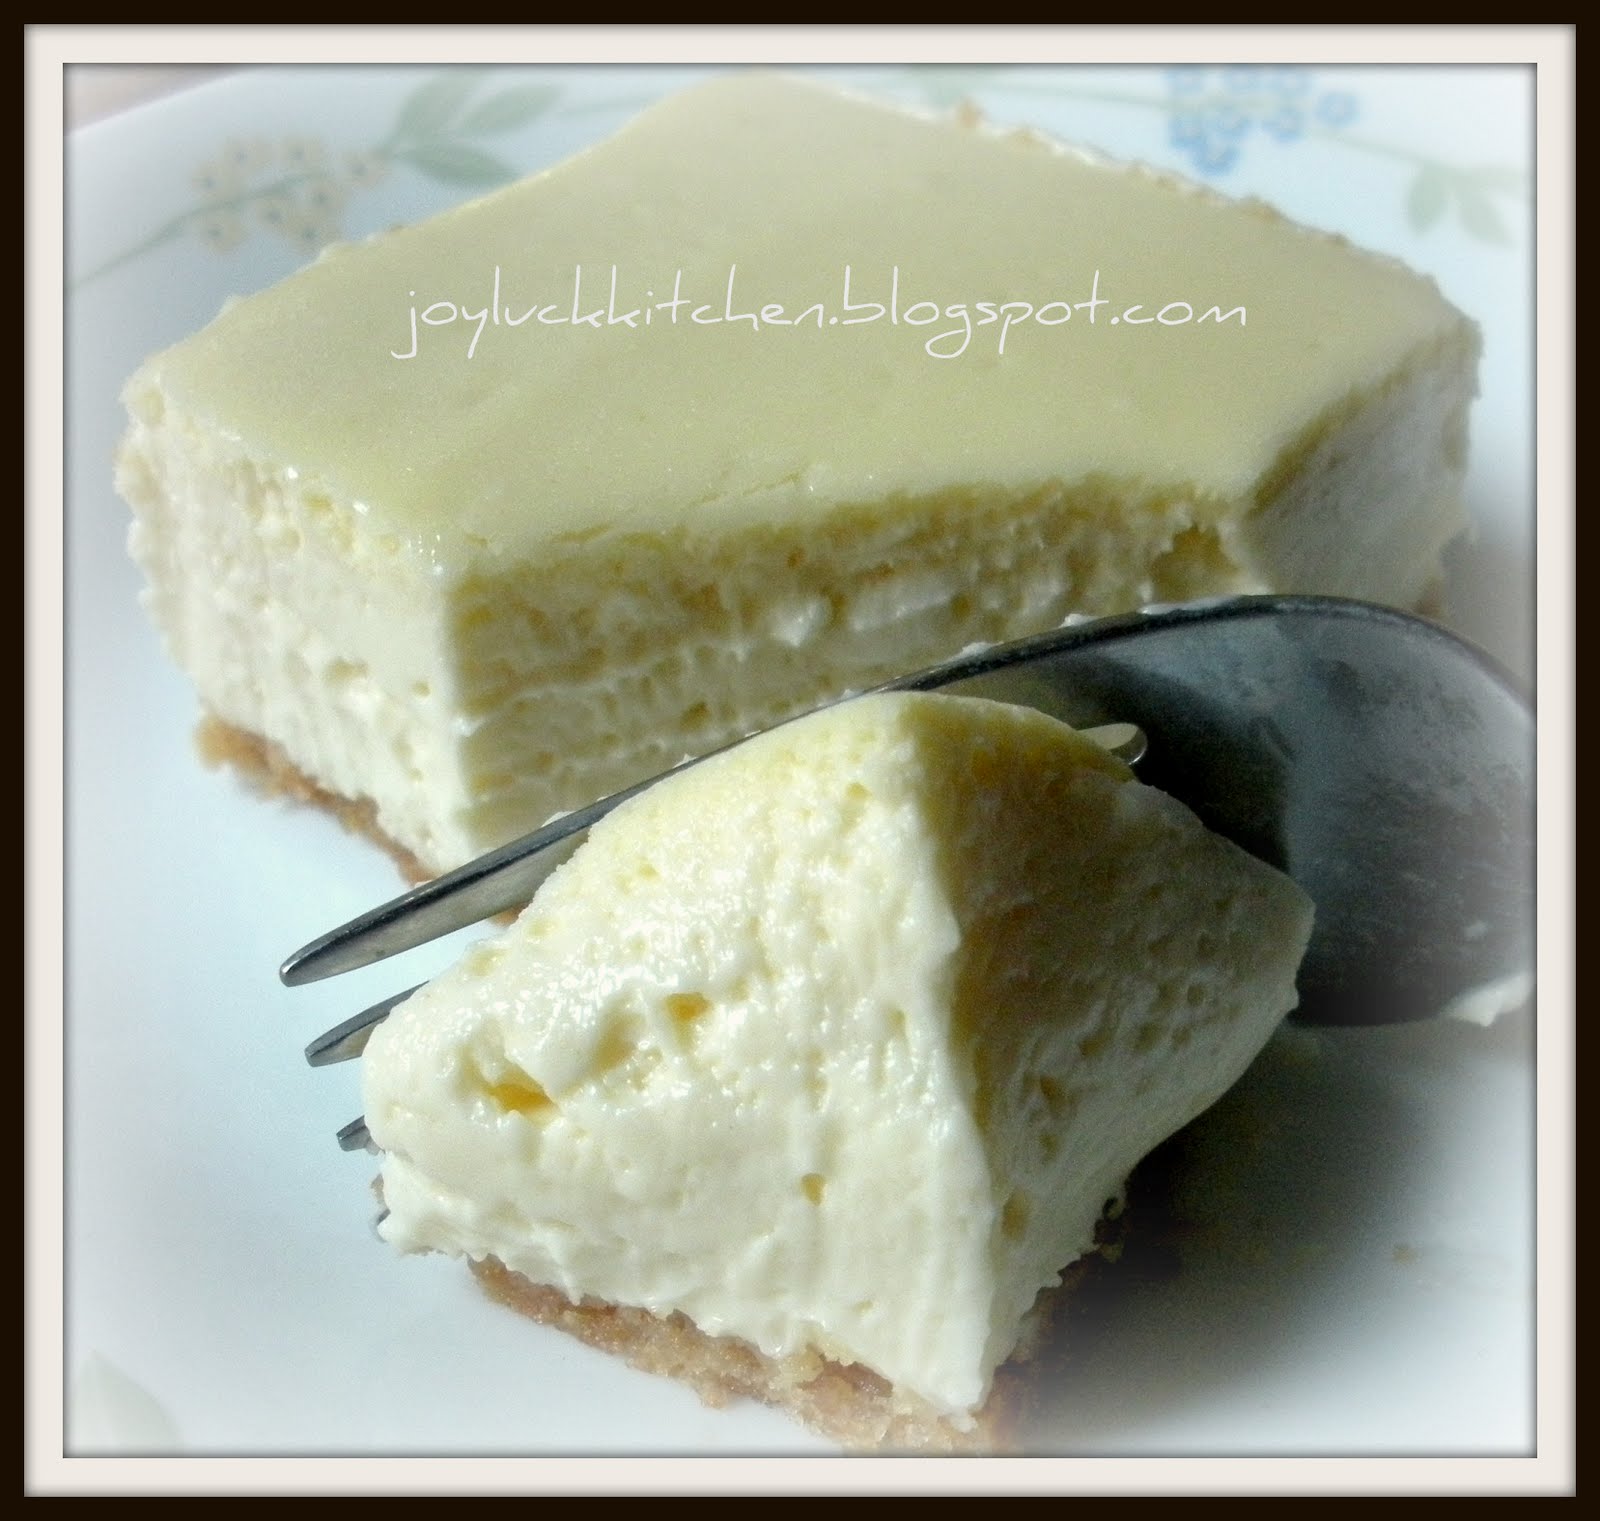
Strawberry Tres Leches Cake


For the cake:
5 eggs separated
1 C sugar, divided 3/4 C and 1/4 C
1/4 C milk
1 ts vanilla
1 1/2 C flour
1 1/2 tsp baking powder

For the milk combo:
2/3 C milk
2/3 C sweetened condensed milk
2/3 C evaporated milk

About 1 C strawberry/rasberry jam, slightly warmed for easy spreading

1/2 - 1 C heavy whipping cream
1-4 Tbs powdered sugar

1. Preheat over to 350 Fahrenheit and grease a 9 in springform pan
2. Beat the yolks with the 3/4 C sugar until light colored and fluffy
3. Combine the flour with baking powder and mix well, then add it to the egg mixture alternately with the milk in 2-3 additions, beating well after each addition. That basically means, add 1/3 of the dry ingredients, then mix well, stop, add 1/2 of the milk, mix well, stop, add another 1/3 of flour mixture, mix well, stop, add rest of milk, mix well, stop, add remaining flour mixture, mix well
4. In another bowl that is free of grease or egg yolk, beat the egg whites till foamy and then gradually, add the 1/4 C sugar until stiff peaks form.
5. Plop one peaked spatula of egg white onto the egg yolk mixture and fold in gently. Then fold in the rest of the whites until thoroughly combined
6. Bake 40 minutes or until toothpick inserted in the center comes out clean
7. Cool in pan 10 minutes. Then invert onto cooling rack and cool completely
8. Now this is the fun part: Like a crazed person, poke as many holes as you can in the cake from the top with a cake tester or or skewer. Have a go at it! But just be sure not to tear the cake apart while you're at it. You just want to make enough holes so the milk combo can soak through the whole cake.
9. When you're done a-pokin', place the cake in a container with sides that is slightly bigger than the diameter of the cake. Then combine the 3 milk and pour onto the cake.
10. Refrigerate overnight.
11. By the next day, the cake should be drenched and have soaked up all the milk solution. Invert onto a large plate and prepare to slice the cake horizonatally into half. I used a serrated knife and did some guesswork. It was a little tricky because the cake is so soaked that when I placed my hand on the top while cutting, it wet my hand, so I used a cake insert just so my hand won't get wet from the milk.
12. Spread the jam over the bottom half of the cake and carefully, very carefully (since the cake is wet and can break easily) place the top half inside part down over the jam.
13. Beat the heavy cream with powdered sugar until it looks like whipped cream. Be careful not to overbeat or it will curdle. If it does, you can rectify this by adding more heavy cream, but if you don't have anymore on hand, you're in big trouble.
14. Spread whipped cream on top of cake. Best eaten chilled.


I had made a Tres Leches cake before, but it was a different recipe. I think we all like this one better. Now the next time I'm at a check out line, I know what to do.

Saturday, May 1, 2010

Say Cheese!


It's creamy, rich yet not too overpowering, light yet not airy. It was perfect. I only wish I had a topping to pour on this off white smooth-topped cheesecake.

I rarely do this (not out of aversion, but more out of laziness), but this time I did. At the doctor's office, I picked up a magazine, flipped through it, and a photo of a scrumptious cheesecake caught my eye. Without thinking, I quickly rummaged through my purse for a pen and notepad, and copied down the recipe.

The recipe remained on the bulletin board near my work station for weeks, a month maybe, before I actually did something about it. My Taleem classes and homeschooling left me little time to indulge in extra kitchen activities. But I had snared myself into the trap. I bought the cream cheese when we went shopping, and so, that morning, I took out the cream cheese boxes and left them on the counter so they could come to room temperature.

By the time they did though, I was too lazy, spent, and exhausted to make the darn cheesecake. I was about to put the cream cheese back in the fridge, when the kids offered to help. They must have really wanted that cheesecake. So, somewhat reluctantly, I agreed, and before long, I had kids crushing the graham crackers, melting butter, patting the crushed crackers mixed with butter onto the bottom of the pan and the rest was a breeze. Without these helping hands, I would have probably ditched my intention to make this cheesecake and used the cream cheese for eating with pita bread and graham crackers for snack.

I didn't use Philadelphia cream cheese though, but it still tasted delish. Why didn't I use it? I was being frugal. My only reason. I also used more than 6 graham crackers. I think I probably used about 10-12 graham crackers.

Philadelphia New York Cheesecake


6 graham crackers crushed (I dumped about 10-12 graham crackers in a bowl and handed my kids a pestle and told them to crush them crackers to bits)
1 C sugar
3 Tbs sugar (keep this separate for the crust)
3 Tbs butter, melted (courtesy of one of the kids. I forgot which one)
5 8 oz. packages cream cheese, softened (that basically means, you leave it at room temperature)
3 Tbs flour
1 Tbs vanilla
1 C sour cream (at room temperature)
4 eggs

1. Preheat the oven to 325 F. Prepare a 13x9 rectangular pan (if you have one with a removable bottom, that would be even better). No need to butter the pan.
2. Combine crushed graham crackers with 3 Tbs sugar and melted butter
3. Dump this mixture into the pan, and using the bottom of a measuring cup or hand slipped in small ziploc, press it so it forms an even crust in the pan. No need to push it up the sides. Just cover the bottom.
4. Bake 10 minutes. Cool.
5. At low to medium speed, cream cream cheese, sugar (the 1 C), flour and vanilla till smooth
6. Add sour cream and continue mixing
7. On low speed, add eggs one at a time, beating till smooth after each. Do NOT overbeat.
8. Bake 40 minutes or till the center almost sets. I usually do a jiggle test. I hold the pan and slightly shake it. If the center jiggles like jelly but doesn't slosh over, it's done.
9. Cool completely
10. Refrigerate 4 hours (and this was where the kids groaned. After all the helping they did, I guess they had a right to groan like they did.)


But it's definitely worth it.

Thursday, July 30, 2009

Simple No-Bake Cheesecake Recipe


This is a recipe that I had used a few years ago to make cheesecake. Of course, the non-baked cheesecake tastes different than the baked ones but this is a good idea for times when you are in a hurry and yet want to make a good dessert :)

Ingredients: (Serves 6-8)

- 8 oz Cool Whip Free (take it out 10 minutes before using)
- 16 oz 1/3 less fat Philadelphia Cream Cheese (softened)
- 9 inch reduced fat Graham Cracker Crust/Or you can make your own crust by combing butter and cookie crumbs
- 1/4 cup sugar (can do acc. to taste as well, I have found some recipes which state 1/2 cup)
- 1 pack of Halal Lemon Jello/Jelly
- 1 jar/can of cheesecake topping (I don't like tasting big chunks of fruit so I get Smuckers brand 'Toppings').

Method:

1. In a large bowl, combine whipped cream cheese, lemon jello and sugar for a few minutes until fluffy.

2. Add Cool Whip and whip until smooth. You can use an electric mixer too but make sure you don't over beat (you want soft peaks in the mix, s that it's fluffy and not stiff).

3. In the meantime, you can crush 6 or 7 gram crackers and melt just enough butter (this needs to be adjusted according to how thick you want your crust to be and how big your dish is) to nicely pack the bottom of a springform/any other tray to form the crust.

3. Spoon mixture into pie crust and chill for a few hours, until firm. I usually let it just sit overnight when I can.

Cut into 6/8 equal slices.


Alternate serving option:
Serve just the cheesecake mix as a mousse, with graham crackers on the side as opposed to forming a crust with them.


Picture from: http://www.viecouture.net/wp-content/uploads/2008/02/strawberry_cheesecake_squares.jpg

Saturday, December 13, 2008

Pound Cake


If you're like me, you've been eating pound cake ever since you were a little kid. I remember my mom bringing it back each time she went grocery shopping. It's ridiculously easy to make, I almost didn't believe it when it turned out so good. I say this all the time, but if it worked out for me, it'll work out for you.

I was browsing the Joy of Baking website and eyeing some recipes I'd like to try out in the future. I came across a pound cake recipe. The picture on the site was drool worthy and brought back a rush of memories. I quickly read through the ingredients and noticed that I just happened to have everything, including a lemon (zest from 1 lemon is needed) in my pantry. I also needed an excuse to use my new bread pan :)

Enough of that, the recipe I followed can be found here. Don't underestimate the measurements, follow them exactly. I remembering thinking, oh well, what difference will it make if the ingredients aren't at room temperature, or if I add the eggs in at once (as opposed to 1 at a time). Follow the recipe entirely.

*The recipe mentioned to wrap the cake well, so I sliced it, and saran wrapped the slices, and refrigerated it.
*Mine was ready in 45-47 minutes, even though the recipe says 50-60. Don't let it mislead you so keep a close eye on your cake.


Enjoy!

Friday, December 12, 2008

Buttercream Icing


Finally, an icing recipe that worked for me! Though I'm sure my prior mess ups were due to my own errors, this time I was sure to carefully watch my measurements.

Thinking back to the last time I tried to make icing, I realize what an importance icing sugar (as opposed to granulated sugar) can make!

The recipe I followed is by Wilton and can be found here.

  • 1/2 cup solid vegetable shortening
  • 1/2 cup (1 stick) butter or margarine softened
  • 4 cups sifted confectioners' sugar (approximately 1 lb.)
  • 1 teaspoon of Vanilla
  • 2 tablespoons milk

Instructions

(Medium Consistency)

In large bowl, cream shortening and butter with electric mixer. Add vanilla. Gradually add sugar, one cup at a time, beating well on medium speed. Scrape sides and bottom of bowl often. When all sugar has been mixed in, icing will appear dry. Add milk and beat at medium speed until light and fluffy. Keep bowl covered with a damp cloth until ready to use.

For best results, keep icing bowl in refrigerator when not in use. Refrigerated in an airtight container, this icing can be stored 2 weeks. Rewhip before using.

For thin (spreading) consistency icing, add 2 tablespoons light corn syrup, water or milk.

For Pure White Icing (stiff consistency), omit butter; substitute an additional 1/2 cup shortening for butter and add 1/2 teaspoon No-Color Butter Flavor. Add up to 4 tablespoons light corn syrup, water or milk to thin for icing cakes.

NOTE: Changes in Wilton's traditional recipes have been made due to Trans Fat Free Shortening replacing Hydrogenated Shortening.


Enjoy!

Thursday, December 11, 2008

Eid Cookies Part II


In deciding which cookie recipes to try for Eid from my new cookbook, I had decided off the bat that I would try home made chocolate chip cookies. Not the pre made Pillsbury cookie dough I've been making my whole life, this time I'd try from scratch.

These unfortunately didn't last until the morning of Eid! They kept disappearing, one by one.

I present the 2nd of 3 recipes, Chocolate Chip Cookies. This recipe is slightly different from this one.


3/4 cups butter, softened
1/4 cup shortening
1 cup packed brown sugar
1/2 cup granulated sugar
3/4 teaspoon baking soda
1/2 teaspoon salt
2 eggs
1 teaspoon vanilla
2 1/2 cups all-purpose flour
1 12-ounce package (2 cups) semisweet chocolate pieces or miniature candy-coated semisweet chocolate pieces
1 1/2 cups chopped walnuts or pecans (optional) - [I skipped this part]

1. Preheat oven to 375 degrees F. In a large mixing bowl beat butter and shortening with an electric mixer on medium to high speed for 30 seconds. Add the brown sugar, granulated sugar, baking soda, and salt. Beat until mixture is combined, scraping sides of bowl. Beat in eggs and vanilla until combined. Beat in as much of the flour as you can with the mixer. Stir in remaining flour. Stir in chocolate pieces and, if desired, walnuts.

2. Drop dough by rounded teaspoons 2 inches apart onto an ungreased cookie sheet. Bake for 8 to 9 minutes or until edges are light brown. Transfer to a wire rack; cool.

* Don't try to mix the chocolate chips into the dough using a blender! Stir them in using spatula


Tuesday, December 2, 2008

Peanut Butter Lovers


I may be the biggest peanut butter lover on earth. I can eat anything made with peanut butter, so it's no surprise that I would try this very easy recipe. This was my inspiration. The only thing I did different was dip one half of the cookie in chocolate and peanuts instead of both sides. I also only baked it for 10 minutes and let it cool down for 10-15 minutes. Preparation time was no more than 5 minutes, and then kept the batter in the fridge for 30 minutes before baking.

What you'll need:

1. 1/2 cup of sugar
2. 1 cup of peanut butter
3. 1 egg

- Mix the sugar, peanut butter, and the egg until the batter is smooth.
- Refrigerate for 30 minutes and preheat your oven to 350 degrees.
- Remove from the refrigerator and shape into small balls, and place them 1 inch apart on a cooking sheet
- Bake for 10-12 minutes (depending on your oven)
- When the cookies cool down, dip the cookie in chocolate (I used chocolate ice cream syrup) and then into a bowl of peanuts
- Let it dry for a few minutes
- Enjou :)


Enjoy with a cold glass of milk. Let me know how it works out!

Monday, December 1, 2008

Rich Concoctions

I'm good at following recipes, but not at coming up with my own, especially where baking is concerned, since baking is more of chemistry than art, unlike cooking. But I can say that this is an exception. I came up with this recipe on my own, and to this day, (I'm embarrassed to say) this is one of the very few dessert items that are actually of my own concoctions.

The inspiration came from a cream pie from McDonald's a sister was serving at a gathering. As I devoured the smooth and velvety pie, I thought to myself, I can make something like this. I know the properties of most of the baking ingredients I have been using all these years.

So, I ventured on that experimental path, using heavy cream as the main ingredient that will provide structure, well, somewhat of a structure. My original recipe was raspberry cream cheese layer topped with a whipped cream chocolate layer, but in this one, I was out of raspberry puree, so I changed the flavors a little bit.

I cheated too. I used the pre-made graham cracker pie crust instead of making my own. Oh well. Maybe when I'm feeling 'from scratch' I can make my own.


The bottom cream cheese layer is tangy and embodies whatever flavor I have incporated into it, in this case, plain and chocolate. One recipe make two 9 inch pie plates of Luscious Trifle Pie. The top layer is a whipped cream layer, yes, this one from scratch. I have never used the ready version. So the top layer is both creamy and somewhat light. A combination of the two, along with the crust is pure richness! Rich, rich, rich! I call it my Luscious Trifle Pie. Though, because I was out of raspberry puree, I alternate the flavor for the bottom layers, since one recipe makes two pies (or you can half it and just make one). One is chocolate flavored on the bottom and plain on top, and the other is the yang of the yin.

Luscious Trifle Chocolate Pie I and II

The bottom cream cheese layer:


2 8 oz cream cheese, softened

1 14 oz sweetened condensed milk

1 tsp vanilla

1/2 C heavy cream

5 Tbs cocoa


The whipped cream layer:

1 1/2 - 2 C heavy cream

1/2 C powdered sugar

3 Tbs cocoa

2 9 in pie crusts


Cream Cheese Layer
  1. Beat softened cream cheese till there are no lumps
  2. Add condensed milk , vanilla
  3. Add flavoring (the 5 Tbs cocoa for one of the pie, and none for the other one)
  4. Drizzle in heavy cream
  5. Beat till smooth and thick
  6. Pour this onto the premade crust

Whipped Cream Layer

  1. Beat heavy cream , sugar, and cocoa (for one of the pie) till it reaches the consistency of whipped cream
  2. Spread on top of the cream cheese layer
  3. Garnish with grated chocolate or drizzle with chocolate syrup if you wish
  4. Refrigerate overnight to firm it up


Cook's Notes:

  • Don't overwhip the heavy cream. If you overwhip the heavy cream, it will curdle. To rectify this, add some more heavy cream and beat till it reaches the whipped cream consistency and STOP whipping, especially if you have no more heavy cream left.
  • It's best to refrigerate this overnight to get a firm slice, otherwise, you will just get a blob of a slice.

Saturday, November 22, 2008

Pumpkin-Cheesecake Pie


I was browsing through some of my favorite food blogs and came across this amazing looking pecan pie recipe.  I LOVE pecan pie.  I'll be posting that recipe and pictures next.  I made a batch of the Perfect Pie Crust put it in the freezer.  In the meantime we got invited out so I decided to make another pie to take with the extra dough.   Thats when I found this recipe for Pumpkin Cream Cheese Pie.  If you like cheesecake and you like pumpkin pie, then this recipe is for you!  On a side not if you want a Pumpkin Cheesecake check out this recipe from the Pioneer Woman!

Here is the recipe reposted from http://howtoeatacupcake.net.


Pumpkin Cream Cheese Pie from Better Homes and Gardens: New Baking Book
Prep: 20 minutes - Bake: 1 hour
Makes: 8 servings – Oven 350F

1 recipe pastry for single-crust 9-inch pie
----------------------------------
1 8-ounce package cream cheese, softened
1/4 cup granulated sugar
1/2 teaspoon vanilla
1 slightly beaten egg
----------------------------------
1 1/4 cups canned pumpkin
1 cup evaporated milk
2 beaten eggs
1/4 cup granulated sugar
1/4 cup packed brown sugar
1 teaspoon ground cinnamon
1/4 teaspoon salt
1/4 teaspoon ground nutmeg
----------------------------------
1/2 cup chopped pecans
2 tablespoons all-purpose flour
2 tablespoons brown sugar
1 tablespoon butter, softened

1. Prepare and roll out pastry. Line a 9-inch pie plate with the pastry. Trim and crimp edge as desired; set aside.
2. In small mixing bowl beat cream cheese, 1/4 cup granulated sugar, the vanilla, and the 1 slightly beaten egg with electric mixer on low to medium speed until smooth. Chill in refrigerator for 30 minutes. Spoon into pastry-lined pie plate.
3. In a medium mixing bowl combine pumpkin, evaporated milk, the 2 eggs, 1/4 cup granulated sugar, 1/4 cup brown sugar, cinnamon, salt, and nutmeg. Carefully pour over cream-cheese mixture.
4. To prevent overbrowning, cover edge of the pie with foil. Bake in a 350F oven for 25 minutes.
Remove foil. Bake for 25 minutes more.
5. Meanwhile, combine the pecans, flour, the 2 tablespoons brown sugar, and butter. Sprinkle
over the pie. Bake for 10 to 15 minutes more or until a knife inserted near the center comes out clean. Cool for 1 to 2 hours on a wire rack. Refrigerate within 2 hours; cover for longer storage.

Nutrition Facts per serving: 477 cal., 29 g total fat (11g sat. fat), 122 mg chol., 295 mg sodium, 46 g carbo., 2 g fiber, 10 g pro. Daily Values: 103% vit. A, 4% vit. C, 12% calcium, 17% iron

At first I wasn't going to use the pecan topping but then I decided to since I had extra from the pecan pie and it was delicious alhumduliah!


Oh ya... and I didn't have a pie pan and I wanted to give my friend her pan back so I made a square pie! LOL

Thursday, November 13, 2008

Something Milky, Something Cold, Something Mexican...


I have eyed this recipe for the longest time, but I always put it back in the recipe box, intending to try it some 'other' time. So there it sat, in my recipe box, among my other handwritten recipes, lovingly yet arduously copied manually, by hand, at night, after the three kiddoes entered la la land. This was during the times when I was a young mother of three children under the age of 3. My days were exhausting, but my interest in baking, cake decorating, sewing, and cooking was equally high, thereby pushing me to check out cookbooks upon cookbooks from the public library. On the couch I would sit, and I would pick out recipes that appealed to me. Like a good student, (alhamdulillah my college days were over then) I sat and copied the recipes on index cards, which now fills two big 4 x 6 index card containers and 1 3x5 index card container. There are still some recipes that I haven't yet tried to this day, but alhamdulillah I did end up trying this recipe; the Three Milks Cake: Tres Leche, a dessert famous in Latin America. Although it took me about 5 to 6 years to finally try it.

Who would have thought that a simple cake doused generously in three kinds of milk, slathered with whipped cream, and refrigerated, would taste so divinely like ice cream?

Tres Leche: 'Three Milks' Cake


1 1/2 C cake flour
1 tsp baking powder
1 C sugar
1/2 C butter softened
5 eggs
1/2 tsp vanilla
1/3 C milk

Milk Syrup:
1 C sweetened condensed milk
1 C evaporated milk
1 C whole milk


Topping:
1 C heavy cream
1 tsp sugar
1/2 tsp vanilla
Preheat oven to 350 F. Prepare a 7 x 11 x 2 cake pan by lining it with parchment paper and greasing the bottom and side with butter and then coating lightly with flour. Or you could just spray the lined pan with Baker's Joy.

Cake:

  1. Sift cake flour and baking powder
  2. Cream butter and sugar. Add eggs and vanilla till foamy
  3. Fold in dry ingredients alternately with milk in three additions
  4. Bake on middle rack for 30 minutes
  5. Cool in pan on rack 20 minutes
  6. Invert onto platter (I used a 13 x 9 pyrex dish, slightly bigger than the cake)
  7. Pierce cake all over with fork. Let cool completely.
Milk syrup:
  1. Whisk to combine; condensed milk, evaporated milk, and whole milk
  2. Pour over cake and refrigerate covered at least 3 hours(the milk will be absorbed by the cake and seep in through the pierced holes)
Topping:
  1. Beat heavy cream till it thickens
  2. Add sugar and vanilla till stiff peaks form
  3. Slather topping over cake when ready
It may look like a normal butter cake with whipped cream as topping, but trust me, it doesn't taste like one. It tastes better!


Cook's notes:

  • Unfortunately, I don't remember where I attained this recipe, but it's not my own.
  • Make sure the platter has sides, because the milks will require containment before they're absorbed by the cake.
  • Make sure you do use the pan size specified above, because if you use a bigger pan, your cake will be too thin, and if you use a smaller pan, your cake might rise and deflate, or overflow. In my Joy of Cooking, there is a chart for the capacity of different cake pans, that is really a boon when it comes to wondering if a different sized cake pan will do for a recipe that specifies another. Unfortunately, that book is already safely packed away, but there are some resources on the net. Here is a list of some of them:

Home Baking Association


Monday, November 10, 2008

When We Went Raspberry Picking...


One year, we went strawberry picking with the Malaysians. When the next summer came, I wanted to pick something else. So I suggested raspberries. I didn't know what raspberry plants look like.

It was a picking I don't want to go through again, at least not in that kind of weather. We were drenched with sweat under the sweltering heat, and those raspberries, they're too small that it felt like forever to fill our baskets.

Nevertheless, we did return home with pounds of fresh raspberries, which in turn, gave me a whole afternoon of bustling in the kitchen. I grabbed some recipe pamphlets from the Farm, and on the way home, started planning what I was going to with those raspberries before they go bad.


I made raspberry puree and froze them for my future cake creations. I made raspberry roll, and I made Raspberry Cream Cheese Coffee Cake, which we ended up giving to the Malaysian brothers because we had too mych raspberry baked goods in the house by the time I was done. By the time I was done, I was also completely exhausted, but it was worth it, because hubby came back from the brothers' house with a clean dish. He said the brothers loved it.

For a while, I thought I had lost the recipe, and while the kids and I were looking at the photos, my oldest daughter said,

You have to make this again," pointing at the photo of this Raspberry Cream Cheese Coffee Cake.

I told her, "I don't know where the recipe is."

But, today, as I was sorting out my recipe box while packing, I found it.

"I found it!" I exclaimed.

"You can make it then," she replied.

"No, raspberries are expensive."

"Do they have raspberry picking in New Mexico?" my younger daughter asked.

"No."

"In Malaysia?"

I chuckled to myself before saying, "No."

Poor kids.

So I guess we'll make it when the opportunity arises, inshaallah.


Raspberry Cream Cheese Coffee Cake


Filling:

12 oz cream cheese, softened/at room temperature
1/3 C sugar
1 egg
1 Tbs lemon juice
1 tsp vanilla


Streusel:
1/2 C (1 8 oz stick) butter, softened/at room temperature
1 C sugar
2/3 C all purpose flour
1 1/2 tsp ground cinnamon
1/4 tsp salt


Batter:
1/2 C (1 8 oz stick) butter, softened/romm temperature
1 1/4 C sugar
2 eggs
2 tsp vanilla
4 C all purpose flour
1 Tbs + 1 tsp baking powder
1 tsp salt
1 C milk
3 C fresh raspberries


  1. Preheat oven to 375 F
  2. Butter a 13x9 glass oven proof dish

Filling:

  1. Cream cream cheese and sugar
  2. Add egg, lemon juice, and vanilla
Streusel:
1. Blend butter, sugar, flour, cinnamon, and salt

Batter:
  1. Beat butter and sugar
  2. Beat in eggs, and vanilla till light
  3. Whisk flour and baking powder and salt
  4. *Add the flour mixture slowly to batter in 3 additions, alternating with milk **Fold in raspberries gently
  5. Spread 2 1/2 cups batter in the dish
  6. Spread filling evenly on top
  7. Drop spoonfuls of remaining batter on filling
  8. Spread evenly, sprinkle streusel over
  9. Bake on middle rack for 1 hour and 5 minutes or till golden
  10. Cool completely


Cook's Notes:

  • * For better mixing, the dry ingredients are added to the creamed butter alternately with the wet ingredients. The first addition would be the dry ingredients, 1/3 of it, then mix till combined, then 1/2 of the wet ingredients (in this case, milk) and mix again, then the dry ingredients, and so on. The last addition will be the dry ingredients.
  • ** Folding is not the same as mixing or stirring. Folding ensures that the air we have worked to hard to trap in the batter is not released by stirring.
  • I used an oven proof 13x9 oven proof glass dish. Use a 13x9 dish, oval or rectangular.
  • The reason why the cream cheese and butter were required to be at room temperature is so the mixing will be easier. Just take out the butter and cream cheese sometime way before you plan to make this so by the time you do, they will be at room temperature.
  • However, if you're in a rush, and don't want to wait for them to come to room temperature, or are afraid that if you wait, you will lose the motivation to make this at all (like what always happens to me, and I believe, my mom ;), just cream the cream cheese by itself with the mixer until it's soft, and the same with the butter.
  • It's also better if the eggs are also allowed to come to room temperature so you will get more volume. (There is a whole dos and don't related to cake making that I cannot elaborate on here, unfortunately).
  • A demo on folding (we're not talking laundry):


Well, I guess, we'll be waiting ages before we make this again, if we do return to Malaysia, unless we substitute something else for the raspberries that is. Hmm...maybe mangoes, mangosteen, jackfruits, guava, durian, rambutan...ohh...the possibilities!

Sunday, November 9, 2008

Double Chocolate Obama Cupcakes


My plan was to make double chocolate cupcakes and spell out 'Barack Obama 08' by writing on them with icing. Unfortunately, I didn't get everything on time, so I stuck with store bought chocolate icing. I made these the day before election night. Enjoy :)


I followed Rachael Ray's recipe which can be found here. (the only difference is I didn't make the icing recipe on the site- I stuck with store bought Betty Crocker chocolate icing.)

Wednesday, November 5, 2008

Resurrecting Qabeelat Hayl - Fall '06

Hayl al Awwal, Hayl At-Thaani. No, I'm not talking about the Islamic months. I'm talking about the student body of AlMaghrib institute in the 'cow-tipping' town of Columbus.


Hayl was born in 2004. Hayls' first Almaghrib class was in the spring of 2005, The Code Evolved, taught by Sheikh Yaser Birjas. However, by the beginning of 2006, we were shut down. We didn't meet the required number of students.


The qabeelah on wheels was born. Ann Arbor, Maryland, Detroit, Indianapolis, Chicago. If we had walked, we'd probably be following in Baqiyy's footsteps.


After being bashed mercilessly by Ustadh Muhammad Alshareef in Chicago, we, the sensitive and 'emotional' sisters, took it personally and decided to do something about it. Of course when our emotions left us, we realized the wisdom behind the bashing.


The action plan was born. The promos began. There was buzzing all around, and we were gettin' down to business! I was by then in my first going into the second trimester (did I tell you that my baking frenzy always strike during my pregnancies?). The Haylsters (that's Hayl sisters) were busy preparing for the Promo down at Columbus State. Since I was partially incapacitated by pregnancy, they didn't let me do much, but they didn't know how stubborn I can be.

I told them I had a surprise, inshaallah. It was to be my first ever mass cuppies, all 200 of them. AlMaghrib junood I call 'em: standing proudly with their Almaghrib purple armor, bearing their liwaa flags with the word 'AlMaghrib'.

Those flags by the way, were hastily handwritten, with much love, I might add, by a pregnant woman whose common sense had belied her. She could have asked her husband to print out the AlMaghrib logo, all 200 of them, for the cuppies, but instead, she ordered her children to help her do it the hard way.

She measured the sizes of those little flags. She scrutinized the AlMaghrib logo to figure out the font, and she tried writing it out on paper. It was not easy. She tried again. That sun was one heaven of a thingamajig to draw! But she tried again. After many tries, she got it.

She took a deep breath, sat down, gathered all the colored papers on which she had precisely measured and gridded, and set to work. She wrote, drew, and wrote and drew, until her husband turned to look at her, tsk, tsked, and remarked,


"You're out of your mind."


200 of them. She was going to make 200 of those little flags, by hand, and time was running out. But he knew enough to leave her alone. She can be crazy when it comes to one of her creative strikes. Before long, she has mastered the font and logo, that she could probably do it in her sleep. Yet, she fell short of 200, but she made do. Each flag, she traced with highlighters, pink and blue, mostly, to cover the flaws in her handwritten logos.


On D day, the cuppies were ready, all gussied up, bearing their homemade flags. Worried they might slide and bump into each other in their expansive cuppy boxes, she had her children pipe dots of royal icing on the bottom of each cuppy and stick them in their place in the boxes. Of course, the boxes were lined with aluminum foil, so it'd look nice (also rendering the boxes reusable).

Logictics problem: her fridge wasn't big enough to hold two huge boxes of AlMaghrib junood cuppies.

Solution: the van. The temperature outside was in the forties, perfect fridge temperature. Her husband helped her put those cuppies in the van, and in the van they remained until the time of the promo.

The ride to Columbus State (the site of the promo) was excruciating. Every bump, turn, and stop was unbearable, and no, she was not in labor. Her little cuppies, her little babies, all 200 of them had to stay intact. They just had to! Alhamdulillah, they did. Those little AlMaghrib junood behaved very well, remained in their respective places, and lowered her heartbeat and blood pressure upon frantic checking on arrival.


These cuppies were baked, decorated, and flagged by a pregnant woman who was crazy enough to attempt making 200 (and more) decorated cupcakes, thinking at the back of her mind,

Let's see if I can pull this off. If I can, it would help when I make a decision to open a cupcake business in Malaysia.

And the flags were actually a last minute idea (the reason why she couldn't have them printed, which turned out for the best anyway), since she couldn't find anything at the Cake Craft store to represent AlMaghrib. So they had to be customized.

That, my friends, is the story of the Almaghrib cuppies, lovingly baked, decorated, and agonized over by an AlMaghriber, an auntie Haylster who is about to leave her beloved Haylsters for she doesn't know where soon.

And no, I haven't attempted making anymore cuppies since then. I'm waiting for some Obama ones.

Got Hayl?

Monday, November 3, 2008

Halal Jello


Ever since my toddler's allergies were diagnosed, I started an allergy free diet because I am still nursing him. Wheat free, egg free, dairy free, soy free, and peanut free it was. It was not easy. I craved ice cream, I mourned over baked goods, I missed bread, I eyed the bottle of soy sauce with ardent longing.

Now, I'm much better at doing without food that has all the above allergens, and like all mothers to allergic children, I have come to terms with eating allergy free food. In my quest for munchable snacks, I turned to a kind of dessert that I used to eat with gusto when I was a child.

Agar-agar is derived from seaweed. It can also be a substitute for eggs in some cases, and when cooked and cooled, is akin to the western Jello, though I would say that the jello has a different texture. Nevertheless, I call agar-agar Halal Jello. Now let's not open that can of worm, shall we? ;)

When I first came to the United States, I didn't know how to cook, much less make a simple agar-agar dessert (which is very simple by the way). I remember my roommate pouring about a teaspoon of the boiled liquidy agar-agar into a bowl and chucking it into the freezer. I simply looked on, curious. She then took it out and lo and behold, the agar-agar had cooled to a firm jelly-like miniscule slab. We tested it...in our mouth. It was too hard (if I remember it correctly), so we added more water to the boiling agar-agar mixture on the stove and kept stirring.

I seldom make this dessert, but after the allergies, I started making it. But I remember the hassle of this checking process, so I took the trouble to take measurements when I made them. So, I needed only to use the freezer for this in the very beginning, and from thereon after, I kept my measurements for easier future reference.

This is really a nice dish to play around with, in terms of flavoring and design. I guess, it can be categorized as one of those 'cool edible kitchen experiments'. You can also add eggs to the boiling mixture, and produce a rich, interesting textured agar-agar, but since I couldn't take eggs, I experimented only with coconut milk and flavoring. In this case, I decided to make it caramel, after enjoying Shida's delish caramel agar-agar once, a long time ago.

I had the kids brainstorm a name for this particular agar-agar I whipped up, and because of the color, they came up with Cougar (due to the color and the 'gar' in it, for agar-agar). So, Cougar it was.


Cougar


8 cups water
2 cups (1 13.5 fl oz can) coconut milk (I use Chaokoh brand)
1 45g packet of agar-agar
1 cup granulated sugar
3/4 cup palm sugar/dark brown sugar
1 Pandan leaf (screwpine leaf) tied into a knot

  1. Bring 8 cups of water to a vigorous boil.
  2. Add the palm/dark brown sugar, and stir till dissolved

  3. Stir it occasionally. Agar-agar should begin to dissolve.

  4. Meanwhile, make dry caramel (a very informative article on it by David Lebovitz) by cooking the granulated sugar in a saucepan on medium heat. Keep an eye on it because the sugar will melt and turn brown. Stir till sugar turns into a dark amber colored liquid. Quickly take the saucepan off the burner to stop it from burning.

  5. Stir the mixture when the hissing stops. (You can come closer to the pot now), Add in the knotted pandan leaf.

  6. Pour in the coconut milk. Stir till combined, for about 5-7 minutes.

  7. Pour into your desired dish/pan/mould through a fine sieve.

  8. Let cool so it can harden.

  9. Cut into desired shapes.


Cook's Notes:


  • You can use any dish/mould. Malaysians like to use interesting moulds to create interesting shaped agar-agar. I simply used my pyrex dish. You can also use fancy knives or cookie cutters to cut them into interesting shapes if you want.


  • If you do use a mould, gently slide a spread knife to slide it out of the mould onto a plate. Make sure you have the plate ready, or you might be chasing a runaway wobbly agar-agar on your table or worse yet, your kitchen floor! (thanks to my imagination)


  • Wonderingn how to clean that dirty sieve? Well, you may want to put the sieve under running cold water so the remaining agar-agar would cool and harden, and you can just peel it off before washing your sieve.


  • The Pandan leaf adds fragrance to the agar-agar. Omitting it would be akin to omitting vanilla essence, so do without it if you don't have any.


  • If you cook the mixture too long after pouring in the coconut milk, you might not get the two layered look in the picture above, but the taste will still be the same though.


Feast your eyes on these amazing agar-agar creations:

Lily Wai Sek Hong's Rainbow Agar-Agar
This agar-agar was sliced with what my kids would call a 'fancy' knife, hence the scalloped sides.

Lily's Wai Sek Hong's Agar-Agar Batik
This agar-agar depicts a batik pattern, a an artform mastered by the Indonesians and I would also say some Malaysians of the East Coastern regions.

Rose's Pandan Custard Agar-Agar from Rose's Kitchen

jthorge's Agar-Agar Talam from Jthorge's Kitchen

Boo_licious's entry: A plethora of fancy creations! from Masak-Masak
This Ramadan Bazaar takes place in hubby's old neighborhood too!

e's joie's Milo Agar-Agar from e's joie

Gifst From the Kitchen's Watermelon Shaped Pudding

Delicious Thai Agar-Agar from My Baking and Cooking Passion

Green Agar-Agar Made by a 13 year-old boy! from Food Haven


So what are you waiting for? Head on to the nearest Asian grocery store and purchase a packet of agar-agar, and let the cool kitchen creation begin!

Sunday, November 2, 2008

No Bake Cake


When my Egyptian friend served us this creamy and very rich dessert, she served it in a glass casserole dish. When I asked her if it had a name, she just shrugged and said no. Curious, I spooned a scoop on my plate. To be honest, the blob on my plate didn’t look too appetizing. It was creamy white with light brown lines making haphazard patterns.

As soon as it hit my taste buds, my senses went wild with ecstasy. Okay, maybe that’s taking it too far, but it tasted rather like very creamy ice cream. It was chilled. The texture was akin to a moist, fluffy cake. I started with a scoop, but I found myself getting second, third and maybe fourth helpings of it. I couldn’t believe something so uncontoured, unrefined, and with no name, could taste so good.


I asked her how she made it. She showed me the two main ingredients: the tea biscuit (ULKER) and the Nestle table cream.
I took her instructions and modified it to produce something that is somewhat pleasing to look at. I was excited at the thought. However, that table cream is not too cheap around here, so we limited the frequency of making this chilled dessert with no name. Of course once I set to work, I set the kids to work too.


“We need to name this, kids. What do you think we should call it?”


I don’t remember what transpired after that question, but eventually we ended up with Biscake, as it is basically made from biscuits, but tastes like cake.


I have to warn those who are taking this recipe though. I am not a skilled recipe-maker. I have tried jotting down the exact amount of ingredients needed, but they sometimes vary each time, so make sure you have extra ingredients just in case. I have had to send hubby to the store to get more cans of table cream in the midst of making the Biscake.


Ingredients:

1 packet of the Ulker tea biscuits
3/4 cans of Nestle table cream
1-2 tablespoons sweetened condensed milk
a cake pan with removable bottom (springform pan), or any container

1. Pour all contents of table cream cans into a big bowl
2. Add in the sweetened condensed milk and stir till thoroughly combined
3. Dip each biscuit in the cream, making sure to have it thoroughly coated
4. Arrange biscuits in container/cake pan, creating your own design
5. Cover and chill overnight
6. When ready to serve, depending on what container it’s made in, it can be scooped out or presented as a cake (if using the cake pan with removable bottom

*I was into cake decorating. Well, I still am, except I don’t do it anymore due to complicated logistics. So when I was about to modify the recipe, my mind sought to make it such that I could utilize the arrangements of the biscuits to create a design. I also figured that I could use my pans with removable bottom so I could serve it like a cake rather than serving it like ice cream or pudding. Just the thought of that would-be design sent shivers of excitement up my fingers.

So if you do use a pan with removable bottom, when you are about to take the ‘cake’ out, run a knife along the sides of the pan, and loosen the sides of the pan so the cake is left resting on the bottom of the pan. And voila! You have a beautiful masterpiece!
As I was browsing in the ‘Halal’ store, I noticed a chocolate version of the Ulker tea biscuits. The possibilities of designs gushed like a river went wild through my mind. Unfortunately, I have yet to try it out, and seeing how I can’t even consume dairy now, I don’t know when that will be.
This post was an old post of mine on another blog. I haven't made this for ages now, but my kids have. Recently, they made it for my MIL, all by themselves. So that tells you that it's a pretty simple recipe to follow.

Rice Pudding


There are about a million different ways to make rice pudding. Each culture adds their own flavor and style. This is a very basic Middle Eastern style recipe and what I grew up with. It is easy to make and can be adapted to one's own taste.

You will need:
2 cups short* grain rice rinsed well
6 cups of water
8 cups of milk
1/2 - 1 cup of sugar depending on taste
1 teaspoon Rose water (optional)

Garnishs or additional add-ins:
Orange Blossom Water*
Chopped Pistachios or other nuts
Cinnamon and/or Coconut
Sprinkles (for the kids!)

Directions:

1. In a medium saucepan combine the rice and water and cook until done. Drain water.
2. While the rice is cooking put the milk in a large pot and bring to a boil, taking care not to burn it.
3. Once the rice is cooked and the milk is boiling, add the rice to the milk and continue stirring for about 15-20 minutes or until the pudding has thickened to desired consistency.
4. Stir in sugar and rose water.
5. Put the pudding into individual serving bowls or one large container. Allow to cool for some time and then transfer to the refridgerator to chill*.
6. Garnish and enjoy!

*Notes
- Long grain may be used as well but I prefer short.
- May be eaten warm or cold.
- Do not use both rose and orange blossom water together. Choose one or the other.