Showing posts with label Snacks. Show all posts

Sunday, January 3, 2010

The Ch. Whatzisname?

We both stood in silence in the kitchen, both trying to coax the darn name of the thingamajig from our apparently dormant Malaysian brains, or should I say, fake Malaysian brains.

I have been thinking of this Malaysian snack. I miss it. This snack is one of those things that can be easily whipped up. Good for when company drops by unexpectedly or at short notice. These deep fried fritters can be unhealthy if eaten on a daily or even weekly basis, but once in a while, it is a treat, especially for those who live in foreign lands (outside Asia). That is one reason I think I have forgotten what it's called, because I hate deep frying, and because whenever I have made this snack in the past, it turned out tough. So eventually I gave up making it. It's not worth it to slave over hot oil on the stove top only to produce little rocks that test the mettle of your jaw muscles. And I think, hubs probably forgot its name because I make it once in every 5 years (or 8).

He had asked the kids if they were making pancakes for breakfast, and I chimed in,

"I'm making cekodok here!"

I was cleaning a bowl of little dried anchovies because he likes his anchovies cleaned. He is not fussy about everything else, but his anchovies, oh, they have to be cleaned. So cleaned them I did.

"Cekodok? That's not cekodok. We don't have bananas. That's not what it's called!" hubs retorted.

"I know. I can't remember what it's called. Somehow I knew cekodok sounded wrong, but it's not jemput-jemput. So what is it?" I asked, admitting defeat.

And that's when a wave of shameful silence swept over us. Such an embarrassment to our fellow Malaysians. I guess that's what happens when you live overseas for so long, and you do not really strictly adhere to your culture like how magnet sticks to metal. The fact that hubs (who is usually more Malay than I am, and makes fun of me for not being Malay enough) also forgot, is a terrible sign. We are both horribly floating away from our Malaysian roots. We already have trouble remembering what certain Malaysian dishes or food item are supposed to taste like, and now this. I think we've gone over the limit. We need to go back for a visit very soon.

He finally left the kitchen and went back to his Arabic assignment, while I continued working in the kitchen, still trying to recall the dang darned name. And all of a sudden, the rusty wheels started turning, clanging and clonking all the way.

Ch...Ch...Ch...Choo...Choo...Choochor....

"Cucur!" I exclaimed.

"That's what it is!"

I am still Malaysian after all! Hah! I beat hubs on this one.

And that's what it's called; Cucur. There are many different kinds of Cucur. Cucur Ikan Bilis, Cucur Bawang, Cucur Udang. Let me translate that. Anchovy Cucur, Onion Cucur, Shrimp Cucur.

It's basically fried dollops of batter made of flour, water, salt, egg (though some may omit this) and whatever you decide to dump in, either anchovies, chopped shrimps or plain chopped/sliced onions. It's formation is somewhat akin to the formation of Jemput-Jemput Pisang, but the ingredients are completely different. And for the one that I made this morning, I utilized the little baking know-how I've gained over the years to fend off the rocky versions of my past Cucur, hence the addition of eggs (to give it more air), milk (to make it tender) and baking powder.

The oil needs to be hot. We Malaysians do not measure the temperature of our oil, so unfortunately I can't say what temperature the oil should be at, but I'm guessing 375 Fahrenheit or 350. What I usually do is observe three things with regard to the oil so know if it's hot enough or not; the viscosity (the hotter it is the more viscous it is), the silence (the more silent it is, the hotter it is) and how hot it feels to your palm when you hover your palm about 3-4 inches above the oil's surface. When in doubt, I'd drop a small piece of whatever is supposed to be fried in the oil, and if it sizzles beautifully, it's ready. If not, either you will end up with a sticky problem or your to-be fried item cooperates as you prod it and you can fish it back out and let the oil heat up a little bit more. Not much help, I know. Sorry.

Because I am a blameworthy perfectionist, I can go crazy if my Cucur are not formed properly. Same goes with my Jemput-Jemput Pisang. I don't like them too big (and since I put in baking powder, it will double in size) so I use two teaspoons to form the Cucur dollops. I hold one spoon in each hand, and because I am right handed, I scoop the batter with my right spoon, pour it onto the left spoon, flip my now empty right spoon upside down and smooth the batter in the left spoon with the right spoon, curved side facing down. Basically, I am making a rounded shape on the left spoon and I swipe off any dangling bits of batter hanging off the left spoon. Then, very carefully and gently, I hold the left spoon over the hot oil, very close to the hot oil, and slide the rounded dollop off the left spoon with the right spoon. The batter should slide pretty easily and submissively into the hot oil. Ahhh...you can't even hear a plop. Once drowned in the hot oil, the baking powder, the little air beaten into the egg, and everything liquid and dry together perform the chemical performance they're meant to perform. The dollop rises as the chemical concert fill its surrounding with wonderful gas (no, not the far-tey kind), expanding the molecules inside the batter, very much like what happens to a cake batter in the oven.

However, because I used a flat frying pan as opposed to a deep rounded bottom wok, the shapes of my Cucur are not that rounded. Instead, they have this distorted hourglass look because the part of the batter underneath the surface of the oil expands, and pushes the top part above the oil level, resulting in a pinched middle. Because I was too cheap to use the wok for fear of using up too much oil, I guess I have to live with that shape. I am a perfectionist, but not an extreme one.

By the way, a friend of mine, a Malay, living in Malaysia, says that she calls everything cekodok (every deep fried dollop that is) and that Cucur, in her family's vocabulary, refers to something else. So...I guess, maybe I wasn't that far off from what I meant to say. Yeah right! I guess to Kuala Lumpurians, we refer to this particular snack as Cucur, so I still am an embarrassment to my fellow Kuala Lumpurians at the very least. Malaysia is a pretty diverse country, very multicultural and even among the Malays, the names of food item can be pretty mixed up and can get confusing as you go from state to state. It's a beautiful thing, really. It's like pop and soda in the United States.

Cucur


3 cups all purpose flour
salt
1 tsp baking powder
1/4 tsp turmeric powder/ground turmeric
3 stalks green onion, sliced
about 1 cup cleaned anchovies
1/4-1/2 C sliced red onion/4-5 small shallots
1 egg
1/2 C milk
3/4 - 1 C warm/hot water


1. Combine flour, baking powder, turmeric, salt, green onions, anchovies in bowl
2. Lightly beat the egg with a fork
3. Combine egg with milk and water
4. Slowly add the wet ingredients to the dry ingredients and stir with a wooden spoon until a slightly watery batter results. Its consistency is thicker than pancake batter, but not too thick like peanut butter.
5. Make sure the oil is hot (read above, in bold and italicized)
6. Form the dollops using the method described above (in bold) or simply scoop the batter with a teaspoon and drop it in the hot oil. (It's not complicated. I just love making things complicated. My husband can attest to this)
7. Do not overcrowd the pan , so place just enough dollops in the pan to keep the oil temperature stable because if the temperature drops, your dollops might stick to the pan, and even worse, those dollops will absorb a lot of the oil
7. When the bottom side is golden brown, flip the darned dollops
8. Once evenly browned, lift and drain on wads of kitchen paper towel or strainer. I'd say strainer is your best bet to further cut down on the evils of deep-fried food
9. Enjoy with tomato ketchup or chilli sauce


Break one open while it's still hot. As you do so, wisps of steam will gush out from the depths of the Cucur. Right before your eyes, (if you haven't yet popped it inside your mouth) the treasures within the Cucur greet you; the emerald green onions, rubies red onions, and golden anchovy tails, all wonderfully embedded in the saffron yellow of the soft Cucur. Sink your teeth in it. Delight in the medley of experience taking place on your tongue. Your taste buds and olfactory senses are texting each other.

"WCKD!"

Sunday, July 26, 2009

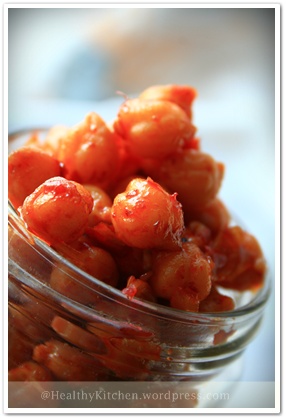
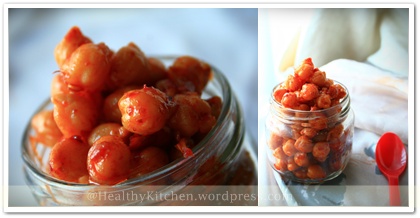
Spicy Chickpeas Snack

Spicy Chickpeas

Has anyone ever tried this snack before ? This spicy chickpea was one of my favorite snack when I was a kid and it still is. Love for the hot and spicy flavor with hint of sweetness from caramelized sugar or sometimes honey. This not greasy spicy snack is super easy to make with great result at the end. You will definitely love it as much as I do.

It’s a big bonus for allergy people who loves spicy and can do legumes, this should be on the list snack you want to try too.

chickpeas snack

Spicy Chickpeas ( makes 5 cups)

Ingredients:

  • 1 bag/ 1 lbs/ 16 oz / 453 grams dried chickpeas

- In a large bowl with enough water to cover , soak the chickpeas overnight, 8-12 hours. By the time,the size of each chickpea will expand due to liquid it absorbs and the texture is softened a little bit.

- In a large pot, pour the soaked chickpeas and fill with enough water to cover the top level of chickpeas.. add a little more water would be great.

- On a medium high heat, boil the beans until cooked and tender but not fall apart, it still quite firm in texture. Add pinch of salt while simmering to add flavor to the beans. Drain the cooked beans , let all liquid drained out and set aside.

Ingredients for the spicy goo:

  • 3 Tablespoons minced shallots or chopped yellow onions
  • 1 clove garlic, chopped
  • 3 Tablespoons chili paste ( depending on how much heat you desire)
  • 3 Tablespoons honey / brown sugar
  • 1 teaspoon white sugar ( optional)
  • 2 teaspoons white vinegar or lime juice
  • Salt, to taste
  • 2 Tablespoons canola oil or other cooking oil

Methods:

1- In a medium wok, drizzle the canola oil. Heat the oil up on a medium heat.

2- Sautee the onions and garlic until fragrant and translucent.

3- Add in chili paste and let it browned slightly and fragrant.

4- Stir in honey, sugar , salt and white vinegar / lime juice . Simmer until the oil separated and appears on top.

5- Add the drained cooked chickpeas, toss it up to well combined on heat for another 5 minutes.

6- Remove from heat and enjoy.

Storing : Keep in a cleaned and dry container for up to 2-3 days at room temperature , up to 2 weeks in the refrigerator.

Thursday, July 23, 2009

I Can Be A Mamak!


I wonder about the origin of Murtabak, just as I began to write this post. Hubby's theory was that this food item was a fusion of Indian and Malay cuisines, as the dough that is used is the dough used to make Roti Canai, which is an innovation and modification made to the Indian paratha or normal roti by the Indians who migrated to Malaysia. As for me, I have no opinions whatsoever about the origin of this food item, that is until I began to do a word play on it, in my mind. Let's just say that taking Taleem Quran with Al Huda has predisposed one to get to dissect words to get to the root words. Call it an obsession if you will. Raw Ta Ba. I know urattibu means to tidy up, or arrange, so it could be something to do with the way the Murtabak is folded. A little googling found me the answer. Voila!

I always feared attempting making Roti Canai, because the stretching process is, I have to say, intimidating. You know how the experts throw the pizza discs high up in the air? Well, the Roti Canai experts do the same thing with thinned Roti Canai dough, so much so that they end up with very thin translucent sheets of dough that is later twirled, flattened, slapped, fried and again slapped to produce crispy yet pliable not to mention flaky rotis that are Roti Canai, one of Malaysia's popular breakfast item. I love eating Roti Canai with sugar and of course the usual dhall curry accompaniment, topped with a dollop of spicy Sambal. Ahh..those were the days...when I didn't have to scour through online recipes just so I can eat one.

Well, finally, I gathered enough courage to actually attempt making Roti Canai while hubby was away in Washington D.C. I wanted to use my mother's recipe, but there was one detail missing and I didn't have time to wait for her to reply (because of the time difference) so I used a recipe from Dari Dapur Maisya. I had been googling for a Roti Canai recipe, and to be honest, after my experience of following Malaysian recipes in the past, I don't place too much trust in them. So I spent quite some time carefully reading the recipes. However, I love Maisya's tips section, and decided that I should trust her. I'm glad I did. The dough was very forgiving and wonderfully fun to work with!

No, I didn't have to throw the thinned dough in midair while twirling it, because thanks to my mother, I have a set of organized and well explained instructions to follow with regards to working with the roti canai dough. And I am darn serious about her instructions being organized and particularly well explained. Being meticulous is a huge plus in recipe writing, and my mother is pretty meticulous, alhamdulillah.

My Roti Canai attempt eventually gave birth to Roti Telur and Murtabak. Suffice it to say, I was overjoyed with the end results! It did take me hours to make it, but like being in labor with a forthcoming baby, (I know I keep coming up with the same analogy, but being a mother of multiples does that to you, you know) the end result is so beautifully worth it, that I didn't quite mind wiping up the trail of oil drips from the dining table (my work place) to the stove, not to mention spewing out some elbow 'grease' (no pun intended). However, it was not a sole effort, as I had to harness my kids' energy. My 9 year old son Hza was my Murtabak frier and flipper. He took turns with my eldest daughter Skee.


Murtabak Filling

1 lbs ground beef
1 medium-large onion/5 - 7 shallots, chopped
4 -5 garlic cloves, minced
3 - 5 Tbs curry powder (add enough water to make a wet paste)
2 -3 Tbs chilli paste
1 tsp sesame oil
2 - 3 whole cloves
2 -3 star anise
1 cinnamon stick
2 -3 sprigs of parsley, chopped
salt to taste
3 - 5 Tbs oil
2 eggs lightly beaten

1. Heat oil and saute onion and garlic till fragrant.
2. Add chilli paste, wet curry powder paste, whole cloves, star anise, cinnamon stick, and continue sauteing until oil breaks the surface (about 5- 7 minutes) over medium fire
3. Add ground beef and cook till ground beef are cooked through. Add salt to taste
4. Drizzle with sesame oil just before you turn off the stove and stir.
5. Toss in chopped parsley and stir.
6. Cool completely. Fish out the whole spices unless you don't mind biting into them later on.
7. Add the beaten eggs to the cooled ground beef filling and stir thoroughly

Notes
:
  • You can pretty much add anything else you want such as soy sauce. The only reason I didn't was because I wanted to use this filling for Zeyoudee's calzone too, and soy sauce has wheat.
  • The basic flavoring is the spiciness from the curry powder and chilli paste and some sweetness from soy sauce (but we did fine with sesame oil. Not sweet, but it gives it that Asian fragrance).


Roti Canai Dough, courtesy of Maisya and Mr. Niceghost

3 C all purpose flour
1 - 1 1/2 C water (look at Notes)
1 Tbs margarine
2 Tbs sweetened condensed milk
1 Tbs cooking oil
salt

1. Combine water, sweetened condensed milk, and salt and stir to mix
2. Dump all the flour in a big bowl (if mixing by hand) and in your mixer bowl if using a stand up mixer
3. If mixing by hand, gradually add the water mixture to the flour. If using stand mixer, add all the water mixture to the flour
4. Add in the margarine and cooking oil, and knead till you get a smooth and elastic dough. One way of knowing if it's elastic enough is to make a 1-2 inch indentation in the dough. If it springs back, it's ready.
5. Cover dough with a damp cloth and let rest for 30 minutes
6. Pinch of small pieces of the dough (75 - 90 gm each) and make into small balls. You should get 10 small dough balls from this recipe.
7. Coat each ball with margarine, or alternately, you can submerge all these balls in cooking oil in a wide bottomed bowl for 2 hours or overnight in the fridge.

Notes:

...all courtesy of Maisya from Dari Dapur Maisya. I was overjoyed to find these tips!


  • If you want the Roti Canai dough to be deliciously pliable after cooking, use cooking oil in the dough
  • If you want it crispy, use sugar or sweetened condensed milk in the dough
  • If you want the dough to remain soft and pliable throughout the day, use cold or ice water

To shape into Murtabak:

...all courtesy of my mother from Cherry on a Cake. I was overjoyed to find these instructions!


1. Clean and liberally oil your work area (make sure it's a big one, you will need the space, trust me). It can be your dining table, or even the back of a huge flat serving platter.
2. Oil your hands generously to avoid as much friction between the dough and your hands. Take one ball and evenly smooth it out to a flat circular disc, much like a pizza dough.

Do this by pressing it gently with your palms and fingers. The more oily your hands are, the easier.
3. Continue doing this until the disc is about 1/4 inch thick, and then begin to lift the edge and gently stretch it. Don't worry if you happen to tear it. Only worry if you tear it right smack in the middle. If you do, please start again. Or, you can do some innovative repairs by placing the Murtabak filling somewhere else. You'll figure it out. But either way, stretch it till it's paper thin or like in the photo below.


4. Take about 2 -3 tablespoons of the ground beef filling and place it in the center of the stretched dough.
5. Start wrapping it up as shown in the following photos, much like wrapping a parcel from four sides and tucking the last end under. Like I said, if you have tears where the filling is, try to wrap around it.
As you can clearly see, one of my wrapped Murtabak was 'holey', but it wasn't disastrous. So, if it happens, don't fret.


Frying the murtabak:

3 - 4 Tbs oil

1. Heat oil in wide flat pan. A long rectangular griddle would be perfect!
2. Gently place one wrapped murtabak in pan, or two or more if the pan is wide enough. Just don't overcrowd so as to make flipping a challenge.
3. Very gently, press the top of the murtabak flat with your spatula so as to disperse the filling evenly. The beaten egg inside needs to be cooked through.
4. Flip it when the underside is browned. Give it enough cooking time for the egg to be cooked through, about 3-5 minutes each side. Adjust the fire so it won't brown too quickly.


Serve with Chilli sauce, or eat as is.

Malaysians usually serve Murtabak with either one of two accompanying sauces, depending on where you are exactly in Malaysia; sweet pickled onion sporting a pinkish reddish hue, or spicy curry gravy.

Churros from New Mexico


I have made these only once before, when we were in Georgia. I don't even remember where I found the recipe, but it must have been from some cookbook I was actively checking out of the public libraries for years when there was time (relatively, now my lifestyle has changed).

Hubby is taking Spanish class this semester, and yesterday, they had a cultural event where everyone had to bring a dish of spanish origin. He had asked if I could make Flan. I had planned to make the flan the day before yesterday, but then realized that I didn't have any cans of sweetened condensed milk, so I made it yesterday.

Of course, being me, I simply had to torture myself and try and make somrthing else too. Actually, as I was browsing through my recipe box, looking for the caramel flan recipe, I came across this Churros recipe. That's how it all came about, as simple as the thought,

Hey, why don't I make Churros too? It's Spanish based too.

However, I still made the caramel flan as my back up, in case my Churros turns out to be horrors. I made two flans (one for us and one for the event), and I whipped up one recipe of Churros. Of course, again, being me, I googled Churros, out of increased curiosity. Hubby didn't even care enough to learn what it was that I made for him to bring yesterday (referring to the Churros), just like I don't care enough about anything to do with economics or finances. But I have passion for food (not necessarily for eating). Don't know if that's a good thing or a bad thing.

The dough for this Churros is very similar to making Choux Paste for eclairs or cream puffs. It's really easy and amazing to work with. You can't go wrong with it. While I was googling, I came across a teenager making Churros on Youtube. The only thing I worried about was butchering the shape of the Churros, though it can come in other shapes too. I vaguely remember having trouble stopping it from piping through when it was time to drop it in the hot oil. So I had Newr help me cut them with a kitchen knife. After a while, all the kids deserted me, so I was on my own.

Alhamdulillah for this Youtube video of a Chef making Churros though. He simply used his hand to stop the flow of the Churros dough.

I decided to do the same, because my Dessert Decorator doesn't really work all that perfectly such that I have to push the top part of it instead of just using the handle to push the dough through. As a result, both my hands were occupied.

At any rate, my Churros did turn out good enough to merit posting on this blog, alhamdulillah!


Churros

1 C water
1/2 tsp salt
1 Tbs sugar
1/2 C butter
1 C flour
4 eggs
oil
cinnamon
sugar


1. Heat water, salt, sugar, and butter on the stove top till butter melts
2. Bring to full boil. Then add flour all at once and beat (manually) till it becomes a thick and smooth battery dough. (Because the saucepan I used was too small, I transferred the hot liquid mixture to my KitchenAid mixer bowl and then poured the flour in that)
3. Continue beating 2 more minutes.
4. Add eggs one at a time, beating vigorously after each addition. I used the mixer, but you can do it manually too. Makes good bicep and triceps development.
5. The dough/batter should not be too runny like cake batter nor too tough like bread dough. It should be somewhere in between. Spoon the battery dough into a Dessert Decorator or a large pastry bag fitted with a large star tip (or you can use a normal round tip too, but your Churros will not have those beautiful ridges that make them characteristic of Churros)
6. Heat oil for deep frying, about 390 F. I simply estimated the temperature by placing my palm a few inches above it. if it feels quite hot, and the oil looks really viscous, it is ready.
7. Squeeze bag over the hot oil, letting out about 5 - 7 inches of ropes, or longer if you wish. Don't worry if the 'rope' curls like a candy cane or a horseshoe or even a spiral.Cut the piped rope either by pinching it off or cutting it with a pair of scissors. Don't worry, the hot oil does not spit.

Meanwhile prepare a dinner plate or a flat container with a mixture of sugar and ground cinnamon to roll the hot Churros in (measurements is up to you)
8. Fry till golden brown and roll them over so the Churros are lightly browned on both sides.


9. Drain the fried Churros on paper towels so the excess oil is absorbed. Then immediately roll these Churros in the sugar-cinnamon mixture until well coated.


They do look like a Malaysian snack called Cakoi. It has been a while since I ate any Cakoi. In fact I had trouble recalling the name, much to hubby's good humored disgust. I asked him yesterday if the Churros tasted anything like Cakoi, and he said that the Cakoi are more 'bready'. I had guessed as much. These Churros are crunchy on the outside and soft on the inside, somewhat like cream puffs.

So there you go...finally, something from New Mexico.

Tuesday, November 11, 2008

Allergy Free Banana Ball Fritters


If not for Zeyoudee's allergies and a sister's determination in conducting her own kitchen experiments (despite not having any problems with allergies herself), I might have never learned about the properties of different types of flours, the different function of eggs, and eventually be moved to hatch some recipes of my own in concocting something my little Zeyoudee can eat without breaking into hives and going into a fit of coughing and wheezing, alhamdulillah!

It took me a while to get used to eating baked goods made with rice flour, and getting used to drinking rice milk. Rice flour is particularly grainy and gritty, and the first time I ate pancakes I made using rice flour, I was quite disappointed. Brown rice flour though, makes a huge difference!

I had made this Jemput Jemput with white rice flour first, combined with buckwheat flour. It tasted like...rice flour. It was okay, but I decided to try making it with brown rice flour. And it tasted...better.


The only thing I had to deal with was that it would brown very quickly compared to the Jemput Jemput made with normal flour. And I think this probably has something to do with the color of the buckwheat flour, which is somewhat grayish. It also tends to be crispy on the outside, but very fluffy and soft on the inside.

There I was, evaluating and critiquing my allergy free version of Jemput Jemput Pisang, yet when we handed some to Zeyoodee, he joyfully stuffed them in his mouth, simply happy to have yet another new thing to eat. Crispy, fluffy, I don't think he cared. Alhamdulillah!

And alhamdulillah, we gave him something that had coconut milk (coconut is considered a tree nut) days before, and he didn't have any reactions. So that opened up more possibilities for him, and I was beyond elated. He will be a true Malaysian. That means, I have to learn to make these Malaysian desserts now, after avoiding them for years because I couldn't rely on Malaysian recipes that are usually simply written as recipes, as opposed to western cookbooks that also include the science of chemistry behind baking. Let's just say I'm kind of a geek when it comes to following recipes. I want to know the whys, hows, in addition to the recipes. In fact, I don't like it when a cookbook just has recipes but no explanations.

And thus, the Cake Bible, by Rose Levy Beranbaum, is one of my favorite and most treasured cookbooks. Recently I also discovered her blog, and I have to say, it's one of my greatest 'stumble upon' on the internet. Ahhh....however, I have moved from the world of baking to the world of baking/cooking allergy free, and my favorite allergy free site now, is Karina's Kitchen. But I still owe my first peek into the world science behind the baking to Rose's Cake Bible, among other cookbooks I have amassed throughout the years.


Zeyoudee's Jemput Jemput Pisang


2 bananas mashed
1/2 c brown rice flour
1/4 c buckwheat flour
1 tsp baking powder
1/4 - 1/2 cup coconut milk/rice milk
salt


1. Combine the above together till they make a thick batter
2. Heat oil for deep frying
3. Drop spoonfuls of the batter one by one
4. Turn over to brown the other side
5. Drain on paper towels

Cook's notes:

  • The brown rice flour has to be refrigerated once opened because it can go rancid pretty quickly.
  • For a truly allergy free version, use gluten free baking powder
  • Since it will brown very quickly, make sure to turn it as soon as it browns
  • Wait until the oil is really hot, otherwise it will stick

I know most people probably have no need for an allergy free version, but in case you know someone who has allergies, especially multiple allergies, this will be one of those rare pearls!

Thursday, November 6, 2008

Going Bananas!


Only after I got to know the Somalis in Columbus did I associate banana with the Somalis, because of the interesting fact that they eat their rice with bananas.

Bananas, all kinds of them, grow in abundance in Malaysia, and I really mean in abundance! When I was prescribed glasses, I devoutly, every single morning after Fajr, headed out to our orchard and struggled to get drops of fresh morning dews from the banana plants (just the banana plants, not tapioca, not durian, not anything else!) into my myopic eyes, as per my grandmother's prescription for curing my myopia. I can still feel the smoothness of the banana leaves, and I can still see those coveted pool of fresh dew breaking into glistening drops as they slid down the central stem of the banana leaf. I'm still myopic by the way, so no, it didn't work.

Since we have a lot of bananas, Malaysians have come up with many ways to eat it, but none of them includes eating it with rice. :) We have fried banana fritters, banana ball fritters, banana in sweet rich creamy sauce, ...err...well I guess that is about it, well at least those that I am aware of (and I'm not really an expert on Malaysian food, despite being Malaysian). You can find banana fritters being sold on the streets by hawkers, freshly fried and still steaming hot. It's usually served for tea when guests come to visit, since it's pretty easy to whip up last minute.


This version, called Jemput Jemput, in Malay (which directly translate to 'invite/tiny portions'). I wondered about the etymology of the name, and asked my husband.

His theory:

1. Because of its size, and the way it's made is by deep frying tiny portions

My theory:

1. It's easily whipped up for guests, and you tell them, "Jemput makan," (Please come and eat! The 'invite' version of the meaning)


Jemput Jemput Pisang (Banana Ball Fritters)


4 overripe bananas, mashed
1/2 cup coconut milk
1 tsp baking powder
1 3/4 cup flour
dash of salt


1. Combine the mashed bananas and coconut milk in a big bowl
2. Add the flour and baking powder and salt
3. Mix with a wooden spoon into a thick batter
4. Heat enough oil for deep frying, wait until it's really hot
5. Take one spoonful of batter, and using another spoon, swipe it neatly, as a ball into the hot oil
6. Turn it over when the bottom is light brown
7. Serve warm as a light sweet snack


Cook's notes:

  • Make sure the oil is hot before you drop your first banana ball in it. If it's not hot enough, the banana balls might stick, and it won't fluff up as much. I learned this the hard way.
  • Turn down the heat a tad if it browns too quickly.
  • Rule of thumb for deep frying: don't crowd the pan or the oil temperature will dip
  • Just like making pancakes, don't overmix the batter, or the gluten will overdevelop and make them tough.
  • Below is a how to video:


Check out other Jemput Jemput Pisang on the blogosphere:

Jthorge's Jemput Jemput Pisang on Jthorge's Kitchen

Brenda Tan's Jemput Jemput Pisang on Mum Loves Cooking

Beachlover's Jemput Jemput Pisang on Beachlover's Kitchen

Wednesday, November 5, 2008

Malawah


For those of you have been asking about the malawah recipe, here it is again. It was down temporarily. Enjoy :D

What you'll need

- 3 cups of all purpose flour
- 1 1/2 cups of milk
- 1/2 cup of water
- 2 eggs
- 1/4 cup of sugar
- 1 tsp of salt

Preparing the batter

Using an electric hand mixer, mix the above ingredients until the batter is smooth and free of chunks.

Preparing Malawah

1. Put a non stick pan on medium-high heat and grease if necessary
2. When the pan is hot, apply 1/4 cup of malawah onto the pan and spread it out in circular motions using a ladle


3. Peek under neath the malawah, when it appears to be golden brown, apply 1 tsp of butter

4. Spread the butter on the malawah and flip


5. When that side is golden brown, you may take it off of the pan and apply a pinch of sugar.
6. Eat :)

Friday, October 24, 2008

Too Hot? Too Cold? Just Nice!

People call it baby food. I remember eating my baby brothers' rice porridge cooked with grated carrots and anchovies, and enjoying it. I also remember making rice porridge for my daughters when they were starting to eat solids. I made it for my youngest son when he was starting to eat solids, except without the salt, spices and garnishes.

I have to say I love baby food, adulterized that is (which means we salt and spice it). My idea of a tempting breathtaking rice porridge is chicken rice porridge, with a smattering of shredded fried or cooked chicken hidden throughout the depths of theporridge, a tantalizingly glistening shrimp sitting atop the surface and a scattering of garnishes, but I have come to love this ground beef version too.

So, I present, my...


Malaysian Ground Beef Rice Porridge
Serves 6, with maybe second and third helpings...

1 lb ground beef
1 onion, minced
2-4 garlic cloves, minced
1-2 whole star anise seed
3-4 whole cloves
1-2 whole cardamoms
1 cinnamon stick
1 Tbs ground coriander
1/2 Tbs ground cumin
3 cups of long grain rice (not basmati rice)
10 cups water
1/4 cup oil
salt
dashes of black pepper
spring onions - sliced for garnish
fried onions - optional
green chillies - sliced for garnish

1. Heat oil and saute the onion, garlic, anise seeds, cloves, cardamoms and cinnamon stick till fragrant
2. Add ground beef and stir for a few minutes. Add coriander and cumin.
3. Add uncooked rice and keep stirring till rice grains are coated with oil and glistening
4. Add water and bring to boil, then bring to simmer
5. Stir occasionally so rice won't stick at the bottom
6. Simmer it till rice absorbs the water and is overdone
7. If it looks dry add more water. It should look like porridge, and the rice grains should look exploded
8. Salt and pepper it to taste
9. Garnish with with sliced green chillies, spring onions, fried onions, and maybe add a fried egg sunny side up if you wish. Be adventurous.

Enjoy it especially on a frigid winter day!


Cook's Notes:

1. Stir it occasionally while it's simmering
2. You can take out the whole spices before serving it, in case someone bites on the cardamom or cloves and gets the fright of his/her life
3. It should be more on the watery side, so add more water if it looks like the rice had absorbed all the water
4. Use a big pot, even though it's only 3 cups of uncooked rice, because unlike normally cooked rice where the rice doubles in size, the rice for porridge has to absorb more water until the rice grains explode and they can't absorb anymore. 3 cups of rice will swell into a lot of porridge! Try it with 1 cup of rice for a start. For my family (family of 6) 3 cups is just nice.