Things you need:
-Mutton (goat) 1 or 2 pounds
-Oil (amount according to your preference)
- 2 or 3 Fried onions (store bought, or fried seperately in a frying pan and then laid out on a paper towel, or fried in the same pot in which you are going to cook the mutton but removed and drained on paper towel serperately before cooking mutton in it).
-Garam masala (whole, if you have any or you can use the powder)
- Ginger and garlic paste (about 2 or 3 tsps, i typically put more garlic than ginger)
- Coriander powder (one or two tsp)
- cumin powder (half tsp)
- turmeric (1/4 tsp)
- red chili powder (to taste)
- salt (to taste)
- tomatoes (2 or a tablespoon or so of canned tomato)
- yogurt (one or two tablespoons)
Wash and drain the mutton and then leave it aside in a colander.
Heat some oil in a pan and once it gets hot put the whole garam masala in it (around 2 or 3 cloves/ two cardamoms, an inch of cinnamon stick, a few peppercorns and a little bit of zeera (if u like it, don't put too much because u r also going to be adding cumin powder later on)).
Add the meat, ginger garlic paste and all of the dry spices & salt.
Fry the meat for 10 or 15 minutes on high heat so that any water that may be present dries up, and the meat begins to brown a little (it's not red and fully raw).
After the meat has been fried for a few minutes and it completely dry, add in the tomatoes and cook until they begin to dissolve.
Now you may add the yogurt.
Stir your meat a few times so that the yogurt is completely mixed in, then add water and bring to a boil. Once it starts boiling add in the fried onions (and garam masala powder, if u did not have the whole kind) and cover your pot (or pressure cooker).
Now all you have to is wait for the meat to cook.
Once the meat is tender, dry up the gravy/curry to a consistency that u desire and then put the stove on low for 5 mins until you see the oil separate from the gravy.
You are done! :)
Enjoy.
Showing posts with label Indian. Show all posts
Showing posts with label Indian. Show all posts
Tuesday, September 18, 2012


Monday, July 27, 2009
Naan (A form of Indian Bread)

As some of you may know, I'm pretty new to the whole cooking scene and so I don't really have much to contribute as of yet, but insha'Allah as a newly married person I hope to be contributing to this blog more and more.
The recipe that I'm going to post is taken out of an Indian recipe cookbook which I have and my sister tried this at home while I was sick one day and the bread turned out AMAZING! She made it two times over two days and it was gone so fast that we didn't even have time to take any pictures!
Anyhow, to the recipe now, I guess :)
Ingredients: (Makes about 3)
225g/8oz/2 cups unbleached white bread flour
2.5 ml/ 1/2 tsp salt
15g/ 1/2 oz fresh yeast
60 ml/ 4 tbsp lukewarm milk
15 ml/ 1 tbsp veg oil
30 ml/ 2 tbsp natural (plain) yogurt
1 egg
30-40 ml/ 2-3 tbsp melted ghee or butter, for brushing (optional)
Method:
1. Sift the flour and salt together into a large bowl. In a smaller bowl, cream the yeast with the milk. Set aside for 15 mins.
2. Add the yeast and milk mixture, vegetable oil, yogurt and egg to the flour. Combine the mixture using your hands until it forms a soft dough. Add a little more of the lukewarm water if the dough is too dry. (It's normal for it to be pretty sticky and goo-ey, don't worry about that).
3. Turn the dough out on a lightly floured surface and knead for about 10 mins, or until it feels smooth. Return the dough to the bowl, cover and leave in a warm place for about 1 hr, or until it has doubled in size.
Preheat the over to its highest setting- it should not be any lower than 230 degrees celsius/ 450 degrees Fahrenheit/ Gas 8.
4. Turn out the dough back on on to the floured surface and knead for a further 2 minutes.
5. Divide into three equal pieces, shape into balls and roll out into teardrop shapes 25cm/10in long, 13cm/5in wide and 5mm-8mm/ 1/4-1/3 inch thick.
6. Preheat the grill (broiler) to its highest setting. Meanwhile place naan on preheated baking sheets and bake for 3-4 minutes, or until puffed up. (Usually you do not need more than 3 so be careful, they are quick to burn!)
7. Remove from the oven and place under the hot grill for a few seconds until the tops brown slightly. Brush with ghee or butter and serve warm.
Enjoy & tell me how yours turns out & if you make any changes :)
(Below is a video that we used to make sure we were doing things correctly, but we followed the recipe that I have provided)
Thursday, July 23, 2009
I Can Be A Mamak!

I wonder about the origin of Murtabak, just as I began to write this post. Hubby's theory was that this food item was a fusion of Indian and Malay cuisines, as the dough that is used is the dough used to make Roti Canai, which is an innovation and modification made to the Indian paratha or normal roti by the Indians who migrated to Malaysia. As for me, I have no opinions whatsoever about the origin of this food item, that is until I began to do a word play on it, in my mind. Let's just say that taking Taleem Quran with Al Huda has predisposed one to get to dissect words to get to the root words. Call it an obsession if you will. Raw Ta Ba. I know urattibu means to tidy up, or arrange, so it could be something to do with the way the Murtabak is folded. A little googling found me the answer. Voila!
I always feared attempting making Roti Canai, because the stretching process is, I have to say, intimidating. You know how the experts throw the pizza discs high up in the air? Well, the Roti Canai experts do the same thing with thinned Roti Canai dough, so much so that they end up with very thin translucent sheets of dough that is later twirled, flattened, slapped, fried and again slapped to produce crispy yet pliable not to mention flaky rotis that are Roti Canai, one of Malaysia's popular breakfast item. I love eating Roti Canai with sugar and of course the usual dhall curry accompaniment, topped with a dollop of spicy Sambal. Ahh..those were the days...when I didn't have to scour through online recipes just so I can eat one.
Well, finally, I gathered enough courage to actually attempt making Roti Canai while hubby was away in Washington D.C. I wanted to use my mother's recipe, but there was one detail missing and I didn't have time to wait for her to reply (because of the time difference) so I used a recipe from Dari Dapur Maisya. I had been googling for a Roti Canai recipe, and to be honest, after my experience of following Malaysian recipes in the past, I don't place too much trust in them. So I spent quite some time carefully reading the recipes. However, I love Maisya's tips section, and decided that I should trust her. I'm glad I did. The dough was very forgiving and wonderfully fun to work with!
No, I didn't have to throw the thinned dough in midair while twirling it, because thanks to my mother, I have a set of organized and well explained instructions to follow with regards to working with the roti canai dough. And I am darn serious about her instructions being organized and particularly well explained. Being meticulous is a huge plus in recipe writing, and my mother is pretty meticulous, alhamdulillah.
My Roti Canai attempt eventually gave birth to Roti Telur and Murtabak. Suffice it to say, I was overjoyed with the end results! It did take me hours to make it, but like being in labor with a forthcoming baby, (I know I keep coming up with the same analogy, but being a mother of multiples does that to you, you know) the end result is so beautifully worth it, that I didn't quite mind wiping up the trail of oil drips from the dining table (my work place) to the stove, not to mention spewing out some elbow 'grease' (no pun intended). However, it was not a sole effort, as I had to harness my kids' energy. My 9 year old son Hza was my Murtabak frier and flipper. He took turns with my eldest daughter Skee.

Murtabak Filling
1 lbs ground beef
1 medium-large onion/5 - 7 shallots, chopped
4 -5 garlic cloves, minced
3 - 5 Tbs curry powder (add enough water to make a wet paste)
2 -3 Tbs chilli paste
1 tsp sesame oil
2 - 3 whole cloves
2 -3 star anise
1 cinnamon stick
2 -3 sprigs of parsley, chopped
salt to taste
3 - 5 Tbs oil
2 eggs lightly beaten
1. Heat oil and saute onion and garlic till fragrant.
2. Add chilli paste, wet curry powder paste, whole cloves, star anise, cinnamon stick, and continue sauteing until oil breaks the surface (about 5- 7 minutes) over medium fire
3. Add ground beef and cook till ground beef are cooked through. Add salt to taste
4. Drizzle with sesame oil just before you turn off the stove and stir.
5. Toss in chopped parsley and stir.
6. Cool completely. Fish out the whole spices unless you don't mind biting into them later on.
7. Add the beaten eggs to the cooled ground beef filling and stir thoroughly
Notes:
- You can pretty much add anything else you want such as soy sauce. The only reason I didn't was because I wanted to use this filling for Zeyoudee's calzone too, and soy sauce has wheat.
- The basic flavoring is the spiciness from the curry powder and chilli paste and some sweetness from soy sauce (but we did fine with sesame oil. Not sweet, but it gives it that Asian fragrance).
Roti Canai Dough, courtesy of Maisya and Mr. Niceghost
3 C all purpose flour
1 - 1 1/2 C water (look at Notes)
1 Tbs margarine
2 Tbs sweetened condensed milk
1 Tbs cooking oil
salt
1. Combine water, sweetened condensed milk, and salt and stir to mix
2. Dump all the flour in a big bowl (if mixing by hand) and in your mixer bowl if using a stand up mixer
3. If mixing by hand, gradually add the water mixture to the flour. If using stand mixer, add all the water mixture to the flour
4. Add in the margarine and cooking oil, and knead till you get a smooth and elastic dough. One way of knowing if it's elastic enough is to make a 1-2 inch indentation in the dough. If it springs back, it's ready.
5. Cover dough with a damp cloth and let rest for 30 minutes
6. Pinch of small pieces of the dough (75 - 90 gm each) and make into small balls. You should get 10 small dough balls from this recipe.
7. Coat each ball with margarine, or alternately, you can submerge all these balls in cooking oil in a wide bottomed bowl for 2 hours or overnight in the fridge.
Notes:
...all courtesy of Maisya from Dari Dapur Maisya. I was overjoyed to find these tips!
- If you want the Roti Canai dough to be deliciously pliable after cooking, use cooking oil in the dough
- If you want it crispy, use sugar or sweetened condensed milk in the dough
- If you want the dough to remain soft and pliable throughout the day, use cold or ice water
To shape into Murtabak:
...all courtesy of my mother from Cherry on a Cake. I was overjoyed to find these instructions!
...all courtesy of my mother from Cherry on a Cake. I was overjoyed to find these instructions!
1. Clean and liberally oil your work area (make sure it's a big one, you will need the space, trust me). It can be your dining table, or even the back of a huge flat serving platter.
2. Oil your hands generously to avoid as much friction between the dough and your hands. Take one ball and evenly smooth it out to a flat circular disc, much like a pizza dough.
 Do this by pressing it gently with your palms and fingers. The more oily your hands are, the easier.
3. Continue doing this until the disc is about 1/4 inch thick, and then begin to lift the edge and gently stretch it. Don't worry if you happen to tear it. Only worry if you tear it right smack in the middle. If you do, please start again. Or, you can do some innovative repairs by placing the Murtabak filling somewhere else. You'll figure it out. But either way, stretch it till it's paper thin or like in the photo below.

4. Take about 2 -3 tablespoons of the ground beef filling and place it in the center of the stretched dough.
5. Start wrapping it up as shown in the following photos, much like wrapping a parcel from four sides and tucking the last end under. Like I said, if you have tears where the filling is, try to wrap around it.


As you can clearly see, one of my wrapped Murtabak was 'holey', but it wasn't disastrous. So, if it happens, don't fret.
Frying the murtabak:

3 - 4 Tbs oil
1. Heat oil in wide flat pan. A long rectangular griddle would be perfect!
2. Gently place one wrapped murtabak in pan, or two or more if the pan is wide enough. Just don't overcrowd so as to make flipping a challenge.
3. Very gently, press the top of the murtabak flat with your spatula so as to disperse the filling evenly. The beaten egg inside needs to be cooked through.
4. Flip it when the underside is browned. Give it enough cooking time for the egg to be cooked through, about 3-5 minutes each side. Adjust the fire so it won't brown too quickly.

Serve with Chilli sauce, or eat as is.
Malaysians usually serve Murtabak with either one of two accompanying sauces, depending on where you are exactly in Malaysia; sweet pickled onion sporting a pinkish reddish hue, or spicy curry gravy.
Sunday, November 2, 2008
Tandoori Chicken
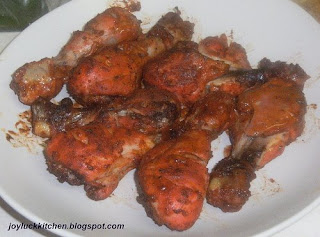
I like my chicken real spicy (not Malay spicy, just spicy) so I always add a little more chilli powder than I probably should when making tandoori chicken. Whatever meal I'm serving it with, I remember not to forget a banana- the two complement each other very well!
Here's my tandoori chicken recipe:
What you'll need
- 8 chicken drumsticks, skinless
- 10 tablespoons yogurt
- 1 maggi cub
- 4 tablespoons of tandoori mix
- 1 table spoon of curry powder
- 1 tablespoon of chilli powder
- 1 teaspoon garlic powder
- 1 teaspoon of salt
- 1 teaspoon of pepper
- paprika (until preferred colour)
- 2 teaspoons olive oil
- 1 cup of water
- lemon juice, 1/2 cup
*Before marinating, apply some lemon juice to the drumsticks and slash them using a knife. This helps the marinate get inside all the way to the bone.
Marinate the Chicken
1. Take 10 tablespoons of yogurt and mix with 1 cup of water and 1/2 cup of lemon juice
2. add all of the above spices EXCEPT the pepper and mix really well using a whisk.
3. Cover and refrigerate over night. (or at least 5 hours)

Bake the Chicken
1. Pre-heat the oven to 350 degress
2. Remove the drumsticks and spread them out on a pan. (grease beforehand if necessary) Apply 1 teaspoon of olive oil over the drumsticks.

3. Set time to 35 minutes
4. Check the chicken in 35 minutes, then set oven to broiler and set timer for another 10 minutes

5. 10 minutes later, remove the chicken from the oven and let it cool
6. Serve :)
Tuesday, October 28, 2008
Chapati
 I normally stay away from making Chapati (a kind of bread) because it sets the smoke detectors off but when I do make them, I make enough for a few meals.
Here's the recipe:
What you'll need
- 3 cups of flour
- 2 cups of water
- 1/4 tsp of salt
What to do
1. Mix the flour and the salt
2. Slowly add in the water
3. Keep mixing it with your hands until you make a dough like ball
 4. Divide the dough into small palm size pieces and flatten it out

5. Place one Chapati on your pan, when it starts to puff up with small circles, pour droplets of olive oil and flip over

6. Repeat the flipping process until the Chapati is as dark and crispy as you want it to be

Enjoy!
Subscribe to:
Posts (Atom)