Saturday, November 7, 2009

Salmon Patties

This is something we have in the house once or twice a month. It is a good way to get some fish, as well as those omega fatty acids that are good for you. I use canned boneless skinless salmon. I used to use just regular canned salmon, but I found that I was throwing away more and more of it picking out the bones and skin (my dad's preference, otherwise I would leave the skin). This is a very simple recipe. I use three cans of boneless skinless salmon for 5 people.

3 cans boneless skinless salmon (drained)
2 eggs
1/3 cup of breadcrumbs
1 small onion chopped
1 tsp - 1 tbls of dillweed (to taste)
salt and pepper (to taste)

Mix everything together in a large bowl until well incorporated. Heat just enough oil to coat a large frying pan. I use a 1/3 cup measure to make patties. Then place them in the hot oil and fry until golden brown on the outside. Usually takes about 5 minutes a side depending on the heat setting.

Monday, October 26, 2009

Crispy Oven Tilapia

Another favorite in our house. Every Friday I try and get some fish into us, since we really should eat more. With my dad pretty picky, and my hubby not liking anything with a strong fishy smell, it tends to limit my options. Tilapia is a nice mild white fish that you can find just about anywhere these days. This recipe works with both frozen and fresh fish. Some recipes I have tried do not work as well with the frozen, it tends to get a little dry sometimes depending on how it is cooked.

This recipe is very simple and quick to put together.

1 pound or so of tilapia (fresh or frozen, defrosted)
Non-stick spray
1/2 cup of Parmesan cheese
sprinkle of dried basil
2 cups crushed potato chips (actually made it one time with crushed soup crackers, too)
3 tbls of melted butter

Preheat the oven to 425. Spray a 9x13 pan with the non stick spray and arrange tilapia in a single layer in the pan (a little overlap isn't a big deal).


Sprinkle the Parmesan cheese over the fish, and then just a little dried basil.


Then pour the 2 cups of crushed potato chip over the cheese and basil and spread so it covers the top in a layer. Drizzle the melted butter over the chips. And bake for about 20 minutes (more or less depending on the thickness of your fish).


YUM!

Wednesday, August 5, 2009

Yodeling Chicken

This was originally a recipe for chicken cordon bleu casserole, but I needed to leave out the ham, heehee. So my dad renamed it yodeling chicken (swiss cheese, swiss people yodel.... you get the joke). My husband got very excited when he found out I was making this for supper last night. I had been avoiding putting it on my menu because it involves turning on the oven, but I caved to the will of my family and made it. It is a very simple recipe.

4 boneless skinless chicken breast, cut into chunks
2 eggs
1 cup of plain breadcrumbs
poultry seasoning
salt and pepper to taste
oil
cream of chicken/ celery/ or mushroom soup
1/2 can of milk
6 slices of swiss cheese (more if you like it cheesy)

Preheat oven to 350. Heat the oil to medium high heat in a large frying pan. Whisk together the egg and a splash of milk and soak the chicken in it for 5 minutes. Mix together the breadcrumbs, some poultry seasoning (approx 1 tablespoon) and some salt and pepper.


Coat the chicken chunks in the breadcrumb mixture and brown in the oil. Place in a single layer in a 9x13 baking dish. Once all of the chicken is browned, place the slices of swiss cheese over the chicken. Whisk together the cream soup with 1/2 of the can filled with milk, and then pour over the cheese and chicken.


Bake for 30 minutes uncovered.


YUM! I serve it with rice. The cheesy sauce is delicious on rice.

Monday, August 3, 2009

Chicken Enchiladas

This is a family favorite. It isn't exactly a traditional enchilada, but the flavors are there and it is easy to do substitutions. I made this last weekend, and there are leftovers in the fridge.

1 whole chicken, cooked and shredded
3 cups of chicken broth (I reserve this from the water the chicken was boiled in)
1 medium onion, chopped
1 green pepper, chopped (you can use a hotter pepper if you prefer spicy)
2-3 cloves of garlic minced
2 tablespoons of olive oil
several tablespoons of chili powder, cumin, and cayanne pepper (if you want it spicy)
salt and pepper to taste
1/4 cup of butter
1/4 cup of flour
1 can of black beans, drained and rinsed
1 can of corn (I use frozen and fill the can of beans after it has been rinsed)
3-4 cups of cheddar cheese
1 package of burrito size tortillas

Preheat oven to 350. Grease a 9x13 pan. In a large pot, heat olive oil. Add 1 tablespoon of chili powder and cumin (and cayenne if you like it spicy), then saute the onion, peppers, and garlic until softened. Remove from the pan (I usually add to the bowl of the shredded chicken). In the same pan melt the butter, once the butter is melted completely, add the flour and cook until it is "blonde". To this add the chicken broth and whisk well to get rid of any lumps. Bring it to a boil and thickened. Add 1 cup of the cheese, the chicken, sauteed veggies, beans, and corn, another 2 tablespoons of chili powder, cumin, salt and pepper. Stir until well combined and heat until bubbly. In the greased 9x13 pan, place some of the sauce mixture, then tear apart teh tortillas and cover that completely, layer on several scoops of the sauce mixture, sprinkle with the cheese, and cover with another layer of torn tortillas, repeat layers until the pan is full ending with a topping of cheese. Bake at 350 for 30 minutes or until bubbly.


Serving suggestions:
Top with a dollop of sour cream, chopped green onion, chopped tomatoes, black olives, guacamole, etc...

Thursday, July 30, 2009

Saudi Champagne


To some this name might sound a little weird! Haha... I was confused too, the first time I heard it. Alcohol is strictly prohibited in Saudi Arabia but this drink just happens to have the word 'Champagne' in it, even though it's kind of like apple cider.

This isn't really much of a "recipe" just because there's really nothing to it. And yet, whenever I make it for parties or brunches, I am left going back and forth from the kitchen and dining table making more and more refills! :)

Ingredients:

1 Bottle Perrier (sparkling) Water (or 'water with gas' as they'd call it in Rome! haha) [I usually substitute this with sugar-free sprite/Sprite Zero]

1 bottle apple juice

A julienne cut apple to garnish

A few sprigs of mint

Cut slices of orange/lemon to garnish (optional)

Method:

Mix one part sparkling water with 2 parts of apple juice, you can alter this based on what you feel your diners would prefer.

Pour the mixture into a glass jug and garnish the entire top of the drink with mint sprigs, oranges & apple.

For best results, let the drink sit in the fridge for a little while before serving, so that the scent of the mint gets well-infused with the rest of the drink, it really adds a nice twist!

I've always gotten a lot of compliments with this drink, even though there's really nothing to it!


Enjoy!

Simple No-Bake Cheesecake Recipe


This is a recipe that I had used a few years ago to make cheesecake. Of course, the non-baked cheesecake tastes different than the baked ones but this is a good idea for times when you are in a hurry and yet want to make a good dessert :)

Ingredients: (Serves 6-8)

- 8 oz Cool Whip Free (take it out 10 minutes before using)
- 16 oz 1/3 less fat Philadelphia Cream Cheese (softened)
- 9 inch reduced fat Graham Cracker Crust/Or you can make your own crust by combing butter and cookie crumbs
- 1/4 cup sugar (can do acc. to taste as well, I have found some recipes which state 1/2 cup)
- 1 pack of Halal Lemon Jello/Jelly
- 1 jar/can of cheesecake topping (I don't like tasting big chunks of fruit so I get Smuckers brand 'Toppings').

Method:

1. In a large bowl, combine whipped cream cheese, lemon jello and sugar for a few minutes until fluffy.

2. Add Cool Whip and whip until smooth. You can use an electric mixer too but make sure you don't over beat (you want soft peaks in the mix, s that it's fluffy and not stiff).

3. In the meantime, you can crush 6 or 7 gram crackers and melt just enough butter (this needs to be adjusted according to how thick you want your crust to be and how big your dish is) to nicely pack the bottom of a springform/any other tray to form the crust.

3. Spoon mixture into pie crust and chill for a few hours, until firm. I usually let it just sit overnight when I can.

Cut into 6/8 equal slices.


Alternate serving option:
Serve just the cheesecake mix as a mousse, with graham crackers on the side as opposed to forming a crust with them.


Picture from: http://www.viecouture.net/wp-content/uploads/2008/02/strawberry_cheesecake_squares.jpg

Fettuccine Alfredo

Ingredients:

4 oz. (1/2 of 8-oz. pkg.) PHILADELPHIA Cream Cheese, cubed
1/2 cup KRAFT Grated Parmesan Cheese
3/4 cup milk
1/4 cup (1/2 stick) butter or margarine
1/4 tsp. white pepper
1/8 tsp. garlic powder
8 oz. fettuccine, cooked, drained
1/8 tsp. ground nutmeg

Method:


MIX cream cheese, Parmesan cheese, milk, butter, white pepper and garlic powder in medium saucepan; cook on low heat until cream cheese is melted and mixture is well blended.

TOSS with hot fettucine. Sprinkle with nutmeg.

This is basic alfredo recipe and you can put sauteed shrimp or chicken breasts into it as well and adjust accordingly :)

Monday, July 27, 2009

Naan (A form of Indian Bread)


As some of you may know, I'm pretty new to the whole cooking scene and so I don't really have much to contribute as of yet, but insha'Allah as a newly married person I hope to be contributing to this blog more and more.

The recipe that I'm going to post is taken out of an Indian recipe cookbook which I have and my sister tried this at home while I was sick one day and the bread turned out AMAZING! She made it two times over two days and it was gone so fast that we didn't even have time to take any pictures!

Anyhow, to the recipe now, I guess :)

Ingredients: (Makes about 3)

225g/8oz/2 cups unbleached white bread flour
2.5 ml/ 1/2 tsp salt
15g/ 1/2 oz fresh yeast
60 ml/ 4 tbsp lukewarm milk
15 ml/ 1 tbsp veg oil
30 ml/ 2 tbsp natural (plain) yogurt
1 egg
30-40 ml/ 2-3 tbsp melted ghee or butter, for brushing (optional)


Method:

1. Sift the flour and salt together into a large bowl. In a smaller bowl, cream the yeast with the milk. Set aside for 15 mins.

2. Add the yeast and milk mixture, vegetable oil, yogurt and egg to the flour. Combine the mixture using your hands until it forms a soft dough. Add a little more of the lukewarm water if the dough is too dry. (It's normal for it to be pretty sticky and goo-ey, don't worry about that).

3. Turn the dough out on a lightly floured surface and knead for about 10 mins, or until it feels smooth. Return the dough to the bowl, cover and leave in a warm place for about 1 hr, or until it has doubled in size.
Preheat the over to its highest setting- it should not be any lower than 230 degrees celsius/ 450 degrees Fahrenheit/ Gas 8.

4. Turn out the dough back on on to the floured surface and knead for a further 2 minutes.

5. Divide into three equal pieces, shape into balls and roll out into teardrop shapes 25cm/10in long, 13cm/5in wide and 5mm-8mm/ 1/4-1/3 inch thick.

6. Preheat the grill (broiler) to its highest setting. Meanwhile place naan on preheated baking sheets and bake for 3-4 minutes, or until puffed up. (Usually you do not need more than 3 so be careful, they are quick to burn!)

7. Remove from the oven and place under the hot grill for a few seconds until the tops brown slightly. Brush with ghee or butter and serve warm.

Enjoy & tell me how yours turns out & if you make any changes :)

(Below is a video that we used to make sure we were doing things correctly, but we followed the recipe that I have provided)

Herbed Green Beans


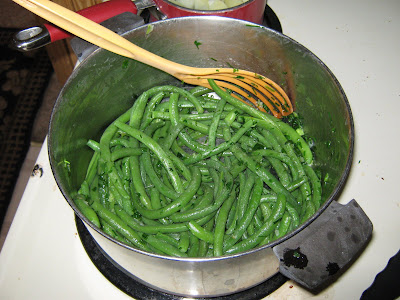
I made these tonight for dinner, a variation on a recipe I found on recipezaar. The original had mustard in it, but my mom can't stand mustard and so I left it out. We got a basket of fresh green beans from the garden, and from my herb garden some garlic chives, parsley, and green onion. It was delicious! I ended up snacking on the leftovers all evening long, whenever I would walk through the kitchen :-)

1 tablespoon of butter
handful of chives, parsley, chopped together
two green onions chopped white and all
approximately 1 pound of fresh green beans
salt and pepper to taste

Boil the green beans in salted water for 6 minutes. Drain and rinse with cold water, set aside. In the pot they were just boiled in, melt the butter. Saute the herbs and green onion in the butter just until warm and fragrant. Add salt and pepper. Toss the green beans to coat and reheat. And serve warm.

Sunday, July 26, 2009

Spicy Chickpeas Snack

Spicy Chickpeas

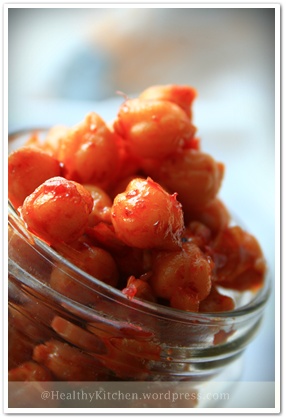
Has anyone ever tried this snack before ? This spicy chickpea was one of my favorite snack when I was a kid and it still is. Love for the hot and spicy flavor with hint of sweetness from caramelized sugar or sometimes honey. This not greasy spicy snack is super easy to make with great result at the end. You will definitely love it as much as I do.

It’s a big bonus for allergy people who loves spicy and can do legumes, this should be on the list snack you want to try too.

chickpeas snack

Spicy Chickpeas ( makes 5 cups)

Ingredients:

  • 1 bag/ 1 lbs/ 16 oz / 453 grams dried chickpeas

- In a large bowl with enough water to cover , soak the chickpeas overnight, 8-12 hours. By the time,the size of each chickpea will expand due to liquid it absorbs and the texture is softened a little bit.

- In a large pot, pour the soaked chickpeas and fill with enough water to cover the top level of chickpeas.. add a little more water would be great.

- On a medium high heat, boil the beans until cooked and tender but not fall apart, it still quite firm in texture. Add pinch of salt while simmering to add flavor to the beans. Drain the cooked beans , let all liquid drained out and set aside.

Ingredients for the spicy goo:

  • 3 Tablespoons minced shallots or chopped yellow onions
  • 1 clove garlic, chopped
  • 3 Tablespoons chili paste ( depending on how much heat you desire)
  • 3 Tablespoons honey / brown sugar
  • 1 teaspoon white sugar ( optional)
  • 2 teaspoons white vinegar or lime juice
  • Salt, to taste
  • 2 Tablespoons canola oil or other cooking oil

Methods:

1- In a medium wok, drizzle the canola oil. Heat the oil up on a medium heat.

2- Sautee the onions and garlic until fragrant and translucent.

3- Add in chili paste and let it browned slightly and fragrant.

4- Stir in honey, sugar , salt and white vinegar / lime juice . Simmer until the oil separated and appears on top.

5- Add the drained cooked chickpeas, toss it up to well combined on heat for another 5 minutes.

6- Remove from heat and enjoy.

Storing : Keep in a cleaned and dry container for up to 2-3 days at room temperature , up to 2 weeks in the refrigerator.

Thursday, July 23, 2009

I Can Be A Mamak!


I wonder about the origin of Murtabak, just as I began to write this post. Hubby's theory was that this food item was a fusion of Indian and Malay cuisines, as the dough that is used is the dough used to make Roti Canai, which is an innovation and modification made to the Indian paratha or normal roti by the Indians who migrated to Malaysia. As for me, I have no opinions whatsoever about the origin of this food item, that is until I began to do a word play on it, in my mind. Let's just say that taking Taleem Quran with Al Huda has predisposed one to get to dissect words to get to the root words. Call it an obsession if you will. Raw Ta Ba. I know urattibu means to tidy up, or arrange, so it could be something to do with the way the Murtabak is folded. A little googling found me the answer. Voila!

I always feared attempting making Roti Canai, because the stretching process is, I have to say, intimidating. You know how the experts throw the pizza discs high up in the air? Well, the Roti Canai experts do the same thing with thinned Roti Canai dough, so much so that they end up with very thin translucent sheets of dough that is later twirled, flattened, slapped, fried and again slapped to produce crispy yet pliable not to mention flaky rotis that are Roti Canai, one of Malaysia's popular breakfast item. I love eating Roti Canai with sugar and of course the usual dhall curry accompaniment, topped with a dollop of spicy Sambal. Ahh..those were the days...when I didn't have to scour through online recipes just so I can eat one.

Well, finally, I gathered enough courage to actually attempt making Roti Canai while hubby was away in Washington D.C. I wanted to use my mother's recipe, but there was one detail missing and I didn't have time to wait for her to reply (because of the time difference) so I used a recipe from Dari Dapur Maisya. I had been googling for a Roti Canai recipe, and to be honest, after my experience of following Malaysian recipes in the past, I don't place too much trust in them. So I spent quite some time carefully reading the recipes. However, I love Maisya's tips section, and decided that I should trust her. I'm glad I did. The dough was very forgiving and wonderfully fun to work with!

No, I didn't have to throw the thinned dough in midair while twirling it, because thanks to my mother, I have a set of organized and well explained instructions to follow with regards to working with the roti canai dough. And I am darn serious about her instructions being organized and particularly well explained. Being meticulous is a huge plus in recipe writing, and my mother is pretty meticulous, alhamdulillah.

My Roti Canai attempt eventually gave birth to Roti Telur and Murtabak. Suffice it to say, I was overjoyed with the end results! It did take me hours to make it, but like being in labor with a forthcoming baby, (I know I keep coming up with the same analogy, but being a mother of multiples does that to you, you know) the end result is so beautifully worth it, that I didn't quite mind wiping up the trail of oil drips from the dining table (my work place) to the stove, not to mention spewing out some elbow 'grease' (no pun intended). However, it was not a sole effort, as I had to harness my kids' energy. My 9 year old son Hza was my Murtabak frier and flipper. He took turns with my eldest daughter Skee.


Murtabak Filling

1 lbs ground beef
1 medium-large onion/5 - 7 shallots, chopped
4 -5 garlic cloves, minced
3 - 5 Tbs curry powder (add enough water to make a wet paste)
2 -3 Tbs chilli paste
1 tsp sesame oil
2 - 3 whole cloves
2 -3 star anise
1 cinnamon stick
2 -3 sprigs of parsley, chopped
salt to taste
3 - 5 Tbs oil
2 eggs lightly beaten

1. Heat oil and saute onion and garlic till fragrant.
2. Add chilli paste, wet curry powder paste, whole cloves, star anise, cinnamon stick, and continue sauteing until oil breaks the surface (about 5- 7 minutes) over medium fire
3. Add ground beef and cook till ground beef are cooked through. Add salt to taste
4. Drizzle with sesame oil just before you turn off the stove and stir.
5. Toss in chopped parsley and stir.
6. Cool completely. Fish out the whole spices unless you don't mind biting into them later on.
7. Add the beaten eggs to the cooled ground beef filling and stir thoroughly

Notes
:
  • You can pretty much add anything else you want such as soy sauce. The only reason I didn't was because I wanted to use this filling for Zeyoudee's calzone too, and soy sauce has wheat.
  • The basic flavoring is the spiciness from the curry powder and chilli paste and some sweetness from soy sauce (but we did fine with sesame oil. Not sweet, but it gives it that Asian fragrance).


Roti Canai Dough, courtesy of Maisya and Mr. Niceghost

3 C all purpose flour
1 - 1 1/2 C water (look at Notes)
1 Tbs margarine
2 Tbs sweetened condensed milk
1 Tbs cooking oil
salt

1. Combine water, sweetened condensed milk, and salt and stir to mix
2. Dump all the flour in a big bowl (if mixing by hand) and in your mixer bowl if using a stand up mixer
3. If mixing by hand, gradually add the water mixture to the flour. If using stand mixer, add all the water mixture to the flour
4. Add in the margarine and cooking oil, and knead till you get a smooth and elastic dough. One way of knowing if it's elastic enough is to make a 1-2 inch indentation in the dough. If it springs back, it's ready.
5. Cover dough with a damp cloth and let rest for 30 minutes
6. Pinch of small pieces of the dough (75 - 90 gm each) and make into small balls. You should get 10 small dough balls from this recipe.
7. Coat each ball with margarine, or alternately, you can submerge all these balls in cooking oil in a wide bottomed bowl for 2 hours or overnight in the fridge.

Notes:

...all courtesy of Maisya from Dari Dapur Maisya. I was overjoyed to find these tips!


  • If you want the Roti Canai dough to be deliciously pliable after cooking, use cooking oil in the dough
  • If you want it crispy, use sugar or sweetened condensed milk in the dough
  • If you want the dough to remain soft and pliable throughout the day, use cold or ice water

To shape into Murtabak:

...all courtesy of my mother from Cherry on a Cake. I was overjoyed to find these instructions!


1. Clean and liberally oil your work area (make sure it's a big one, you will need the space, trust me). It can be your dining table, or even the back of a huge flat serving platter.
2. Oil your hands generously to avoid as much friction between the dough and your hands. Take one ball and evenly smooth it out to a flat circular disc, much like a pizza dough.

Do this by pressing it gently with your palms and fingers. The more oily your hands are, the easier.
3. Continue doing this until the disc is about 1/4 inch thick, and then begin to lift the edge and gently stretch it. Don't worry if you happen to tear it. Only worry if you tear it right smack in the middle. If you do, please start again. Or, you can do some innovative repairs by placing the Murtabak filling somewhere else. You'll figure it out. But either way, stretch it till it's paper thin or like in the photo below.


4. Take about 2 -3 tablespoons of the ground beef filling and place it in the center of the stretched dough.
5. Start wrapping it up as shown in the following photos, much like wrapping a parcel from four sides and tucking the last end under. Like I said, if you have tears where the filling is, try to wrap around it.
As you can clearly see, one of my wrapped Murtabak was 'holey', but it wasn't disastrous. So, if it happens, don't fret.


Frying the murtabak:

3 - 4 Tbs oil

1. Heat oil in wide flat pan. A long rectangular griddle would be perfect!
2. Gently place one wrapped murtabak in pan, or two or more if the pan is wide enough. Just don't overcrowd so as to make flipping a challenge.
3. Very gently, press the top of the murtabak flat with your spatula so as to disperse the filling evenly. The beaten egg inside needs to be cooked through.
4. Flip it when the underside is browned. Give it enough cooking time for the egg to be cooked through, about 3-5 minutes each side. Adjust the fire so it won't brown too quickly.


Serve with Chilli sauce, or eat as is.

Malaysians usually serve Murtabak with either one of two accompanying sauces, depending on where you are exactly in Malaysia; sweet pickled onion sporting a pinkish reddish hue, or spicy curry gravy.
Churros from New Mexico


I have made these only once before, when we were in Georgia. I don't even remember where I found the recipe, but it must have been from some cookbook I was actively checking out of the public libraries for years when there was time (relatively, now my lifestyle has changed).

Hubby is taking Spanish class this semester, and yesterday, they had a cultural event where everyone had to bring a dish of spanish origin. He had asked if I could make Flan. I had planned to make the flan the day before yesterday, but then realized that I didn't have any cans of sweetened condensed milk, so I made it yesterday.
Of course, being me, I simply had to torture myself and try and make somrthing else too. Actually, as I was browsing through my recipe box, looking for the caramel flan recipe, I came across this Churros recipe. That's how it all came about, as simple as the thought,

Hey, why don't I make Churros too? It's Spanish based too.

However, I still made the caramel flan as my back up, in case my Churros turns out to be horrors. I made two flans (one for us and one for the event), and I whipped up one recipe of Churros. Of course, again, being me, I googled Churros, out of increased curiosity. Hubby didn't even care enough to learn what it was that I made for him to bring yesterday (referring to the Churros), just like I don't care enough about anything to do with economics or finances. But I have passion for food (not necessarily for eating). Don't know if that's a good thing or a bad thing.

The dough for this Churros is very similar to making Choux Paste for eclairs or cream puffs. It's really easy and amazing to work with. You can't go wrong with it. While I was googling, I came across a teenager making Churros on Youtube. The only thing I worried about was butchering the shape of the Churros, though it can come in other shapes too. I vaguely remember having trouble stopping it from piping through when it was time to drop it in the hot oil. So I had Newr help me cut them with a kitchen knife. After a while, all the kids deserted me, so I was on my own.

Alhamdulillah for this Youtube video of a Chef making Churros though. He simply used his hand to stop the flow of the Churros dough.

I decided to do the same, because my Dessert Decorator doesn't really work all that perfectly such that I have to push the top part of it instead of just using the handle to push the dough through. As a result, both my hands were occupied.

At any rate, my Churros did turn out good enough to merit posting on this blog, alhamdulillah!


Churros

1 C water
1/2 tsp salt
1 Tbs sugar
1/2 C butter
1 C flour
4 eggs
oil
cinnamon
sugar


1. Heat water, salt, sugar, and butter on the stove top till butter melts
2. Bring to full boil. Then add flour all at once and beat (manually) till it becomes a thick and smooth battery dough. (Because the saucepan I used was too small, I transferred the hot liquid mixture to my KitchenAid mixer bowl and then poured the flour in that)
3. Continue beating 2 more minutes.
4. Add eggs one at a time, beating vigorously after each addition. I used the mixer, but you can do it manually too. Makes good bicep and triceps development.
5. The dough/batter should not be too runny like cake batter nor too tough like bread dough. It should be somewhere in between. Spoon the battery dough into a Dessert Decorator or a large pastry bag fitted with a large star tip (or you can use a normal round tip too, but your Churros will not have those beautiful ridges that make them characteristic of Churros)
6. Heat oil for deep frying, about 390 F. I simply estimated the temperature by placing my palm a few inches above it. if it feels quite hot, and the oil looks really viscous, it is ready.
7. Squeeze bag over the hot oil, letting out about 5 - 7 inches of ropes, or longer if you wish. Don't worry if the 'rope' curls like a candy cane or a horseshoe or even a spiral.Cut the piped rope either by pinching it off or cutting it with a pair of scissors. Don't worry, the hot oil does not spit.

Meanwhile prepare a dinner plate or a flat container with a mixture of sugar and ground cinnamon to roll the hot Churros in (measurements is up to you)
8. Fry till golden brown and roll them over so the Churros are lightly browned on both sides.


9. Drain the fried Churros on paper towels so the excess oil is absorbed. Then immediately roll these Churros in the sugar-cinnamon mixture until well coated.


They do look like a Malaysian snack called Cakoi. It has been a while since I ate any Cakoi. In fact I had trouble recalling the name, much to hubby's good humored disgust. I asked him yesterday if the Churros tasted anything like Cakoi, and he said that the Cakoi are more 'bready'. I had guessed as much. These Churros are crunchy on the outside and soft on the inside, somewhat like cream puffs.

So there you go...finally, something from New Mexico.

Wednesday, July 15, 2009

Salmon On A Whim


Brain food. That's what it's called, or at least that's what I call it. Omega 3 fatty acid. It has been a while since we've had salmon, and so when hubby called yesterday saying he had to go to Sam's Club, among the things I told him to buy was salmon.

So, salmon he did buy. A big one too. All that was missing was its head. And guts, skin, bones of course. It was a filleted salmon, alhamdulillah.

I took it out of the freezer and shoved it in the fridge last night, planning to cook it today. As is with every raw meat, chicken, fish, and seafood, I fretted over how to cook it. I used to make weekly menus, but with growing children whose appetites are also growing, it has become quite unpredictable. So unpredictable that making a weekly menu is more trouble than it's worth. I have even at times told them,

"Don't eat too much, or I'll have to cook again tomorrow!"

Of course hubby would just say,

"Just eat tuna or something."

I see the sensibility of his suggestion, but those who know me well, also know that I like to torture myself. Maybe I have this guilt-ridden dogged responsibility of making homemade food for my family all the time, despite wishing I can just lay the guilt ridden responsibility aside on some days and plunge into the world of processed and junk food with careless abandon. Maybe when they're all grown up and married off, I will do that. However, I have a feeling that I have my dear mother's traits. As she now indulges in her many hobbies, that are amazingly the same as mine, or should I say mine are the same as hers, so do I, though on a much smaller, thus hectic scale, as I'm also juggling many other things at the same time.

And like my mother, despite the trouble, I thoroughly enjoy the fruits of that labor when it's all done and over with. Much like giving birth, eh?

Before I dive into my world of metaphors and analogy, let me divert us back to this salmon, who once probably leapt out of the rushing rivers, fighting its current, and dove back into the frothing body of water.


I had dropped off the girls at the masjid for their Arabic class, then drove to the Dona Ana County Extension Office to pick up the 4-H & FFA Expo book, and then headed to the public library before driving back to the masjid to pick the girls up. On the way home, I asked them,

"How should I cook the salmon?"

I honestly do not remember what transpired after that question, but somehow, we arrived at the decision to simply bake the salmon after rubbing it with black pepper and salt. I was happy with that decision, because it doesn't require much work.

Because my eldest daughter was the one who for the most part supported this, I told her, (trying to kill two birds with one stone)

"Skee, I want you to do this and I will show you how, because it's so easy to do."

I prepared the broiling pan, and preheated the oven while she washed the thawed salmon.

In the beginning, I had decided on only black pepper and salmon, and key limes since we have a bagful of them. But being me, I couldn't resist adding more to that combination of spices, so I added ground cumin and turmeric.

Before long, we had a beautiful slab of salmon baking in the oven, though we had to cut off the tail end of it since it couldn't fit on the broiler pan.


I call this dish Salmon On A Whim because that's truly what it was, and alhamdulillah it turned out so picture perfect that I couldn't resist plating it and spending a few minutes, which probably seemed like ages to my hungry children, photographing it. The measurements are quite approximates because as the name denotes, it was done on a whim.

Salmon On A Whim

1 slab of filleted salmon
1/4 - 1/2 C cooking oil
1 Tbs+ black pepper
1/2 Tbs+ ground cumin
1 tsp turmeric
1 tsp+ salt

Garnish:
3-5 fresh basil leaves
2 fresh red chillies, sliced thinly at an angle
6-7 key limes


1. Preheat oven to 350 F
2. Line a broiling pan with aluminum foil and brush it with oil generously
3. Place the salmon carefully. If it is too long for the pan, cut it to size and place the cut piece on the pan too. It can be 'connected' to the main body later on.
4. Smear oil on the salmon, top and bottom (or if you're more civilized than me, use a brush)
5. One by one, pour the spices onto your cupped palm and gently rub them on the salmon, top and bottom. Or you can also combine the spices together in a bowl and rub the salmon with this spice combo.
6. Sprinkle with salt
7. Pop in the oven and bake until it is done, about 10-20 minutes
8. Switch the oven from bake to broil and broil for about 5 minutes or till top of salmon is slightly browned. When we did ours, the edges browned to a crisp, which provided that wonderful crunch.
9. Take salmon out of the oven. Immediately squeeze 4-5 halved key limes, literally dousing it with key lime juice. Garnish with sliced chillies and basil leaves.
10. Oh, and don't forget to 'piece' them back together if you had to cut it to fit the pan. (Ignore this if you think that is too much)


Notes:

  • For a Malaysian experience, make a dipping sauce by combining salty soy sauce (about 2 -4 tsp) with a few squirts of the lime juice and sliced chillies. You can dip the bits of salmon meat in this sauce and eat it as is, or douse your bit of salmon with some of this sauce.
  • Can be eaten with steaming white Jasmine rice or in a sandwich (not the whole slab of course!).

Tuesday, July 14, 2009

If You Have Bananas and Sour Cream...

I love this recipe. I have made banana breads and banana cakes, but by far, I love this recipe the most. I love Rose Beranbaum's cake recipes. Period. This is by far the most tender and yummiest banana cake I have ever tasted. I attribute it all to the sour cream and mixing technique. One thing I love about Rose's cake recipes is that she incorporates her knowledge in food science into her cookbooks. I am a lover of recipe elaborations, explanations, tips and the like. This may have been due to my lack of knowledge in cooking and baking in the first place when I first became a wife, such that when I tried recipes of Malaysian food, many turned out into chicken feed. For years I gave up trying and focused on baking and western cookbooks instead, as they are more like chemistry, and should I say, more organized (well most are at least). And after gaining some food chemistry know how, I returned to my attempts at Malaysian food, and lo and behold, alhamdulillah, at least some of them were fit for consumption.

Anyway, like I said, this is by far my favorite banana cake recipe. The sour cream produces a very tender cake, and the lemon zest lends a delightful fragrance and wonderful tang, in addition to the sour cream. If you don't like your banana cake to look brown though, put off blending the bananas until you're ready with the dry ingredients, so they don't have time to oxidize (did I tell you I love food facts?), and you will get a light colored banana cake, with Allah's permission. It is also from this recipe that I concocted an allergy free version for Zeyoudee, which can be found here.

Taken from Rose Beranbaum's Cake Bible,

Cordon Rose Banana Cake

2 large ripe bananas (about 1 cup)
2 Tbs sour cream (for extra moistness you can use up to 1/2 cup)
2 eggs
2 tsp grated lemon zest
1 1/2 tsp vanilla
2 C sifted cake flour
3/4 C + 2 tsp sugar
1 tsp baking soda
3/4 tsp baking powder
1/2 tsp salt
10 Tbs unsalted butter, softened

1. Preheat oven to 350 F and grease and line pans. You can use an 8x8, or one 9 inch by 2 round pan or even a 9 inch springform pan.
2. In a food processor, or blender, blend the bananas and sour cream until smooth. Then add eggs, lemon zest, and vanilla and blend briefly, just to blend.
3. In a large mixing bowl, combine the dry ingredients (cake flour, sugar, baking soda, baking powder and salt) and mix on low speed for 30 seconds to blend
4. Add the softened butter and half of the banana mixture. Mix on low speed until the dry ingredients are moistened.
5. Increase to medium speed (high speed if using hand mixer) and beat for 1 1/2 minutes
6. Add the rest of the banana mixture in two batches, and make sure to scrape down the sides between each addition. The batter will develop beautifully as you continue beating (the beauty is in the technique Rose has developed)
7. Pour batter into the prepared pan/s and smooth the surface. I always create a slight dip in the middle of the batter and bring them to the sides so that when the cake naturally domes, it will be somewhat level and not too domed in the middle.
8. Bake 30 to 40 minutes or till cake springs back when lightly pressed.
9. Cool cake in pan on a cooling rack for about 10 minutes, and then invert cake out of pan and cool completely.


Or you can also immediately dig in while it's still hot, and emanating a wafting aroma of banana and lemon. At least that's what my son did, despite me telling him to leave some for his father. I had sliced the square cake into strips and let them eat half of the cake and they devoured it uninhibitedly of course. I left, and when I returned, the other half was literally butchered, the culprit having moved away from the crime scene as far as he could. At the end of the day, there were two pieces left in the pan which went in the fridge. When I saw it, I told hubby and believe it or not, when he went for those pieces later on, he found the pan empty (but still in the fridge).

"Good joke, good joke!" he said.

Alas, he didn't get a taste of that cake. The kids beat him to it. He took revenge (not sure for that particular incident or an accumulated ice cream incidents in whci the kids would eat almost the whole tub and leave a measly bit for their parents) by eating more than half of the tub of ice cream. When the kids took the tub out to get some, they exclaimed,

"Hey! Who ate so much?"

Of course, they accused each other, and when it turned out that none of them did it, and hey, I didn't do it, the only person left to accuse was their father. Ahh...revenge is truly sweet when it involves ice cream. I guess.

Thursday, July 9, 2009

Ma'aloubeh (Meat, potato, rice hotpot)

This month when I made my menu, I was tired of the same old, same old recipes. So off I went to the library to check out some new cookbooks. And I chose several recipes that I have never made before from them. This was the first "new" recipe I made and it turned out great, alhamdulilah. It is taken from The Food of Israel by Sherry Ansky. Tomorrow I will make my first attempt at kibbeh. I did modify this recipe a bit so I will give you my version, based on the recipe from the book. And this time I made sure to get some good pictures!

Ingredients:

3 cups (720 g) rice
2 teaspoons of salt
4 lbs chicken or lamb (divided into pieces)
1/2 cup of olive oil
3-5 potatoes (peeled and sliced thick)
3-5 carrots (peeled and halved if necessary)
1 medium onion (cut into thick slices)
a handful of green onions chopped
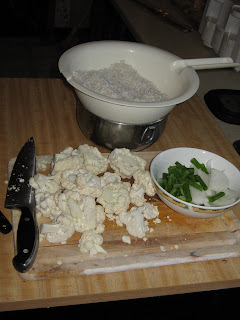
1 cauliflower (divided into florets)
butter

Herb Mixture (recipe called for saffron, but it is expensive so they had an alternative):
pinch of ground clove
1/2 tsp of black pepper, ground cardamom, cinnamon, allspice, and ground ginger, and turmeric (mainly for the color that it provides without the price of saffron)

Soak the rice in cold water for one hour, rinse, and drain.

In a dutch oven, heat half the oil and brown the chicken pieces (I used boneless skinless chicken breast for this first try, and in the future I am going to use bone-in chicken since the chicken did get a bit dry).


Remove the chicken to a bowl. In the pan with the browned bits and left oil, fry the herb mixture for just a minute or two until the flavors meld. To that add 6 cups of chicken broth. Bring it to a boil (while scraping the bits off the bottom, it adds good flavor), then add back in the browned chicken, along with any juice in the bowl, and lower the temperature to a simmer. Allow to simmer for 20 minutes. When the time is up remove the chicken to the bowl, and reserve the cooking liquid.


(it is a lot of liquid, make sure you have a large bowl or several small bowls :-)

In a separate frying pan heat the other half of the oil to med-high heat.


Fry the vegetables separately, first the potatoes, then the carrots, and last fry the onions (green and white) until they are soft and then add the cauliflower florets and fry the onions with the cauliflower.

Now for assembly! In the dutch oven that the chicken was cooked in, wipe it out with some clean napkins once it has cooled. Then coat the inside with butter, for me it took about a tablespoon to coat it nicely.


First layer the potatoes across the bottom of the pot. Next make a ring around the outside of the pot on top of the potatoes with the carrots.


Inside the ring of carrots place the cauliflower/ onion mixture.


On top of the veggies place the meat. Once that is all in the pot spread the rice evenly over all of it. And then pour all of the reserved broth over everything. Cover the pot.

Place the pot on high heat for 10 minutes, then reduce the heat to a low simmer and continue cooking for another 15 minutes.


To serve place a large (and it needs to be really big) serving platter over the top of the pot and in one quick motion (I had the hubby do this part) invert. Slowly lift the pot and ta-da!


Be very careful as you lift the pot, we didn't have a large round serving platter so we used the largest sheet pan we had. As we lifted the pot we moved it a bit from left to right to keep everything on the sheet. There will be leftovers unless you are serving a very large family. We reheated the next day by adding just a bit of chicken broth to keep things moist, but be careful not to add to much of it will turn the rice mixture to mush.

Thursday, June 25, 2009

Latkes (Potato Pancakes)

When I was little, I loved to visit my grammie. And she would always make latkes at least one day for lunch while we were visiting. Now that I have found a recipe that compares somewhat to hers I am thrilled. We always at our latkes with a big dollop of cottage cheese on the side. Delicious! And it is super simple recipe. These have great potato flavor because of the use of the potato starch.

4-5 medium potatoes
1 egg
salt and pepper
canola oil
cheesecloth

Peel the potatoes. Then line a bowl with the cheesecloth (if you don't have this I have used a thinner kitchen towel, just be sure to rinse it after so it doesn't get stained from the potato starch), and shred the raw potatoes into the bowl. When all of the potatoes have been shredded wring as much of the liquid out of them with the cloth as possible into the bowl. Let this liquid sit for 5 minutes in the bowl. While it sits, heat oil in a large frying pan, enough to cover the bottom of the pan, to med-high heat. Once the liquid sits for 5 minutes the potato starch in the liquid settles to the bottom of the bowl, pour off just the liquid and not the potato starch (the starch in the bottom kind of looks like elmers school glue). Whisk together the egg, salt and pepper to taste and the potato starch. Then add in the shredded potatoes and mix it all up with a fork. Fry them a couple at a time in the oil until golden brown. I hold them in the oven on a cookie sheet at 200 degrees until I am finished cooking all of them.

My hints:

I use a 1/4 cup measure to keep them all about uniform size.
To get that nice creamy consistency in the middle when you first put them into the pan smash them down with the underside of the spatula.

Saturday, June 20, 2009

When Kids Make Bread

I'm probably known as the 'Bread Lady', at least for a while, to the Malaysians in D.C., as a result of this particular filled sweet bread. One Ramadan, the Malaysians asked if I could make 'more' for post Taraweeh. In Malaysia, there is a post tarawih indulgence, called more, which is usually a sweet porridge caller Bubur Caca. When the Malaysian Students Department staff paid a visit to Columbus that year, as they usually do each Ramadan, the Malaysian Student Association here had asked if I could make something for the iftar or more. They were to pay me for the cost, as funding was already available for this. I decided to make 200 small individual cream cheese rolls. All praises to Allah, it was a hit. I received suggestions to open a bakery or business. But that was not all. The next year, we went to D.C. for a conference, and stayed over at one of the staff's house. Our visit also included a tour in the Malaysian Embassy. That was when I realized that it wasn't just a hit, it had become history.

"So when are you going to make us more of that bread?" they kept asking me.

Their wives also asked me or told me about my 'bread'. I was flabbergasted. Of course, I smiled it off and made some awkward replies. I have to say that this recipe is quite fool proof, and the proof lies in the rise of the 'Bread Lady'.

Truth be told, I don't remember where I garnered this recipe from, but it is one of the best bread recipes I have tried in my bread-making endeavors. So far, I have filled it with the cream cheese filling, savory sardine cooked in tomato sauce filling, and chocolate cheese filling and orange cheese filling. Cream cheese filling is the favorite though.

One day, the kids decided to make this bread, all by themselves. I was quite hesitant, well, more like lazy to make it, because due to Baby Zayoudee's allergies, and my nursing him, I couldn't eat it anyway. So they got the green light from me and with minimal supervision from me, they labored in the kitchen making this bread.
This bread dough is not the one intended for this recipe, actually. The original bread dough recipe uses sour cream, which produces a much much more softer bread. Since I don't usually use sour cream for anything other than baking, I don't usually have it in my pantry. Nevertheless, this particular bread dough recipe is versatile and in my humble opinion, works very well for this Cream Cheese filled bread.

There is just something about braids that appeal to me. And apparently the kids too. Thus they decided to shape the bread like a Challah. Shaping the bread as individual rolls filled with the filling works too. It's pretty much any shape you want it to be, though with the filling, it can get pretty messy if you're not used to it. The other loaf, I shaped (yes, I finally plunged into the bread making activity too) simply into a rectangle that I spread with the filling. I enclosed it, seaming all sides, and then snipped the edges lengthwise at an angle, just enough to produce the second fat loaf in the photo below.

2 packages active dry yeast (4 1/2 tsp)
2/3 sugar divided ; 1 tsp + remaining
1 c warm water (105 -115 F)
1 tsp salt
1/2 c butter/margarine, softened
1/2 shortening
1 c boiling water
2 eggs beaten
6-7 c all purpose flour divided; 3 c + remaining


Filling:
3/4 c sugar
2 16 oz. packages cream cheese at room temperature
1 egg, lightly beaten
1/8 tsp salt
2 tsp vanilla


1. Dissolve yeast with 1 tsp sugar and 1 c warm water2. Let stand 5 minutes
3. Combine remaining sugar, salt, butter, and shortening
4. Add boiling water, stirring till the butter and shortening melt
5. Cool slightly
6. Add dissolved yeast, eggs, and 3 c flour and mix till smooth
7. Gradually add enough remaining flour to make soft dough
8. Knead until surface of dough is smooth, and when poked with a finger, the indentation bounces back
9. Place in a greased bowl (oil is ok)
10. Cover and let rise 1 - 1 1/2 hours, or until doubled in size
11. Punch dough down to get rid of air pockets
12. Knead lightly, not too much, or the bread may not be as soft
13. Divide the dough into four portions.
14. As you work with one portion, keep the rest under the shelter of a clean towel.
15. Shape each as you like, filling it with the filling. For the Challah shape roll out the dough into a rectangle about 1/4 inch thick and cut into three strips. Make sure each strip is wide enough for you to spread the filling and fold the seams closed. Braid these ropes into a Challah. Finish shaping all the portions and place them on greased baking sheets/pan, leaving enough room between them because they will double in size.
16. Cover and let rise 30-40 minutes or till doubled. Preheat oven to 325 F.
17. Brush the tops with egg wash (one egg yolk with a little milk, beat to combine) and sprinkle with sugar
18. Bake 20-25 min or till golden


One thing is for sure. Whatever shape you make them, when you sink your teeth into the fluffy softness followed by sweet yet tangy creamy filling, you're going to want to savor it for as long as you can.