Friday, October 31, 2008

Even the kids can do it!

I have to say up front; I don't like making cookies. Why? Because cookies bake in batches, and it requires you to remain the kitchen, by the oven, until all the batches of cookies are done. I prefer making cakes to cookies, because you can pop your pan of cake batter in the oven, set the timer, and go take a shower.

That is why I tell my kids they can make Eid cookies if they wanted to, and lucky for our family, my daughter prefers making cookies to cakes. These here cookies, are baked by the hands of three of my children, for Eid. Traditionally, Malaysians make all sorts of cookies for Eid Al Fitr, due to our custom of having guests throughout Shawwaal but especially during the first few days. When guests come unannounced, but are nonetheless somewhat expected, the presence of these Eid cookies relieve the hosts from scattering to the kitchen to whip something up several times a day, several days a week.


My children attained the recipe for this cookie from one of the library books they happened to have lying around at the time. Fortunately though, the recipe is online too on PopularCookieRecipes.com.


Even kids can do it! So what are you waiting for? ;)

Impromptu


I was trying to will the Chicken Ginger to come to life so I wouldn't have to cook this morning, but alas! I still had to cook. So cook I did, albeit with sighs and groans. I had thawed some boneless beef chunks right after Fajr, intending to make Rendang when my Friday visitor comes over, but she couldn't make it, so my menu changed because Rendang takes forever to make!

I wanted to make Pengek Daging (an Indonesian meat dish I have come to love), and I started working on the onions and garlic. I realized I didn't have ginger, fresh ginger, I mean. I dumped the onion chunks and garlic cloves in the blender, and as I looked up, I spied the new plastic jar of Madras curry powder I recently bought from the New Asia Super Market on 161. Hubby had said it was quite expensive, but I had made meatball curry using that curry powder and it was a hit! So I bought it anyway.

Normally, when I make curry, I would mince the onions, garlic, and ginger and then make a wet paste out of that and the curry powder, but today, I was feeling unmotivated, so I pounded the onions and garlic, forgoing the missing ginger, and sauteed them, with a spoon nonetheless, which reminded me of a friend who remarked that my kitchen was high tech because I had cutting boards, cooking utensils, and blenders *chuckle*. When she demonstrated how to make sukhaar to me, she simply stirred the ingredients in the pan with a humble spoon, whereas I would have gone for one of the cooking utensils. So I guess I decided to go 'low tech' this morning and save myself some dish washing labor.

I dumped the Madras curry powder in the sizzling oil that was nicely extracting the aromatic fragrance of cooking onion and garlic, and lo and behold, we had a 'curry mass'. Then I tossed in the whole spices as my oldest daughter watched on, with my tot on her hips. He was cranky because he didn't take his morning nap, which I had tried to make him take but he refused, oh so there you have it, one more thing that drove (or should I make that present tense) me to the depths of demotivation.

Realizing that I hadn't yet prepared the meat, I beckoned my son to stir it for me. So he did, while I scrambled and fumbled with half frozen beef chunks that threatened to give my fingers frostbite as I hastily cut them into haphazard small pieces, so as to speed up the cooking process, so we could eat lunch ASAP.

I have to admit, that while I thought of making beef curry, I thought of this blog.

Hmm...one more recipe to put up, and a few more food photography practice to indulge in!

However, the 'mass' in the pot was on the verge of burning as my son stirred it dutifully, so I grabbed a bowl, filled it with tap water and dumped it in the pot. I had intended to dump in the beef pieces first, but ahhh...there goes my 'orderly' recipe for the blog. I continued to deal with the cold beef chunks, struggling with some fat that stubbornly belied my dull knife, which immediately set off these thoughts in my head,

We need to get a set of new sharp knives, but oh...we can't because we don't know where we're going yet.

And those thoughts my dear Watson, are catalysts for other more depressing thoughts, so I will stop right there.

I added more water and tossed in all the beef pieces, and as my son stirred it, I looked on. It actually looked good.

"Does it look good?" I asked him.

"Yeah."

I skipped adding coconut milk, just because I was lazy and also because we have been consuming a lot of coconut milk as of late, and I just don't want to drive my bad cholesterol up the roof. About half an hour or more later, or maybe less, I don't know, I didn't look at the time, and if I did, it was to help my daughter give my allergic tot his first taste of rice milk at measured amounts and spaced intervals. With all the physical and mental multitasking I was doing, it was a wonder I even had lunch ready by the time we were ready to have it.

Such a simply and haphazardly made dish has managed to elicit such joy in my children, such that my son offered to cook more rice because he wanted to eat again after Jumuah prayer. As for me, despite my sighs and groans, I managed also to prepare the beef chunks for Satay Padang and Dendeng, which I hope will be blogworthy enough to be put up here in the very near future inshaallah.


Impromptu Madras Beef Curry


1/2 - 1 lb. boneless beef, cut into small bitesize pieces
1 onion, roughly pounded (or minced)
3-4 cloves of garlic, roughly pounded (or minced)
2 whole cloves
1 star anise
2-3 cardamom pods
1 cinnamon stick, broken
1/2 - 1/3 cup Madras Curry Powder
1/3 cup oil
lemon juice

1. Heat oil and saute onion and garlic till fragrant
2. Add in the whole spices
3. Add in curry powder and stir the resulting wet oily paste
4. Turn down heat to medium low, and continue stirring until the oil breaks the surface
5. Add beef slices, and stir to coat beef with paste
6. Add water enough to cover beef pieces
7. Cover and bring to boil
8. Turn down heat and bring to simmer until beef pieces are tender
9. Squeeze some lemon juice to taste, and salt to taste
10. Serve hot with white Jasmine rice and accompanying greens

Cook's Notes:

  • You can also mix the minced onions, garlic, whole spices, and curry powder and add enough water to make a wet paste and saute this in the oil instead of step 1 through 3 above
  • You can keep the beef pieces big too if you want, but the cooking time might be longer to cook them till they are tender
  • You can also garnish it with fresh curry leaves if you have any on hand
  • You can also toss in peeled potato chunks and sliced carrots while at the simmering step (Step 8)

Moroccan Fruit Salad


I first tasted this at an iftar gathering over Ramadan and I fell in love. It's also a much healthier alternative to deserts at your dinner parties. Considering all of the cake and chocolate we've been eating lately, I decided to quickly put together a healthier option. With tons of school work and midterms underway, the 10 minute preparation time was also pretty appealing :)

What you'll need

- some red and green seedless grapes, sliced in half
- strawberries, chopped up to make bite size pieces
- kiwi, peeled and chopped
- bananas, chopped
- oranges, chopped
- 3 tablespoons yogurt (You could add more- we're not big on yogurt though)
- 1 cup of mango juice (you can also use orange juice)
- 1 teaspoon of sugar
- any other fruits of your choice, this is just what I had in my fridge

1. Chop and dice your grapes, strawberries, kiwi, bananas, and oranges and throw them into a bowl to mix
2. Add the yogurt and mix
3. add one cup of mango juice, 1 tsp of sugar, and mix
4. Serve :)

* I planned to make fruit kebabs but I remembered I needed skewers for that!

Thursday, October 30, 2008

Malaysianised Somali Bariis?


I had the wonderful opportunity of watching a Somali make Bariis in her own unique style, which I think will be imprinted in my mind forever. Here in Columbus, OH, Darbo is popular among the Malaysian brothers. Most of them, being single hungry students who most of the time are too lazy/busy/tired to cook, would head out to Darbo and have their lunch and dinner.

I have eaten rice cooked the Yemeni style, Turkish style, Saudi style, Indopak style, Egyptian style, and of course the Somali style. Each style of cooking seems to produce this wonderful fluffed up plump yet long separated rice grains, glistening and individually coated with the mixture of spices. I also realized that the way Basmati rice is cooked by Malaysians for some special rice dishes that I think are originally adapted from international rice dishes is quite different.

I have never managed to master cooking Basmati rice, despite witnessing how these sisters of various ethnicities cook it, that is until, I saw how the Somali Bariis was made. May Allah reward Ruqiya for showing me how to make Somali Bariis, her way (because apparently, other Somalis make their Bariis differently).

After trying to cook Basmati rice in so many different ways before, I truly believe that what makes a big difference in how the rice turns out, is not soaking it first. The Somali Bariis that was demonstrated to me didn't involve any presoaking, and involved intense frying, until all the oil was absorbed by the rice grains, after which hot stock was poured in, producing a whoosh of hot steam that can be dangerous. But I discovered that this makes for really plump and separated rice grains.

I love cooking Basmati rice, and have discovered that it's easier to cook Basmati rice (any style) for a large number of people, and have resorted to doing this whenever we have more than 10 people over. My resulting dilemma then, is, adapting my Malaysian meat or poultry dishes and even vegetables, to marry well with the Basmati rice. In my humble opinion, and I believe maybe most Malaysians would think this too, typical everyday Malaysian meat/poultry/seafood dishes and accompanying vegetables do not pair very well with Basmati rice cooked in oil. They do however, blend in very well with plain white rice cooked with plain water. They are in fact flavored and cooked to be eaten with white rice! So whenever I do cook Basmati rice in oil, I have had to make meat/poultry dishes that are suitable, and it has not been that easy, at least not for me.

Here is my version of (I say mine because I have probably fiddled with it so much that it would not do Ruqi's Bariis much justice) the Somali Bariis:


Juli's version of Ruqi's Somali Bariis

5 cups of Basmati rice
1 medium onion, minced
1 Tbs curry powder
1/2 Tbs ground coriander
1/4 Tbs ground cumin
1/4 Tbs turmeric powder
1 tsp chilli powder/paprika
dash of salt
1 cinnamon stick roughly crushed
2-3 cardamom pods
2-3 cloves
7 1/2 cups hot beef/chicken stock
1/4 - 1/3 cup oil

1. Heat oil and toss in the minced onions until fragrant, then add the whole spices (cardamom, cinnamon stick, cloves)
2. Add rice and stir frequently, coating each grain with oil
3. Add the ground spices
4. Continue stirring until the oil is absorbed by the rice grains

5. Pour in the hot stock, but be prepared to move away very quickly from the pot because it will truly hiss and smoke!
6. Wait until it comes to a boil (since the stock is hot, this will happen pretty quickly)
7. Turn the heat down to low and cover the pot
8. Meanwhile, preheat the oven to 350 Fahrenheit
9. When the rice looks almost done (not submerged in water but if you poke all the way to the bottom of the pot, there will still be water), transfer it to the oven until it's done (it's done when all the water has been absorbed and the rice looks fluffy)


Cook's notes:


  • I use a big Mexican caldero to cook this in. A bigger wider pot is more effective than a taller pot (like a stock pot) because it helps distribute the water evenly among the rice grains

  • Make sure the pot is also oven safe to make for easier transfer from stove top to the oven

  • You can also finish cooking the rice on the stove top, but I believe that finishing the rice off in the oven makes it fluffier

  • Did you know that uncooked rice in Malay is called 'beras' (pronounced buh-russ)? So I understand Bariss. :) Cooked rice is called 'Nasi' in Malay by the way. I can foresee future Malaysian 'Nasi' recipes coming up inshaallah, though maybe not in the near future.

I'm sure my version of Somali Bariss may not be up to par with the true Somali Bariss, but at least, when I no longer have my Somali sistahs around to cook the Bariss for me, I can still whip up my own version and keep that taste of Somali (as how I remember it) with me. And I'm sure the Malaysian brothers who adore Darbo appreciates my version, which is free too.

Bariis & Sukhaar


We eat different variations of bariis (rice) and sukhaar (small pieces of beef or chicken) about once a week in my home and what I love most about it is that you can cook it differently each time- no meal will taste the same. Here's one I made last week:

The rice

What you'll need:

- 4 cups of rice
- 1 tomato chopped
- 2 maggi chicken cubes
- handful of chopped parsley
- minced garlic
- 1/2 of an onion chopped
-

Steps

1. sautee the onions over a medium-high heat until they are golden brown.
2. add your chopped tomato, minced garlic, and parsley
3. add your maggi cubes and mix
4. add 4 cups of rice and mix
5. add 3 cups of water
6. put rice on low-medium heat and leave it for 20 minutes
7. pre-heat your oven to 350 degrees
8. after twenty minutes, put the rice in the oven to finish cooking
9. take rice out of the oven after 10 minutes and leave to cool

Chicken Sukhaar

What you'll need

- yogurt
- 1 tablespoon of butter
- 1/2 of an onion, chopped
- minced garlic
- chopped parsley
- xawaaji (a Somali spice)
- curry
- paprika
- chilli powder
- salt
- pepper
- garlic powder

Steps

1. marinate 1/4 pound of chicken sukhaar (chicken breast cut into small pieces)
2. mix sukhaar with 4 tablespoons of yogurt, and all of the above mentioned spices
3. mix it well and refrigerate for at least 3 hours
3. 3 hours later, grease a frying pan on medium-high with butter
4. add your marinated chicken to fry
5. 10 minutes later, add your chopped onions, parsely, and minced garlic
6. put on medium-low for 10-15 minutes
7. done

Serve your rice and sukhaar :)

Enjoy!

Ginger and Chicken, No Oyster.


Originally, oyster sauce is used for flavoring and provides authenticity of Chinese cuisines.. I think! But this time, I decided to make Chicken Ginger without oyster sauce because we were out of it , besides I could make it an Allergy-Free version who craves for the real taste of this wonderful chicken cuisines but can’t do shellfish - oyster, scallop, shrimp, squid and anything made from one of these. In my humble opinion, by using sesame oil for sauteing really gives the true taste of Chicken Ginger , and yes.. do not omit the ginger; that’s where the main flavor and aroma comes from. So make sure you have dark or light sesame oil in hands ;it can be found almost anywhere now.

The substitute I used in place for oyster sauce was based on my grandma’s whom I adore for her cooking soooo much, she is absolutely a great cook to the whole family. I guess everybody thinks their grandma’s foods are the best.MasyaAllah, my grandma doesn’t use oyster sauce much in her cooking yet still get the wonderful flavor and of course taste. She loves tamarind and palm sugar in most of her recipes . The idea of subbing these 2 ingredients came up then. Thanks grandma! I love you…!!

I forgot to measure each ingredients in detail because it was a quick ‘experiment’ . The good news is the Chicken Ginger turned out as good even though no oyster sauce added. The actual taste is still there.. alhamdulillah!

Ok, let’s see what we need to make No Oyster Sauce Chicken Ginger...Please adjust salt and sugar to your taste.

Chicken Ginger

Ingredients:

To marinate:

1 1/2 lbs chicken breast , sliced

1/2 cube chicken bouillon

1 tsp. white pepper powder

1 Tbsp. cornstarch (See Notes)

Combine all together and marinate for 20 - 30 minutes in the refrigerator.

Mix together :

1 or 2 Tbsp. palm sugar

1/3 Cup thick tamarind juice

1/4 Cube chicken bouillon (See Notes)

Mix all until sugar and bouillon are completely dissolved.

Other fresh Ingredients:

2 Inches ginger root, thinly sliced

1 large yellow onion, roughly sliced

3 Cloves garlics, pounded

2 Tbsp. dark sesame oil ( See Notes)

1 Cup thinly sliced carrots

1 Cup green peppers , slice 3 inches length

1 Cup red peppers , slice 3 inches length

1Tbsp. Cornstarch mix in 1/4 - 1/3 Cup water

Salt , palm sugar and white pepper to taste ( See Notes)

Garnishing : Chopped green onions , fried shallot, toasted sesame seeds

Method:

Heat a medium sized pan on medium-high, drizzle 2 Tbsp sesame oil and let it heat for 1 minutes or 2.

Add in sliced ginger and marinated chicken and saute for 2 minutes. Stir every few minutes until the chicken just slightly crisp and fragrant from the ginger .( Do not cook the chicken too long especially chicken breast , this is to keep the chicken moist and tender)

Stir in the onions, peppers and carrots until they begin to soften. About 4 - 5 minutes. Pour the sweet sour mixture ( tamarind, palm sugar, chicken cube) , let it boil. Lower the heat to low , slowly pour cornstarch mixture, keep stirring to avoid lumps.Add more water if necessary . Let it thicken , add salt/sugar / white pepper to your taste. Garnish with chopped green onion, fried shallot and sprinkle sesame seeds on top.

Serve immediately with hot rice.

Served with hot jasmine rice

Notes Of The Day

  1. If you can’t use or out of cornstarch, replace with potato starch or sweet ( glutinous) rice flour . These too are great option to thicken your sauce.
  2. If you can’t find chicken cube ( the halal) in your place, vegetable bouillon would be find.
  3. Use Dark sesame oil for best result. light sesame works too. Like olive oil, grape seed oil and other low saturated fat oil… sesame seed oil provides health benefit to us and help lower cholesterol. If canola oil all you have, that’s find! .. it just the real flavor you will miss. Try not to use olive oil.. it works terribly.
  4. I didn’t have to add salt and extra sugar - chicken cube contains salt. I only had to add a little more white pepper - I wanted it hot and spicy.

Wednesday, October 29, 2008

Get the Ice Cream, Quick!

I love this dish, and so do my children. It's considered a simple humble dish because it consists of eggs, not chicken or meat, but I can eat this dish with white rice and fresh slices of celery stalk or cucumbers over and over and over!

I love spicy food. I can't live without them. However, I think I probably overdid it, since I recently found out that I can't take chomping down on fresh bird's eye chillies like I used to (which my husband and I began to take up after the kids ate with us). Since both of us can't live without having this hotness in our food, whenever I cook something that is not spicy or not spicy enough, we'd get a few bird's eye chillies and bite on them with every two or three fingerfuls of rice and whatever meat/chicken dish was accompanying our meal.

Sambal is what we call our spicy condiments. It's like the Somali Bizbaaz, except I think it's way spicier. Sambal is usually not generously slathered onto the rice, since it's very spicy! When eating it, we would scoop about less than a teaspoon of it, and mix it in our pristine, steaming white rice to 'flavor' it. Of course for those who can tolerate the hotness, maybe more than a teaspoon of sambal is needed.

Tip to deal with the spiciness when it hits your tongue: do NOT drink water, or juice, hot or cold becuase it will only spread the capsaicin molecules (the culprit that contains that spiciness) all over your tongue! Drink whole milk or gobble up several spoons of ice cream (full fat), because the fat molecules trap the capsaicin molecules and carry them safely down your throat. In fact, when training my children to tolerate the heat from spicy food, I would have a glass of whole milk on standby.

Ready for the adventure?


Sambal Telur ( Egg Sambal)


5 hard boiled eggs, peeled and wiped dry with paper towels
1 1/2 - 2 cups (roughly) dried chillies* soaked in hot water to rehydrate, then blended in a blender
1 medium sized onion, cut intochunks
3 cloves of garlic
4 Tbs sugar
salt
1/2 tsp tamarind paste mixed with 1/4 cup water to make tamarind juice (optional)
Oil for frying the eggs


  1. Dump in a blender: the rehydrated chillies, onion chunks, and garlic cloves, and blend till combined. Set aside.

  2. Heat enough oil in a saucepan such that the whole hard-boiled eggs can be partially submerged in it.

  3. Gently and slowly place the eggs in the hot oil. They will sizzle and the oil will start bubbling around each egg as the bottom halves start to beautifully brown

  4. Roll them over to fry the other side. The fried side should look brown with a crinkly texture

  5. Drain them on a paper towel when the surface of the eggs are roughly browned. (don't worry about parts that are not browned)

  6. In the same oil, pour in the blended mixture in step 0, and cook for about 5-10 minutes. Keep stirring.

  7. Meanwhile, slice the fried eggs in half, and set them aside

  8. Put in sugar and salt in the cooking sambal

  9. If using tamarind juice, add them in at this point. Cook for additional 3-5 minutes. You may see sambal darkening as a result of the sugar caramelizing.

  10. Add in the eggs, and gently stir so they will be somewhat coated in the cooked sambal

  11. Serve hot with steaming white rice and accompanying greens


Cook's Notes:


  • Make sure the oil is hot before you put the eggs in, or the eggs might stick to the bottom of the pan!

  • Make sure the eggs are really wiped dry to avoid splatter when frying

  • A serrated knife may make slicing the fried eggs easier

  • For a healthier version, toss aside the oil used for frying, and get new oil to cook the sambal in

  • You can reduce the amount of oil if you want, before step 5.

  • *To rehydrate the dried chillies: boil water, submerge the dried chillies in it, keep them submerged, and soak for about half an hour or more, or until they are soft. Pluck off the stem before soaking them (the Mexican ones sometimes have stems). Refer to this post.

  • Get the small, thin dried chillies and mix with the Mexican big sweet dried chillies. The thinner and smaller the chillies, the spicier. The bigger and darker, the sweeter and less spicier. I use Ancho(big and sweet) mixed with Chipotle or Arbol (smaller and spicier) to tame the spice a little, for the kids. For those living in the Columbus, you may find them at Meijer in the vegetable section.

  • The blender that you use must be one that you don't mind using for onions and chillies. You might not want to use a blender that you also use to make smoothies or milk shakes :)

  • The tamarind juice gives it a tangy taste and improves the taste significantly, but if you don't have it, it will also work.

  • When you go to Asian grocery stores, ask for tamarind paste (using the paste may be easier than using the pods version)

  • You can make this dish without frying the hard boiled eggs, but the sambal will most likely slide off the surface of the eggs. The crinkly texture as a result of frying, is what enables the sambal to adhere to the eggs' exterior, and it also gives a different texture to the eggs when you bite on them.

  • You can also, instead of blending the chillies, onions and garlic till they are smooth, in a blender, roughly pound the onions and garlic with mortar and pestle, and saute them with the blended rehydrated dried chilllies as in step 5.

  • I make a jar of these rehydrated dried chillies to keep in the fridge for more than a one time use.

Information on dried chillies from the Cook's Thesaurus

What an excuse to have ice cream for dinner, huh? ;)


Eat Your Greens!


I personally love stir-fried vegetables, Chinese style. The aroma of freshly cooked vegetables, particularly that of green beans, cabbage, and carrots drives up my appetite. It brings back memories of one vacation I had on the high plains of Malaysia's central mountain range, Cameron Highlands where my father rented a vacation house, and we got to cook freshly bought vegetables from the local farmer's market.

I think I can officially attribute my love of greens to my grandmother's incessant nagging of,

"Eat your greens. You'll stay looking young that way."

I would dutifully eat my greens, even the bitter tasting ones, because looking old was something to be scared of back then. My father doesn't look his age, and neither does my mother, and for that matter neither did my grandmother. I feared not looking my age (the opposite way) since almost everyone in my family seem to have this youthful look, so I gobbled up my greens. I grew to love them. In fact, I don't remember hating them at all. Now, I deem any meal that doesn't have greens as lacking something crucial.

Unfortunately though, my kids, despite eating their greens with gusto in their earlier years, are now rather fussy about their greens, well, except for my eight year old son, who seems to maybe have inherited my love for greens. So, in an attempt to give a twist to my usual cabbage and carrot stir-fry, I decided to experiment.

Thus was born my Chips in Stir Fry...


2 cloves of garlic, minced
1/5 of a yellow onion, minced
1/5 of a cabbage, sliced thinly
1 carrot, peeled and sliced
1 potato, peeled, and sliced very thinly (imagine making potato chips)
2 tbs oil
salt
pepper


1. In a frying pan, heat the oil and fry the potato slices till golden on both sides
2. Drain the fried potato chips on a plate lined with paper towel
3. In the same oil, quickly throw in the minced onion and garlic and saute them till lihgtly browned and fragrant
4. Toss in the carrot slices and stir-fry till slightly soft, or crunchy, depending on your preference. (if the carrots begin to stick and the oil evaporates, add a little water)
5. Throw in the cabbage and stir
6. Toss in the potato chips and stir till combined
7. Salt and pepper it to taste
8. Take the pan off the heat when the cabbage glistens and looks bright green
(I like my cabbages slightly undercooked for the crunchy texture)\

Cook's Notes:


  • I like my greens slightly undercooked. If you like yours thoroughly cooked, don't take them off the heat until they're thoroughly cooked. Duhh...


  • You can double, triple the recipe as you see fit.


  • We usually eat our veggies with cooked white rice and a meat/chicken/seafood dish - one of our staple lunch and dinner. If you're not Malaysian, you can try eating this with taco shells or wrapped in tortilla, or just by itself!


  • For a healthier version, you can brush the potato slices with oil and bake them until they brown, and then toss them in with the stir fried veggies.

Is this a hit with the kids? Yeah, pretty much, though some of them still pick through the whole medley for just the potato chips. Maybe I need to blend all these veggies and sneak it in their drinks.

Chocolate Chip Pancakes


Alright, I followed Zurina's (UmmJuli) chocolate chip pancake recipe and made this for breakfast this morning. I too had some chocolate chips hanging around waiting to be used and have never made or had chocolate chip pancakes. Alhamdulilah. The recipe is as follows:

1 cup plain flour
2 teaspn baking powder
2 Tblspn sugar or according to taste
1/4 teasp salt
2 eggs
1/2 cup fresh milk
1/4 cup chocolate chips/frozen blueberries/ sliced bananas or grated coconut

Mix the first six ingredients until no lumps are visible. Add the chocolate chips. Stir. Let rest for at least fifteen minutes to allow the batter to thicken a little.

Heat a pan. Melt 1 or 2 teaspoons of butter in a pan and drop two tablespoonfuls of batter for each pancake. I cooked four pancakes at a time in my pan. Perhaps a bigger pan would be more convenient and will finish off the batter quicker.

TIPS : None. Oh well, don't omit the salt, even in sweet cakes, because it makes such a difference.

Serve warm with honey.

Enjoy :)

Tuesday, October 28, 2008

Somali Shaah (Tea)

I love tea :D Need I say more?


What you'll need

- water
- milk
- sugar
- tea bags
- cardamom
- cloves
- cinnamon

Steps

1. Boil 4 cups of water
2. Add one cup of sugar
3. add your tea bags (I use 2)
4. crush 5-8 cardamom pods and throw them in the kettle
5. crush 1 cinnamon stick and throw it in the kettle
6. crush 3-5 cloves and throw them in the kettle (I add a little extra)
7. Boil for 5 minutes.
8. Serve black or with milk/cream.

Enjoy.

Chapati

I normally stay away from making Chapati (a kind of bread) because it sets the smoke detectors off but when I do make them, I make enough for a few meals.

Here's the recipe:

What you'll need
- 3 cups of flour
- 2 cups of water
- 1/4 tsp of salt

What to do

1. Mix the flour and the salt
2. Slowly add in the water
3. Keep mixing it with your hands until you make a dough like ball

4. Divide the dough into small palm size pieces and flatten it out


5. Place one Chapati on your pan, when it starts to puff up with small circles, pour droplets of olive oil and flip over

6. Repeat the flipping process until the Chapati is as dark and crispy as you want it to be


Enjoy!

Monday, October 27, 2008

Baguette

I made this french bread after I’ve been craving for so long to make it my own. The texture was perfectly crisp from the outside and gooey chewy from the inside.. great for lunch! It took me a good 4 hours to get it done but alhamdulilah.. not so bad for a first timer making baguette! I am truly satisfied.. I really am.

I followed this recipe to the letter. It might look like tonnes of work is required .. it’s not!

Slice ‘em, ready to go..

Made Garlic Bread - Broil it for 3 minutes, drizzle with grape seed oil ( you can use extra virgin olive oil or may be canola oil; normally spread with butter but I am in the no-trans fat mood) , spread with toasted garlic and sprinkle with sea salt. Put it back in the oven , broil for 3 more minutes.. done!

Serve it with hot pumpkin soup or soup of your choice and you are good to go!!….Have a great lunch! :D

http://healthykitchen.wordpress.com

Tiramisu Cake

Okay, so my 1st attempt at making Tiramisu was not without flaws. I'm not much of a baker so I tried it out hoping to ignite some sort of motivation, and surely, it worked! I plan to keep trying until I get it right =). The filling turned out a little too runny (too much cream and not enough mascarpone cheese) as seen in the photo, but I put it in the freezer for 1 hr before putting it together to thicken it out... it was still too runny though. I will adjust the recipe accordingly.


So here's what you'll need:

- 750g mascarpone cheese (fresh cheese aisle at your local grocery store)
- 6 eggs
- 500 ml of cream
- 1 cup of espresso coffee
- 3 packs of ladyfingers (cookie aisle at your local grocery store)
- 1 cup of sugar
- cocoa powder

Making the Filling:

1. Mix 6 eggs (without the whites) and 1 cup of sugar thoroughly using an electric hand mixer or until it thickens and turns a light yellowish colour.


2. Put on the stove (preferably a double boiler so that it doesn't burn!) and heat for 5 minutes.
3. Pour 500 ml of cream in a separate bowl and mix for 5-10 minutes until it thickens using an electric hand mixer.
4. add 750 g of mascarpone cheese, then add your 1 cup of coffee to the cream and mix them together using a good spoon.


5. Pour the egg and sugar mix in to the cheese and cream mix and mix thoroughly using a good spoon, until it becomes a smooth paste. [warning: it shouldn't be as runny as in the pic... mine turned out that way. It should be much thicker!]


6. now you're ready to put the cake together

Putting it together

1. Line up your lady fingers across your pan making sure to cover all of the holes


2. Fill up your first layer of filling on top of the lady fingers
3. Line up your second layer of lady fingers
4. Put the top layer of filling on
5. Refrigerate over night
6. In the morning (or at least 6 hours later) top with cocoa powder.
7. So from the bottom up: lady fingers, filling, 2nd layer of lady fingers, 2nd layer of filling, cocoa powder.
Enjoy!

*Notes

- In the future I plan to substitute the cheese for vanilla or something similar inshaa Allah, I'm not a fan of cheese in general so I wasn't fond of the taste. alhamdulilah!
- Instead of pouring the coffee into the mix, you have the option of dipping each lady finger into a bowl of coffee before putting the cake together so that the coffee flavour is still there.
- Instead of lady fingers, you can use wafers or graham crackers. I haven't tried it but it's been recommended to me

questions? ask away!

Coconut Ice Cream


Does coconut sound familiar to you? to my knowledge , It does for people who live in a tropical country such as South East Asia and some part of Africa. Probably in Hawaii and Caribbean they use coconut a lot too. As for Malaysians, we are grown up with coconut milk , everyday.. ok , I am exaggerating . Not daily but it is “all time available” in the kitchen and we still using it today.

Nowadays, I see Vegans in America and Canada..(I am sure from any other countries too ) use coconut milk a lot for milk alternative in their cooking. This is especially to achieve rich creamy and flavorful dishes as they can get from dairy products/foods.

Ok, I am not a coconut expert so enough about it. What I am about to share you is coconut ice cream that I actually whimped out to even experiment with. Alhamdulillah, I did. I was inspired by a friend , can I just say she is like a sister to me who very much loves ice cream for it’s richness . Let me make it clear, she is not very much into dessert but ice cream.. definitely the only. And recently she can’t tolerate anything dairy for some reason ( let me ask her if she’s ok to say it out loud here, ok I decided not to) . As she mentioned about ice cream made from rice milk, my first impression was not so creamy and more on sorbet-y side.. am I right ? correct me If I am not!

I then raced home and did some research about other milk alternative for ice cream.. something came up in my mind.. what about giving coconut milk a chance! Did some research again, I found a lot for coconut ice cream recipe but for allergy free just seemed impossible. I decided to experiment myself BUT referring from several sources from dairy to vegan. I finally made homemade ice cream that is especially allergy-free ( if you can eat coconut ) and you will never ever miss dairy ice cream.. again!

Thanks a bunch to them for their helpful tips about making ice cream , I will try to update the links I referred to InsyaAllah Please stay tuned! And thanks a zillion to her also for the inspiration that leads me to this.

And for those out there , don’t be afraid to try this recipe.

Vanilla Coconut Ice Cream

Ingredients:

1 ½ Cups coconut milk (See Notes)

½ Tsp. agar-agar powder (See Notes)

Pinch of Salt

1 Tsp. vanilla extract

1/3 Cup white sugar

1 Tbsp. apricot preserve ( See Notes)

1 Tbsp. tapioca starch ( See Notes)

2 Tbsp. coconut oil

2 Tsp. lime juice

1 - In a small pot or sauce pan , combine 1 cup of coconut milk , agar-agar powder and salt. Allow to sit, covered on your countertop.

2 – Cook over medium-low heat until agar-agar is completely dissolved, keep stirring to avoid lumps and burn on the bottom of the pot.

3 – When the mixture starts to boil, turn the heat to low. Stir in white sugar, apricot preserve and continue stirring until the sugar dissolved. At this point, the mixture should be thick ( not too thick) .

4 – If everything (sugar and agar) is completely dissolved, ( the key to determine whether it’s dissolved or not; spoon just a little bit of the mixture with a metal spoon or rubber spatula , when you can still see bits of agar then it’s not ready yet.. keep stirring.)

5 – If everything is all dissolved, remove from the heat and immediately, pour the mixture in a deep shallow bowl. Using a hand blender ( immersion blender) , blend thoroughly to achieve smooth and silky mixture. (this process is to making sure that bits from apricot preserve and agar are perfectly blended.) – if you don’t have immersion blender, regular blender or food processor works well too.

6 – Now, while it’s still warm you can start adding tapioca starch bit by bit. Again use immersion blender / blender/ food processor to bring them all together. Let the the mixture sit at room temperature until it start to firm up and then refrigerate until solid and chilled.

7 – Again, blend again with your blender until smooth and velvety. Slowly pour the remaining coconut milk, coconut oil and lime juice until well mixed. ( See Notes)

8 – Chilled again for 20-30 minutes (for best result chilled overnight) so the ingredients can get to know each other. When it’s ready, pour in ice cream machine and follow the manufacturer instruction. Churn for 20 – 30 minutes, pour in air tight container and allow to freeze for 20 minutes before served.

OR

If you are not using ice cream machine, beat with heavy duty electric mixer for at least 10 minutes on high speed until it fluff up. Place in the freezer for 60 minutes to allow chilling and repeat the same process for 3-4 times. I know it sounds a lot of work but it worth the effort, insyaAllah.

Notes Of The Day:

1 - Please please please use full fat coconut milk, it won’t work if using lite coconut milk.. you will not get that creamy velvety ice cream. Shake the can first before using.

2 - If agar-agar powder isn’t available in your kitchen, use agar flakes BUT the amount used will definitely change, instead of 1/2 Tsp. try 1 1/2 Tsp of agar flakes but I can’t really vouch that.

3 - For tapioca starch, you can sub with cornstarch or xanthan gum since it helps thickening and avoid crystallization for frozen dessert.

4 - In step 7 , you can add your own variation by adding frozen fruits such as banana, raspberry, strawberry and etc. I tried banana and it turned out great.. alhamdulillah.

5 - Oh before I forgot, adding apricot preserve actually enhances the flavor and also helps from crystallization when freezing.

Enjoy!!

http://healthykitchen.wordpress.com/


Saturday, October 25, 2008

BBQ Southeast Asian Style


Let's just begin by saying I have had bad experiences making satay. I followed all the tips regarding the skewer sticks, but they still smoked horrendously in the oven (I don't have a BBQ grill), thereby triggering an annoying persistent ear-piercing wail of the smoke alarm. I even soaked the wooden skewers overnight, yet they were still burnt.

Fortunately, my love or rather desire, for satay was too high for me to abandon trying to make it altogether, and I tried again, but instead of threading marinated beef slices onto the soaked skewers, I endured the ordeal of deboning whole chickens and chicken drumsticks to make chicken satay. Of course, I had to google the recipe for it, for making satay has obviously not been my strong point. Alhamdulillah, I stumbled upon this Chicken Satay recipe from Rasa Malaysia, which I find pleasantly simple and true to taste.


As I arranged my chicken-threaded skewers on my aluminum foil-lined broiling pan, I made dua the skewers wouldn't burn again. I put the oven on bake for about 350 Fahrenheit until the chicken pieces looked cooked, then turned it on to broil until they were somewhat burnt to a dark brown crisp.


Allahu Akbar! The skewers didn't burn, because the chicken pieces did not take too long to cook, unlike beef, and the skewers managed to withstand the heat of the oven. Now, if we're talking about grilling these satay on an outdoor grill, like the satay sellers do, beef satay would probably be a cinch to make!

Though for my next intended try in making beef satay, I am thinking that I should boil the beef pieces first till tender, marinate them, thread them on the skewers and then grill them. I have a Satay Padang (a Sumatran satay I'm also used to eating growing up, particularly because my father is originally from Sumatra) recipe lying in wait to be tried, which is also allergy free (well, with regards to wheat, gluten, eggs, dairy, and peanut).


Malaysian satay are usually accompanied by peanut sauce (recipe from Rasa Malaysia), which I didn't make because of my toddler's peanut allergy, so I simply devoured my first successful chicken satay, 'dipless'. What a blessing it was, nevertheless! Alhamdulillah.

Because of my tot's allergy, I omitted the soy sauce and oyster sauce from the original recipe, but it still tasted delish!


Satay Ayam (Chicken Satay)

Ingredients:

Deboned chicken legs, cut into roughly 2 x 1 in pieces (big enough to thread on the skewer, you can also cut them into a long strip 1 1/2 in wide and simple weave the skewer through the whole length of the chicken strip)

Spice Paste:

1 tsp of ground coriander
2 stalks lemon grass **
6 shallots/ 1 medium-large sized onion (peeled)
2 cloves garlic (peeled)
4 Tbs of cooking oil
1 tsp chili powder
2 tsp turmeric powder
1 tsp sugar/ 1/2 tsp honey
Bamboo skewers (soaked in water for 2 hours to avoid burning)

1. Blend the spice paste ingredients or process in food processor
2. Marinate the chicken pieces with spice paste for 10-12 hours
3. Thread the chicken meat onto the skewers
4. Preheat oven to 350 Fahrenheit
5. Line a broiling pan with aluminum foil and lightly grease with oil
6. Arrange the satay sticks already threaded with chicken pieces on pan
7. Brush the chicken meat with oil
8. Bake for about 10 minutes, flipping them over after 5 minutes
9. If it looks done, broil for about 2-3 minutes each side, or until they're browned slightly


Cook's Notes:


  • When threading the chicken meat, make sure the skewer pierces through the meatiest part of the meat, otherwise the the meat pieces might fall off the skewers!


  • If you have a grill, by all means, grill them!


  • If you do, don't brush oil on them, because they already have oil in the marinade


  • When you grill them, be careful to extend the unfilled part of the skewers outside of the grilling bars so they don't get burned


  • If they are marinade left over, use it to saute some vegetables in so as to avoid wastage


  • You can eat them like the Malaysians do (dipped in spicy chunky peanut sauce, along with cubed rice cakes, and fresh wedges of cucumber), or like the Americans do (just like that, like BBQ meats)


  • Try to use the dark meat of the chicken (legs), because the white meat (breasts) tend to get dry


  • **Lemon grass stalks can be found at some grocery stores, and Asian grocery stores.


  • Sometimes they're sold frozen, already shredded. You can use this too for simplicity.


  • They're even sold in powder form, but of course this is less fresh.


  • Don't use the whole length, only use 5-6 inches of the bottom part (cut off the remaining root base).


  • When you blend or process them, they will be shredded. Don't be afraid if you hear some roaring in your blender.


  • I usually buy a lot of them, chop off the top part, and store them in my freezer for longer shelf life.


  • Lemon grass provides a tangy taste and fragrance to the cooked food.


* How to debone a chicken: (a very sharp knife makes a LOT of difference!)


Satay Wiki, if you wish to know more about it.

The next time you're having a BBQ, you may want to give it a Southeast Asian twist!

Pumpkin...Pie?

2 little pumpkins were still there sitting on my kitchen pantry since we bought them from the farm. Surprisingly, I had so many wish-to-do list to make with the pumpkins and didn’t know where to start. My mind started browsing up and down the list , let’s go with pumpkin pie first!

I chose the bigger one , cut it, peeled , cored and diced it. Cooked the diced pumpkins and ready to use.

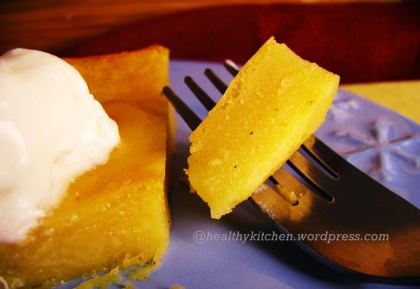
I wanted to make gluten free pumpkin pie, may be crustless pie? pumpkin rice cake or in Malaysia we call it, kuih talam labu? yes , alhamdulillah..I got it! All I need was to play around with the recipe that is lower in fat and gluten free.

Alhamdulillah, the result was a success to my expectation; creamy , not too sweet, custard-y from the inside and slight crust formed along the bottom and sides of the pan make it easy to cut. It is all about the flavor and texture that remind me to malaysian rice cake and pumpkin pie or in between.

Pumpkin Pie

Ingredients:

2 1/2 Cups cooked and diced pumpkin

1/2 Cup white rice flour

2 Tbsp tapioca flour

2 Tbsp potato starch (not potato flour) [ see notes]

2 Cups lite coconut milk ( see notes )

3/4 Cup white sugar

1/4 Tsp of each cinnamon powder , nutmeg powder and ginger powder

pinch of salt

2 1/2 Tbsp coconut oil ( preferable) or other light tasting oil

Method :

  1. Preheat the oven to 325 F
  2. Combine the first 5 ingredients in the blender and blend untill smooth.
  3. Add in sugar , salt , the spices ( cinnamon, ginger and nutmeg) and 2 Tbsp coconut oil.Blend on high, stopping to scrape the sides a couple of times to make sure everything is thoroughly blended. In the mean time, grease the remaining oil (1/2 tsp ) on a 8 - 9 inch pie pan and preheat the pan in the preheated oven.
  4. Pour the mixture into a large pot. Pre-cook on medium-low heat ( keep stirring to avoid lumps and burn on the bottom) until bubbles appear on top and creates steam. The consistency should not be too thick or too runny by now.
  5. Take the preheated pan out of the oven, pour mixture into the pan.. shake a little bit to level it out.
  6. Bake in the oven for 45 to 50 minutes.The top and edges should be brown, but the edges should not be over-done. Do not use fork, toothpick or knife to test because it will remain moist in the middle while still hot even though it is actually done.
  7. Remove from the oven and allow to cool at room temperature. For best results, refrigerate until chilled and completely firm before serving.

This recipe makes 10 servings . I served the pie with coconut ice-cream, InsyaAllah I will post the ice cream recipe on the next entry.

Notes Of The Day :

1- If you are out of potato starch or allergy to it, you can subs with cornstarch. If you can go with egg, you can use one egg instead of the starch.

2 - For the best result, please use coconut milk. If you cannot use coconut, any milk alternatives work too.


** Shida's recipe

Friday, October 24, 2008

Too Hot? Too Cold? Just Nice!

People call it baby food. I remember eating my baby brothers' rice porridge cooked with grated carrots and anchovies, and enjoying it. I also remember making rice porridge for my daughters when they were starting to eat solids. I made it for my youngest son when he was starting to eat solids, except without the salt, spices and garnishes.

I have to say I love baby food, adulterized that is (which means we salt and spice it). My idea of a tempting breathtaking rice porridge is chicken rice porridge, with a smattering of shredded fried or cooked chicken hidden throughout the depths of theporridge, a tantalizingly glistening shrimp sitting atop the surface and a scattering of garnishes, but I have come to love this ground beef version too.

So, I present, my...


Malaysian Ground Beef Rice Porridge
Serves 6, with maybe second and third helpings...

1 lb ground beef
1 onion, minced
2-4 garlic cloves, minced
1-2 whole star anise seed
3-4 whole cloves
1-2 whole cardamoms
1 cinnamon stick
1 Tbs ground coriander
1/2 Tbs ground cumin
3 cups of long grain rice (not basmati rice)
10 cups water
1/4 cup oil
salt
dashes of black pepper
spring onions - sliced for garnish
fried onions - optional
green chillies - sliced for garnish

1. Heat oil and saute the onion, garlic, anise seeds, cloves, cardamoms and cinnamon stick till fragrant
2. Add ground beef and stir for a few minutes. Add coriander and cumin.
3. Add uncooked rice and keep stirring till rice grains are coated with oil and glistening
4. Add water and bring to boil, then bring to simmer
5. Stir occasionally so rice won't stick at the bottom
6. Simmer it till rice absorbs the water and is overdone
7. If it looks dry add more water. It should look like porridge, and the rice grains should look exploded
8. Salt and pepper it to taste
9. Garnish with with sliced green chillies, spring onions, fried onions, and maybe add a fried egg sunny side up if you wish. Be adventurous.

Enjoy it especially on a frigid winter day!


Cook's Notes:

1. Stir it occasionally while it's simmering
2. You can take out the whole spices before serving it, in case someone bites on the cardamom or cloves and gets the fright of his/her life
3. It should be more on the watery side, so add more water if it looks like the rice had absorbed all the water
4. Use a big pot, even though it's only 3 cups of uncooked rice, because unlike normally cooked rice where the rice doubles in size, the rice for porridge has to absorb more water until the rice grains explode and they can't absorb anymore. 3 cups of rice will swell into a lot of porridge! Try it with 1 cup of rice for a start. For my family (family of 6) 3 cups is just nice.

Welcome!

Assalaamu 'Alaikum wa Rahmatullahi wa Barakatuhu

Welcome to our blog! This blog is maintained by a few sisters who share a love for cooking. Although most of the food here can be labeled as Somali, Malaysian, Indian, or American- we like to consider our food as being a fusion of many cultures!

We are not self-proclaimed chefs, and we sure don't expect you to be either! Believe in yourself and your abilities and inshaa Allah you can make it happen too.

If you have any questions or would like to know more about a specific recipe- please don't hesitate to ask!

If you have any suggestions on something you'd like to see cooked, feel free to make suggestions!

Happy cooking =)

Wassalaamu 'Alaikum wa Rahmatullahi wa Barakatuhu